备注
Go to the end 下载完整的示例代码。或者通过浏览器中的MysterLite或Binder运行此示例
基于核主成分分析的图像去噪#
此示例说明如何使用 KernelPCA 对图像进行降噪。简而言之,我们利用了在 fit 以重建原始图像。
我们将比较结果与精确重建使用 PCA .
我们将使用USPS数字数据集来重现在第4节中提出的。 [1].
引用
# Authors: The scikit-learn developers
# SPDX-License-Identifier: BSD-3-Clause
通过OpenML加载数据集#
USPS数字数据集在OpenML中可用。我们使用 fetch_openml 来得到这个数据集。此外,我们对数据集进行归一化,使所有像素值都在范围(0,1)内。
import numpy as np

from sklearn.datasets import fetch_openml
from sklearn.model_selection import train_test_split
from sklearn.preprocessing import MinMaxScaler

X, y = fetch_openml(data_id=41082, as_frame=False, return_X_y=True)
X = MinMaxScaler().fit_transform(X)
其想法是在有噪图像上学习PCA基础(有和没有内核),然后使用这些模型来重建和降噪这些图像。
因此,我们将数据集分为训练和测试集,其中包括1,000个用于训练的样本和100个用于测试的样本。这些图像是无噪声的,我们将使用它们来评估去噪方法的效率。此外,我们创建原始数据集的副本并添加高斯噪声。
该应用程序的想法是表明我们可以通过在一些未损坏的图像上学习PCA基础来对损坏的图像进行降噪。我们将使用PCA和基于核的PCA来解决这个问题。
X_train, X_test, y_train, y_test = train_test_split(
    X, y, stratify=y, random_state=0, train_size=1_000, test_size=100
)

rng = np.random.RandomState(0)
noise = rng.normal(scale=0.25, size=X_test.shape)
X_test_noisy = X_test + noise

noise = rng.normal(scale=0.25, size=X_train.shape)
X_train_noisy = X_train + noise
此外,我们将创建一个助手函数,通过绘制测试图像来定性评估图像重建。
import matplotlib.pyplot as plt


def plot_digits(X, title):
    """Small helper function to plot 100 digits."""
    fig, axs = plt.subplots(nrows=10, ncols=10, figsize=(8, 8))
    for img, ax in zip(X, axs.ravel()):
        ax.imshow(img.reshape((16, 16)), cmap="Greys")
        ax.axis("off")
    fig.suptitle(title, fontsize=24)
此外,我们还将使用均方误差(SSE)来定量评估图像重建。
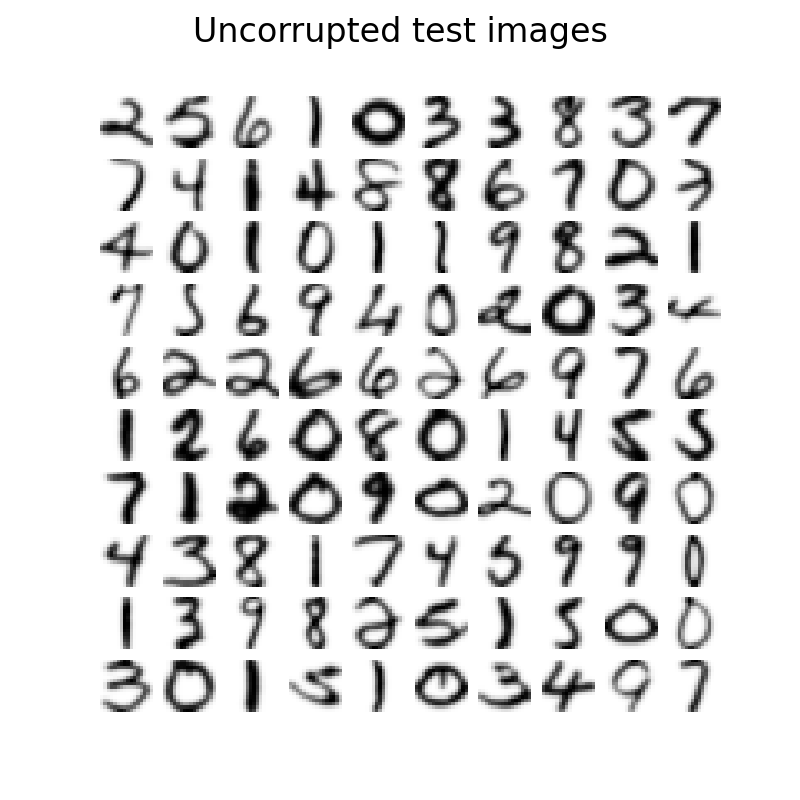
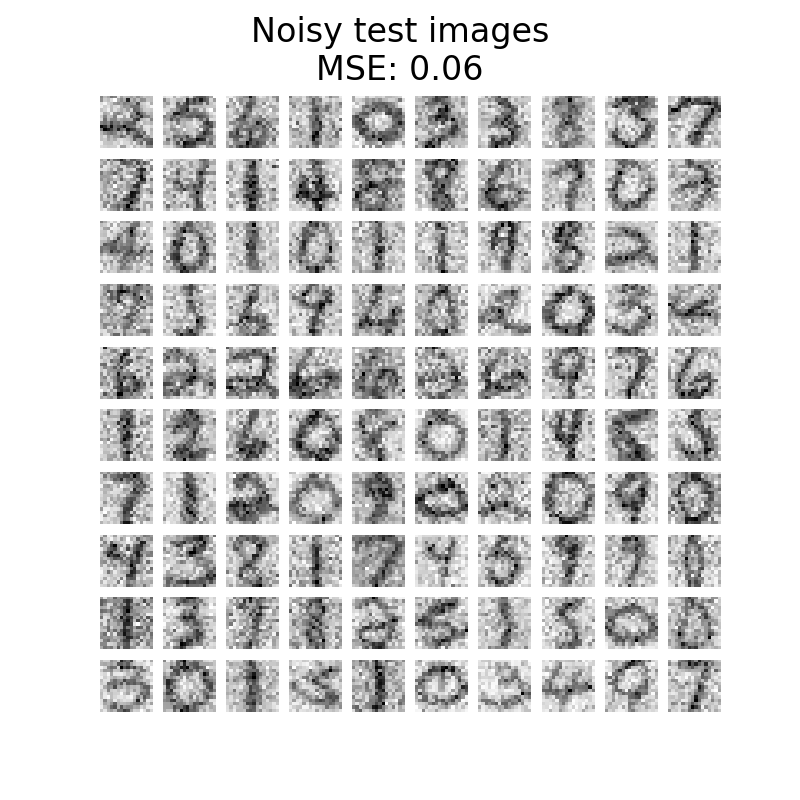
我们首先来看看无噪图像和有噪图像之间的区别。我们将在这方面检查测试集。
plot_digits(X_test, "Uncorrupted test images")
plot_digits(
    X_test_noisy, f"Noisy test images\nMSE: {np.mean((X_test - X_test_noisy) ** 2):.2f}"
)
学习 PCA 基础#
我们现在可以使用线性PCA和使用辐射基函数(RBS)核的核PCA来学习PCA基础。
from sklearn.decomposition import PCA, KernelPCA

pca = PCA(n_components=32, random_state=42)
kernel_pca = KernelPCA(
    n_components=400,
    kernel="rbf",
    gamma=1e-3,
    fit_inverse_transform=True,
    alpha=5e-3,
    random_state=42,
)

pca.fit(X_train_noisy)
_ = kernel_pca.fit(X_train_noisy)
重建和降噪测试图像#
现在,我们可以转换和重建噪声测试集。由于我们使用的组件数量少于原始特征的数量,因此我们将得到原始集合的近似值。事实上,通过减少PCA中解释方差的分量,我们希望消除噪声。类似的想法也发生在核PCA中;然而,我们期望更好的重建,因为我们使用非线性核来学习PCA基,使用核脊来学习映射函数。
X_reconstructed_kernel_pca = kernel_pca.inverse_transform(
    kernel_pca.transform(X_test_noisy)
)
X_reconstructed_pca = pca.inverse_transform(pca.transform(X_test_noisy))
plot_digits(X_test, "Uncorrupted test images")
plot_digits(
    X_reconstructed_pca,
    f"PCA reconstruction\nMSE: {np.mean((X_test - X_reconstructed_pca) ** 2):.2f}",
)
plot_digits(
    X_reconstructed_kernel_pca,
    (
        "Kernel PCA reconstruction\n"
        f"MSE: {np.mean((X_test - X_reconstructed_kernel_pca) ** 2):.2f}"
    ),
)

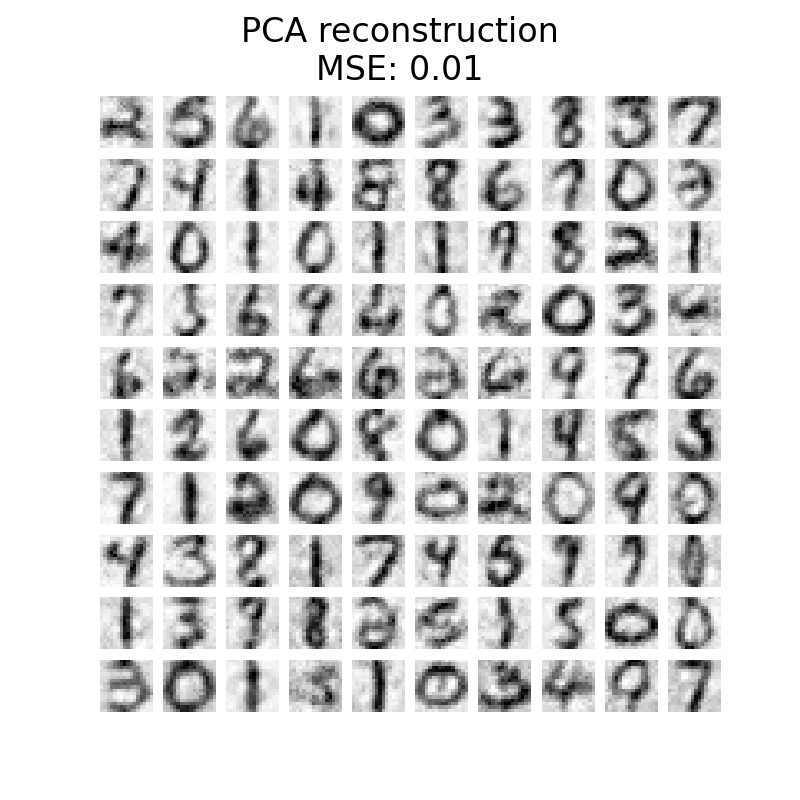
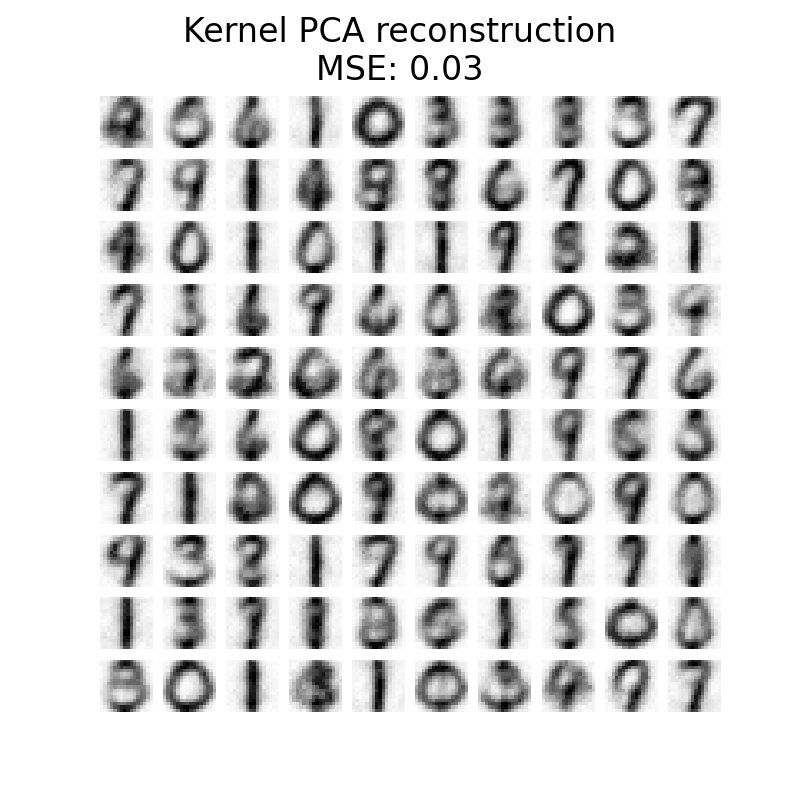
PCA的MSE比核PCA低。然而,定性分析可能不支持PCA而不是核PCA。我们观察到核PCA能够去除背景噪声,并提供更平滑的图像。
然而,应该注意的是,使用核PCA的去噪的结果将取决于参数 n_components , gamma ,而且 alpha .
Total running time of the script: (0分5.204秒)
相关实例

Gallery generated by Sphinx-Gallery <https://sphinx-gallery.github.io> _