>>> from env_helper import info; info()
页面更新时间: 2022-04-13 22:24:47
运行环境:
    Linux发行版本: Debian GNU/Linux 11 (bullseye)
    操作系统内核: Linux-5.10.0-13-amd64-x86_64-with-glibc2.31
    Python版本: 3.9.2
1.7. python数字图像处理(7):图像的形变与缩放
图像的形变与缩放,使用的是skimage的transform模块,函数比较多,功能齐全。
1.7.1. 改变图片尺寸resize
函数格式为:
skimage.transform.resize(image, output_shape)
image: 需要改变尺寸的图片
output_shape: 新的图片尺寸
>>> from skimage import transform,data
>>> import matplotlib.pyplot as plt
>>> img = data.camera()
>>> dst=transform.resize(img, (80, 60))
>>> plt.figure('resize')
>>>
>>> plt.subplot(121)
>>> plt.title('before resize')
>>> plt.imshow(img,plt.cm.gray)
>>>
>>> plt.subplot(122)
>>> plt.title('before resize')
>>> plt.imshow(dst,plt.cm.gray)
>>>
>>> plt.show()
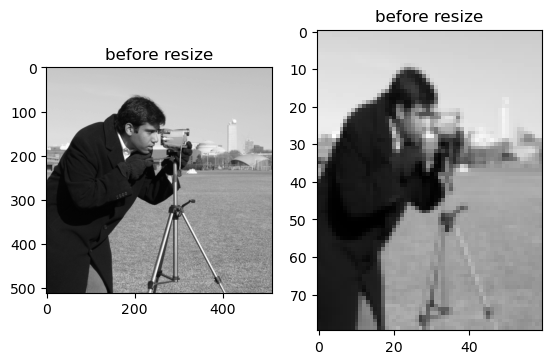
将camera图片由原来的512512大小,变成了8060大小。从图中的坐标尺,我们能够看出来:
1.7.2. 按比例缩放rescale
函数格式为:
skimage.transform.rescale(image, scale[, …])
scale参数可以是单个float数,表示缩放的倍数,也可以是一个float型的tuple,如[0.2,0.5],表示将行列数分开进行缩放
>>> img = data.camera()
>>> print(img.shape)  #图片原始大小
>>> print(transform.rescale(img, 0.1).shape)  #缩小为原来图片大小的0.1倍
>>> print(transform.rescale(img, [0.5,0.25]).shape)  #缩小为原来图片行数一半,列数四分之一
>>> print(transform.rescale(img, 2).shape)   #放大为原来图片大小的2倍
(512, 512)
(51, 51)
(256, 128)
(1024, 1024)
1.7.3. 旋转 rotate
skimage.transform.rotate(image, angle[, …],resize=False)
angle参数是个float类型数,表示旋转的度数
resize用于控制在旋转时,是否改变大小 ,默认为False
>>> import matplotlib.pyplot as plt
>>> img = data.camera()
>>> print(img.shape) #图片原始大小
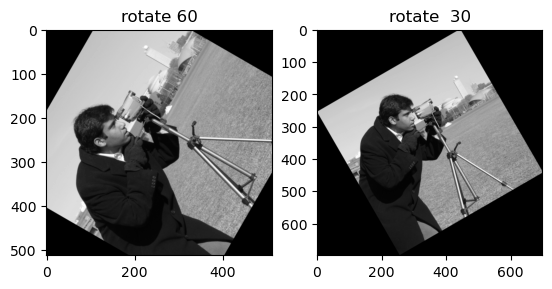
>>> img1=transform.rotate(img, 60) #旋转90度,不改变大小
>>> print(img1.shape)
>>> img2=transform.rotate(img, 30,resize=True) #旋转30度,同时改变大小
>>> print(img2.shape)
>>>
>>> plt.figure('resize')
>>>
>>> plt.subplot(121)
>>> plt.title('rotate 60')
>>> plt.imshow(img1,plt.cm.gray)
>>>
>>> plt.subplot(122)
>>> plt.title('rotate 30')
>>> plt.imshow(img2,plt.cm.gray)
>>>
>>> plt.show()
(512, 512)
(512, 512)
(699, 699)
1.7.4. 图像金字塔
以多分辨率来解释图像的一种有效但概念简单的结构就是图像金字塔。图像金字塔最初用于机器视觉和图像压缩,一幅图像的金字塔是一系列以金字塔形状排列的分辨率逐步降低的图像集合。金字塔的底部是待处理图像的高分辨率表示,而顶部是低分辨率的近似。当向金字塔的上层移动时,尺寸和分辨率就降低。
在此,我们举一个高斯金字塔的应用实例,函数原型为:
skimage.transform.pyramid_gaussian(image, downscale=2) downscale控制着金字塔的缩放比例
>>> import numpy as np
>>> import matplotlib.pyplot as plt
载入宇航员图片
>>> image = data.astronaut()
>>> plt.imshow(image)
<matplotlib.image.AxesImage at 0x7fe9da00f850>
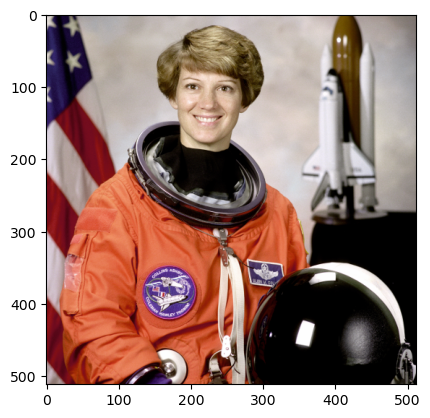
>>> image.shape
(512, 512, 3)
>>> rows, cols, dim = image.shape
>>>
>>> #获取图片的行数,列数和通道数
>>> pyramid = tuple(transform.pyramid_gaussian(image, downscale=2))
>>> #产生高斯金字塔图像
>>> #共生成了log(512)=9幅金字塔图像,加上原始图像共10幅,pyramid[0]-pyramid[1]
>>>
>>> composite_image = np.ones((rows, cols + int(cols / 2), 3), dtype=np.double)
>>> plt.imshow(composite_image)
<matplotlib.image.AxesImage at 0x7fe9d9fe9a00>

>>> #生成背景
>>>
>>> composite_image[:rows, :cols, :] = pyramid[0]
>>> plt.imshow(composite_image)
<matplotlib.image.AxesImage at 0x7fe9d8d41e20>

>>> #融合原始图像
>>>
>>> i_row = 0
>>> for p in pyramid[1:]:
>>>     # print(p)
>>>     n_rows, n_cols = p.shape[:2]
>>>     composite_image[i_row:i_row + n_rows, cols:cols + n_cols] = p  #循环融合9幅金字塔图像
>>>     i_row += n_rows
>>>
>>> plt.imshow(composite_image)
>>> plt.show()
---------------------------------------------------------------------------

ValueError                                Traceback (most recent call last)

<ipython-input-15-ea4730dca5e2> in <module>
      5     # print(p)
      6     n_rows, n_cols = p.shape[:2]
----> 7     composite_image[i_row:i_row + n_rows, cols:cols + n_cols] = p  #循环融合9幅金字塔图像
      8     i_row += n_rows
      9


ValueError: could not broadcast input array from shape (256,256,2) into shape (256,256,3)
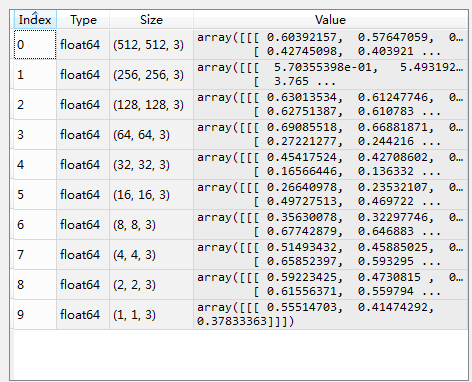
上右图,就是10张金字塔图像,下标为0的表示原始图像,后面每层的图像行和列变为上一层的一半,直至变为1
除了高斯金字塔外,还有其它的金字塔,如:
>>> import skimage
>>> skimage.transform.pyramid_laplacian(image, downscale=2)
>>> pyramid = tuple(skimage.transform.pyramid_laplacian(image, downscale=2))
>>>
>>> #产生高斯金字塔图像
>>> #共生成了log(512)=9幅金字塔图像,加上原始图像共10幅,pyramid[0]-pyramid[1]
>>>
>>> composite_image = np.ones((rows, cols + int(cols / 2), 3), dtype=np.double)  #生成背景
>>>
>>> composite_image[:rows, :cols, :] = pyramid[0]  #融合原始图像
>>>
>>> i_row = 0
>>> for p in pyramid[1:]:
>>>     n_rows, n_cols = p.shape[:2]
>>>     composite_image[i_row:i_row + n_rows, cols:cols + n_cols] = p  #循环融合9幅金字塔图像
>>>     i_row += n_rows
>>>
>>> plt.imshow(composite_image)
>>> plt.show()
>>> plt.imshow(image)
>>> plt.show()
