使用开始/结束屏幕的视图#

视图允许您轻松地切换窗口上所显示内容的“视图”。您可以使用它来支持添加屏幕,例如:
开始屏幕
说明书屏幕
屏幕上的游戏
暂停屏幕
这个 View 类很像 Window 类,这是您已经习惯的。这个 View 类具有用于 on_update 和 on_draw 就像 Window 。我们可以更改当前视图以快速更改管理窗口上绘制的内容和处理用户输入的代码。
如果您提前知道要使用视图,则可以围绕 视图管理 。然而,通常程序员想要将这些项目添加到已经存在的游戏中。
本教程将指导您如何做到这一点。
将主程序更改为使用视图#
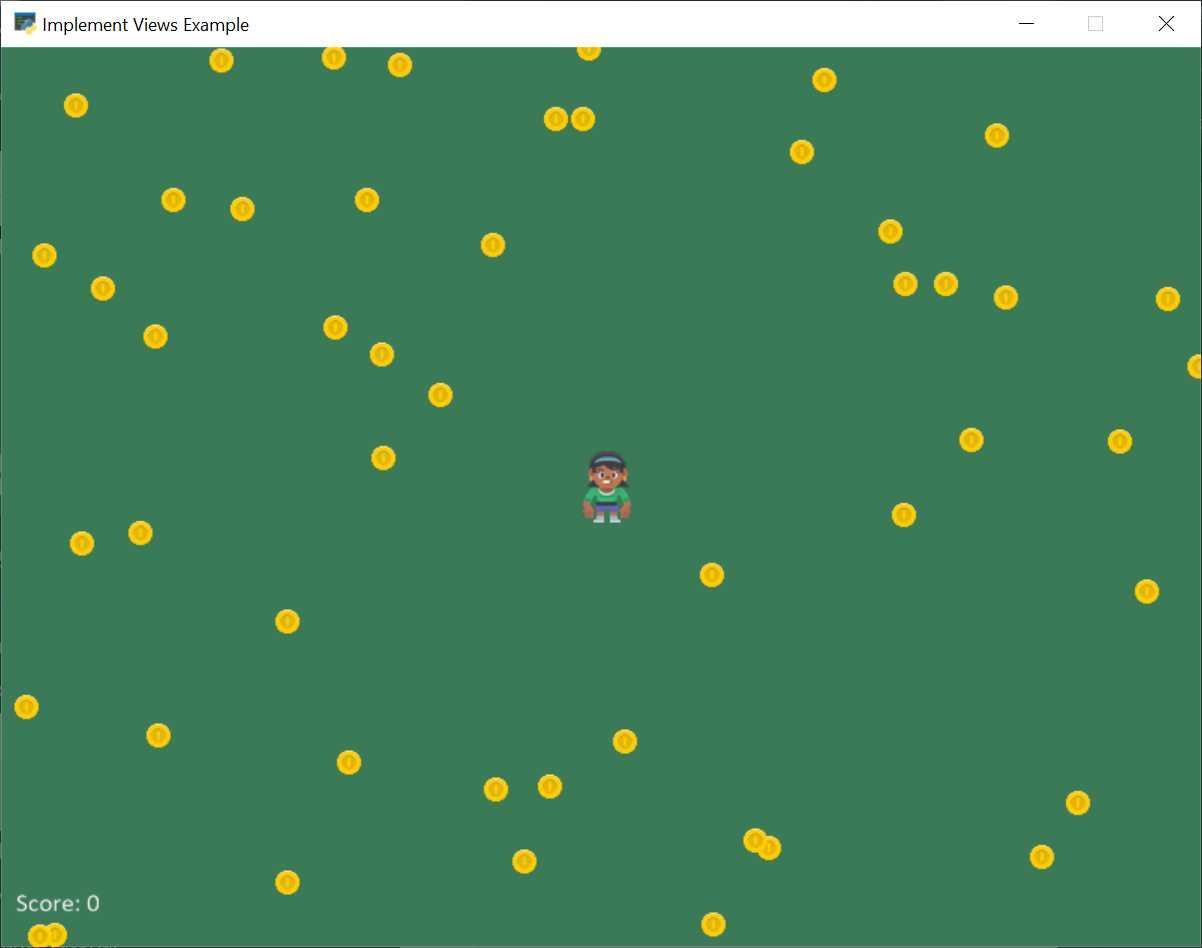
首先,我们将从一个简单的收集硬币示例开始: 01_views.py完整列表
然后我们将把我们的游戏移到游戏视图中。以我们定义窗口类的代码为例:
class MyGame(arcade.Window):
将其更改为派生自 arcade.View 而不是 arcade.Window 。我还建议使用“查看”作为名称的一部分:
class GameView(arcade.View):
这将需要几个其他更新。这个 View 类不控制窗口的大小,因此我们需要将其从对父类的调用中去掉。更改:
super().__init__(SCREEN_WIDTH, SCREEN_HEIGHT, SCREEN_TITLE)
致:
super().__init__()
这个 Window 类仍然控制鼠标是否可见,因此要隐藏鼠标,我们需要使用 window 属性,该属性是 View 班级。更改:
self.set_mouse_visible(False)
致:
self.window.set_mouse_visible(False)
现在在 main 函数,而不是仅仅创建一个窗口,我们将创建一个窗口、一个视图,然后显示该视图。
1def main():
2    """ Main function """
3
4    window = arcade.Window(SCREEN_WIDTH, SCREEN_HEIGHT, SCREEN_TITLE)
5    start_view = GameView()
6    window.show_view(start_view)
7    start_view.setup()
8    arcade.run()
在这一点上,运行您的游戏并确保它仍然正常运行。它应该像以前一样运行,但现在我们可以添加其他视图。
02_views.py完整列表 ← Full listing of where we are right now
02_views.py差异 ← What we changed to get here
添加说明屏幕#
现在,我们可以将说明屏幕添加为视图。为它创建一个类:
class InstructionView(arcade.View):
然后我们需要定义 on_show_view 方法,该方法将在我们切换到该视图时运行一次。在这种情况下,我们不需要做太多事情,只需设置背景颜色。如果游戏是滚动的,我们还需要重置视区,以便(0,0)回到左下角坐标。
    def on_show_view(self):
        """ This is run once when we switch to this view """
        self.window.background_color = arcade.csscolor.DARK_SLATE_BLUE

        # Reset the viewport, necessary if we have a scrolling game and we need
        # to reset the viewport back to the start so we can see what we draw.
        self.window.default_camera.use()
这个 on_draw 方法的工作方式与窗口类的方法类似,但只有在该视图处于活动状态时才会调用该方法。
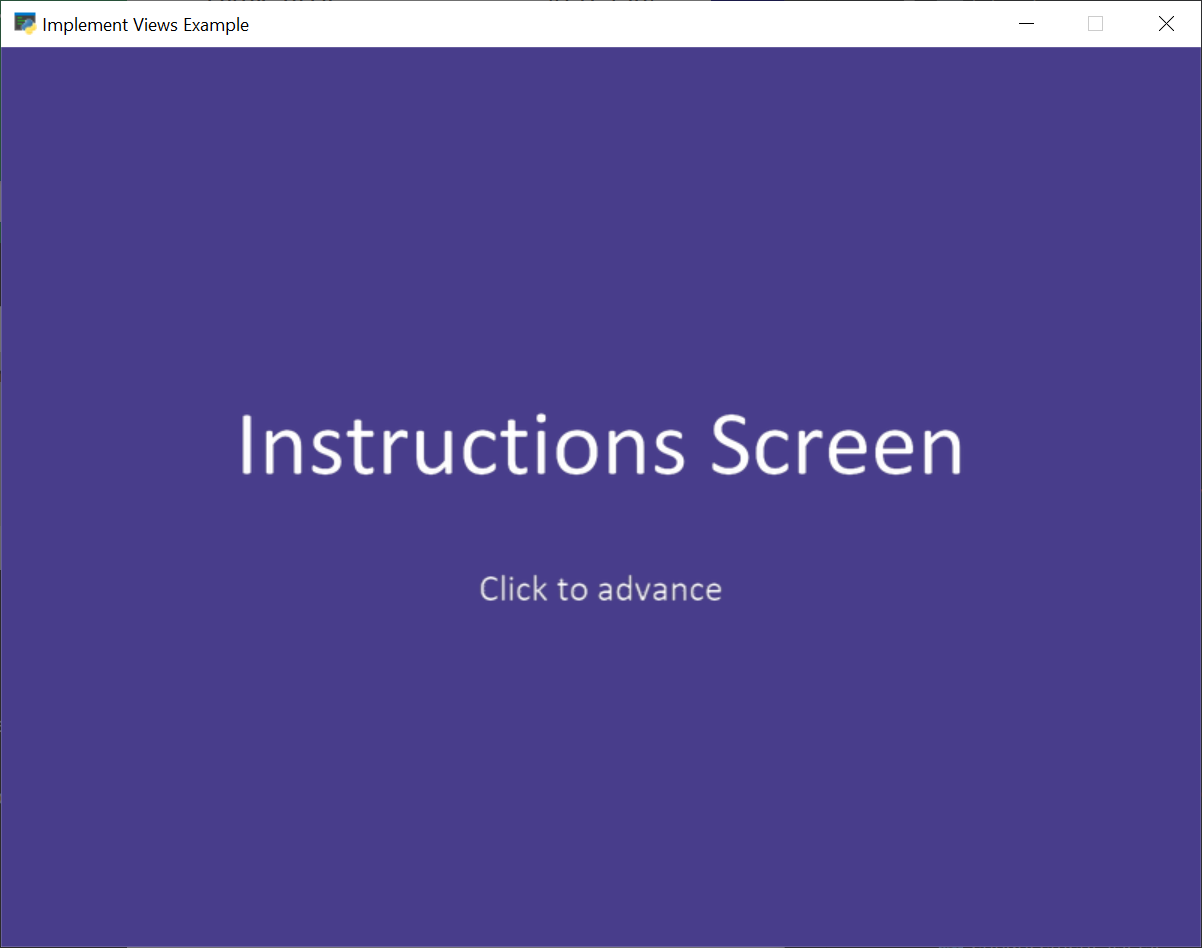
在本例中,我们将只为说明屏幕绘制一些文本。另一种选择是在绘制程序中制作图形,并显示该图像。我们将在下面的屏幕上显示游戏。
    def on_draw(self):
        """ Draw this view """
        self.clear()
        arcade.draw_text("Instructions Screen", self.window.width / 2, self.window.height / 2,
                         arcade.color.WHITE, font_size=50, anchor_x="center")
        arcade.draw_text("Click to advance", self.window.width / 2, self.window.height / 2-75,
                         arcade.color.WHITE, font_size=20, anchor_x="center")
然后我们将放入一种方法来响应鼠标点击。在这里,我们将创建我们的 GameView 并调用Setup方法。
    def on_mouse_press(self, _x, _y, _button, _modifiers):
        """ If the user presses the mouse button, start the game. """
        game_view = GameView()
        game_view.setup()
        self.window.show_view(game_view)
现在我们需要回到 main 功能。与其创建一个 GameView 它现在需要创建一个 InstructionView 。
1def main():
2    """ Main function """
3
4    window = arcade.Window(SCREEN_WIDTH, SCREEN_HEIGHT, SCREEN_TITLE)
5    start_view = InstructionView()
6    window.show_view(start_view)
7    arcade.run()
03_views.py完整列表 ← Full listing of where we are right now
03_views.py差异 ← What we changed to get here
游戏过屏#
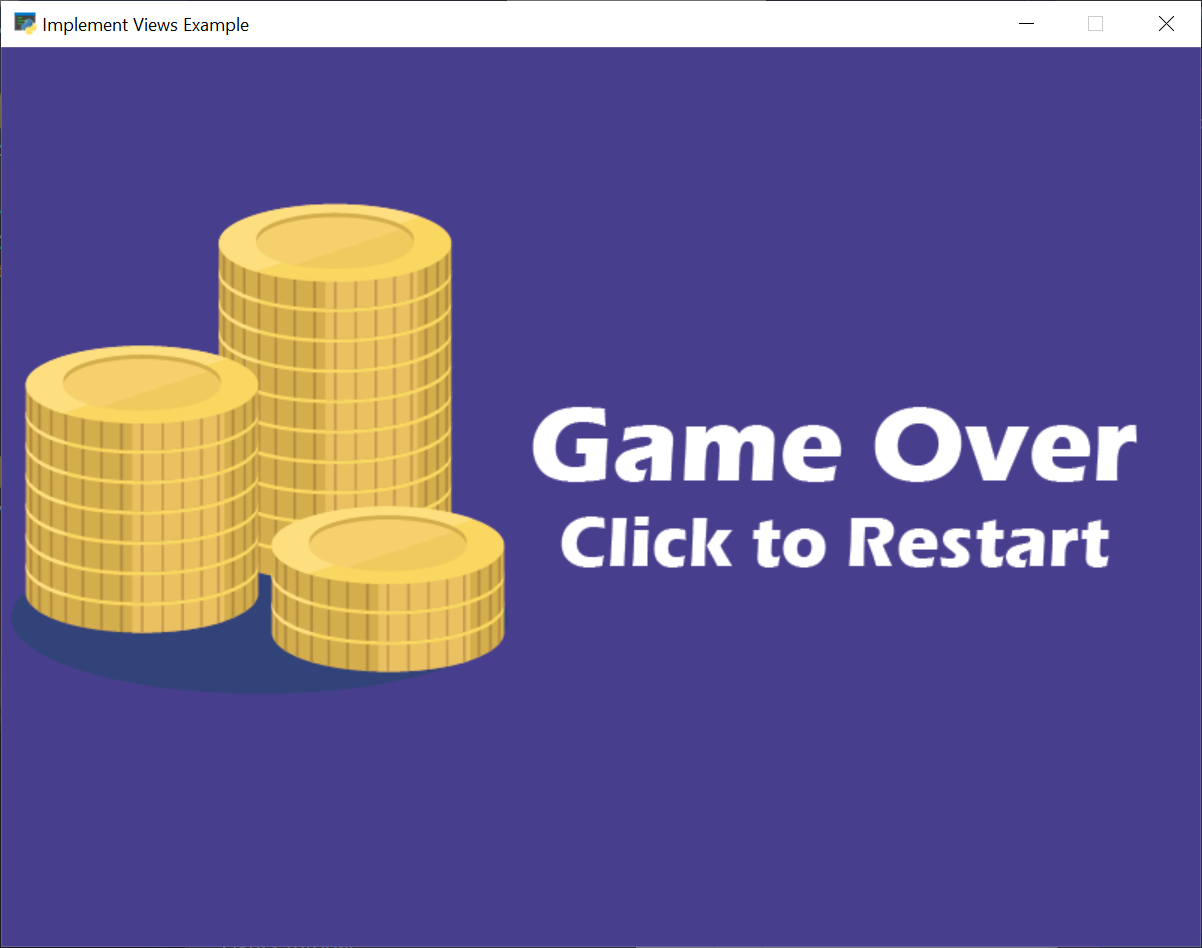
在屏幕上执行指令、暂停和游戏的另一种方式是使用图形。在本例中,我们创建了一个与窗口大小(800x600)相同的单独图像,并将其另存为 game_over.png 。你可以使用Windows的“画图”应用程序,或者在你的Mac上安装一个应用程序来制作图像,以便自己完成这项工作。
新的 GameOverView 查看我们正在游戏中添加负载的屏幕上的图像作为其纹理 __init__ 。这个 on_draw 方法将该纹理绘制到屏幕上。通过使用图像,我们可以尽可能多地使用图像编辑器在屏幕上幻想游戏,同时保持代码简单。
当用户点击鼠标按钮时,我们只是重新开始游戏。
 1class GameOverView(arcade.View):
 2    """ View to show when game is over """
 3
 4    def __init__(self):
 5        """ This is run once when we switch to this view """
 6        super().__init__()
 7        self.texture = arcade.load_texture("game_over.png")
 8
 9        # Reset the viewport, necessary if we have a scrolling game and we need
10        # to reset the viewport back to the start so we can see what we draw.
11        self.window.default_camera.use()
12
13    def on_draw(self):
14        """ Draw this view """
15        self.clear()
16        self.texture.draw_sized(SCREEN_WIDTH / 2, SCREEN_HEIGHT / 2,
17                                SCREEN_WIDTH, SCREEN_HEIGHT)
18
19    def on_mouse_press(self, _x, _y, _button, _modifiers):
20        """ If the user presses the mouse button, re-start the game. """
21        game_view = GameView()
22        game_view.setup()
23        self.window.show_view(game_view)
我们最不需要的就是触发“游戏结束”的观点。在我们的 GameView.on_update 方法,我们可以检查列表长度。一旦它达到零,我们就会改变看法。
 1    def on_update(self, delta_time):
 2        """ Movement and game logic """
 3
 4        # Call update on all sprites (The sprites don't do much in this
 5        # example though.)
 6        self.coin_list.update()
 7
 8        # Generate a list of all sprites that collided with the player.
 9        coins_hit_list = arcade.check_for_collision_with_list(self.player_sprite, self.coin_list)
10
11        # Loop through each colliding sprite, remove it, and add to the score.
12        for coin in coins_hit_list:
13            coin.remove_from_sprite_lists()
14            self.score += 1
15
16        # Check length of coin list. If it is zero, flip to the
17        # game over view.
18        if len(self.coin_list) == 0:
19            view = GameOverView()
20            self.window.show_view(view)
04_views.py完整列表 ← Full listing of where we are right now
04_views.py差异 ← What we changed to get here