PyMunk平台#
本教程介绍如何使用Arcade及其Pymunk API编写平台。本教程假定您对Python、Arcade和 Tiled Map Editor 。
如果您不熟悉使用Python语言进行编程,请查看https://learn.arcade.academy
如果您不熟悉Arcade库,请通过 简单平台 。
如果您不熟悉切片地图编辑器,请参阅 简单平台 还介绍了如何使用平铺地图编辑器创建地图。
常见问题#
在开始之前,有几个关于PyMunk物理引擎的问题需要指出:
物体重叠-允许快速移动的物体与其碰撞的物体重叠,稍后PyMunk会将它们分开。看见 collision bias 了解更多信息。
通过-快速移动的对象可以通过另一个对象,如果它的速度如此之快,以至于不会在帧之间与另一个对象重叠。看见 object tunneling 。
当物理引擎在时间上向前移动时,默认设置是向前移动1/60秒。无论选择什么增量,增量都应该始终保持不变。不要使用变量Delta_time
update方法作为一个单元,否则结果将不稳定和不可预测。为了获得更准确的模拟,您可以每帧前进1/120秒两次。这会增加所需的时间,但需要更多时间进行计算。一个精灵在由许多矩形组成的地板上移动时,可能会被边缘“抓住”。球员精灵的角落可能会被地板精灵的角落抓住。要解决此问题,请确保球员精灵底部的命中框是圆形的。此外,还要考虑合并水平的精灵行的可能性。
打开一扇窗#
首先,让我们从一个使用Arcade打开空白窗口的程序开始。它还包含我们稍后将填充的方法的存根。尝试此代码,并确保您可以运行它。它应该会弹出一扇黑色的窗户。
 1"""
 2Example of Pymunk Physics Engine Platformer
 3"""
 4import arcade
 5
 6SCREEN_TITLE = "PyMunk Platformer"
 7
 8# Size of screen to show, in pixels
 9SCREEN_WIDTH = 800
10SCREEN_HEIGHT = 600
11
12
13class GameWindow(arcade.Window):
14    """ Main Window """
15
16    def __init__(self, width, height, title):
17        """ Create the variables """
18
19        # Init the parent class
20        super().__init__(width, height, title)
21
22    def setup(self):
23        """ Set up everything with the game """
24        pass
25
26    def on_key_press(self, key, modifiers):
27        """Called whenever a key is pressed. """
28        pass
29
30    def on_key_release(self, key, modifiers):
31        """Called when the user releases a key. """
32        pass
33
34    def on_update(self, delta_time):
35        """ Movement and game logic """
36        pass
37
38    def on_draw(self):
39        """ Draw everything """
40        self.clear()
41
42
43def main():
44    """ Main function """
45    window = GameWindow(SCREEN_WIDTH, SCREEN_HEIGHT, SCREEN_TITLE)
46    window.setup()
47    arcade.run()
48
49
50if __name__ == "__main__":
51    main()
创建常量#
现在,让我们设置 import 语句,并定义我们要使用的常量。在本例中,我们得到了128x128像素的精灵瓷砖。它们被缩小到50%的宽度和50%的高度(比例为0.5)。屏幕大小设置为25x15网格。
为简单起见,本例不使用播放器滚动屏幕。看见 简单平台 或 以滚动屏幕为中心移动 。
当你运行这个程序时,屏幕应该更大一些。
 1"""
 2Example of Pymunk Physics Engine Platformer
 3"""
 4import math
 5from typing import Optional
 6import arcade
 7
 8SCREEN_TITLE = "PyMunk Platformer"
 9
10# How big are our image tiles?
11SPRITE_IMAGE_SIZE = 128
12
13# Scale sprites up or down
14SPRITE_SCALING_PLAYER = 0.5
15SPRITE_SCALING_TILES = 0.5
16
17# Scaled sprite size for tiles
18SPRITE_SIZE = int(SPRITE_IMAGE_SIZE * SPRITE_SCALING_PLAYER)
19
20# Size of grid to show on screen, in number of tiles
21SCREEN_GRID_WIDTH = 25
22SCREEN_GRID_HEIGHT = 15
23
24# Size of screen to show, in pixels
25SCREEN_WIDTH = SPRITE_SIZE * SCREEN_GRID_WIDTH
26SCREEN_HEIGHT = SPRITE_SIZE * SCREEN_GRID_HEIGHT
27
28
29class GameWindow(arcade.Window):
创建实例变量#
接下来,让我们创建要使用的实例变量,并将背景颜色设置为绿色: arcade.color.AMAZON
如果您不熟悉Python上的类型转换,那么您可能不熟悉这样的代码行:
self.player_list: Optional[arcade.SpriteList] = None
这意味着 player_list 属性将是 SpriteList 或 None 。如果您不想打字,那么下面的代码也同样有效:
self.player_list = None
运行此程序应该会显示相同的窗口,但背景为绿色。
 1class GameWindow(arcade.Window):
 2    """ Main Window """
 3
 4    def __init__(self, width, height, title):
 5        """ Create the variables """
 6
 7        # Init the parent class
 8        super().__init__(width, height, title)
 9
10        # Player sprite
11        self.player_sprite: Optional[arcade.Sprite] = None
12
13        # Sprite lists we need
14        self.player_list: Optional[arcade.SpriteList] = None
15        self.wall_list: Optional[arcade.SpriteList] = None
16        self.bullet_list: Optional[arcade.SpriteList] = None
17        self.item_list: Optional[arcade.SpriteList] = None
18
19        # Track the current state of what key is pressed
20        self.left_pressed: bool = False
21        self.right_pressed: bool = False
22
23        # Set background color
24        self.background_color = arcade.color.AMAZON
加载和显示地图#
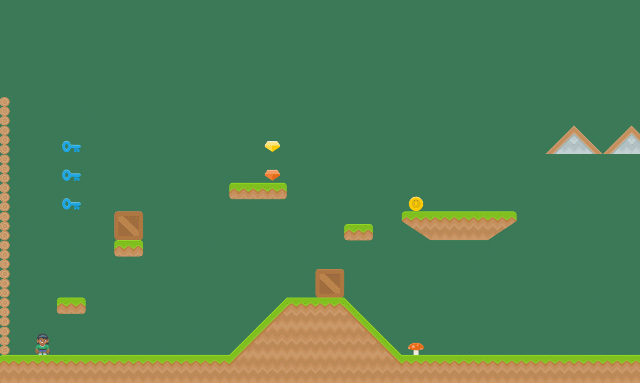
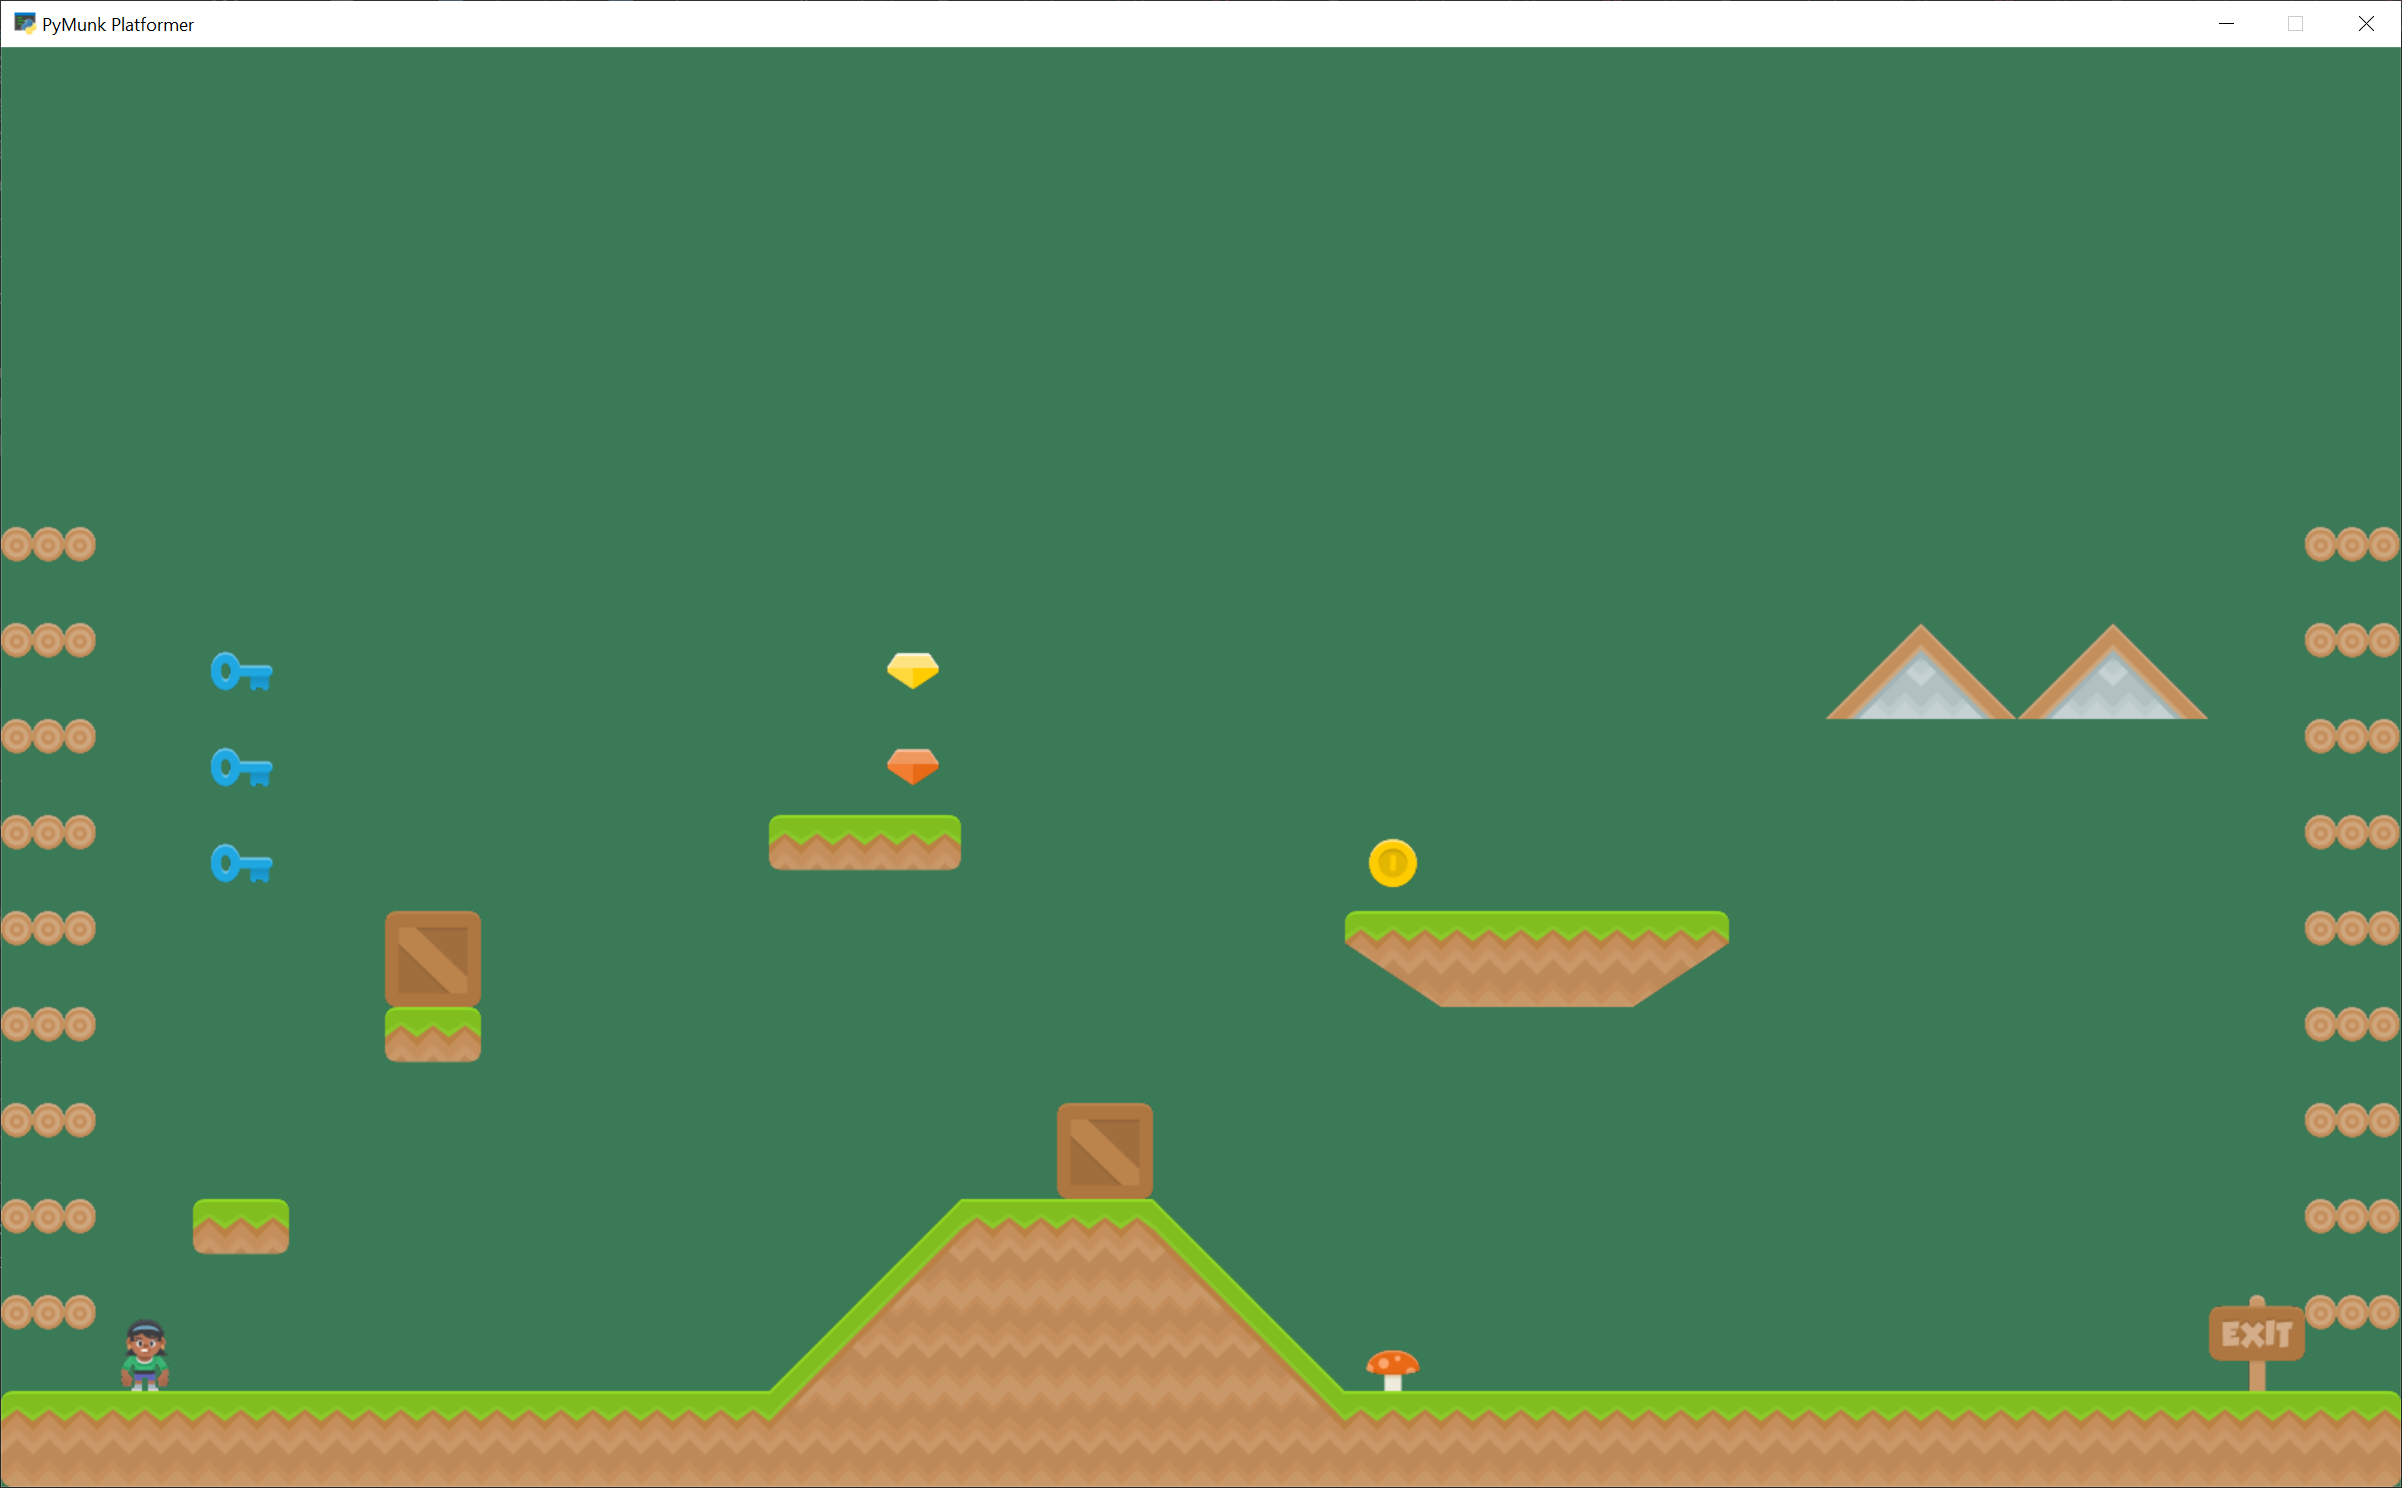
要开始,请使用平铺贴图编辑器创建一张地图。放置您不想移动的项目,并在名为“Platures”的层中充当平台。将你想要推来推去的物品放在一个叫做“动态物品”的层中。将文件命名为“pymunk_test_map.tmx”,并放置在与您的代码完全相同的目录中。

如果您不确定如何使用切片地图编辑器,请参阅 第八步--收集硬币 。
现在,在 setup 函数,我们将向以下位置添加代码:
创建以下对象的实例
SpriteList对于我们要处理的每一组精灵。创建玩家精灵。
在平铺地图上阅读。
从平铺地图中的层创建精灵。
备注
从切片地图图层制作精灵时,加载的图层名称必须匹配 一点儿没错 使用在平铺地图编辑器中创建的层。它区分大小写。
 1    def setup(self):
 2        """ Set up everything with the game """
 3
 4        # Create the sprite lists
 5        self.player_list = arcade.SpriteList()
 6        self.bullet_list = arcade.SpriteList()
 7
 8        # Map name
 9        map_name = ":resources:/tiled_maps/pymunk_test_map.json"
10
11        # Load in TileMap
12        tile_map = arcade.load_tilemap(map_name, SPRITE_SCALING_TILES)
13
14        # Pull the sprite layers out of the tile map
15        self.wall_list = tile_map.sprite_lists["Platforms"]
16        self.item_list = tile_map.sprite_lists["Dynamic Items"]
17
18        # Create player sprite
19        self.player_sprite = arcade.Sprite(":resources:images/animated_characters/female_person/femalePerson_idle.png",
20                                           SPRITE_SCALING_PLAYER)
21        # Set player location
22        grid_x = 1
23        grid_y = 1
24        self.player_sprite.center_x = SPRITE_SIZE * grid_x + SPRITE_SIZE / 2
25        self.player_sprite.center_y = SPRITE_SIZE * grid_y + SPRITE_SIZE / 2
26        # Add to player sprite list
27        self.player_list.append(self.player_sprite)
如果我们不画精灵,那么精灵就没有意义了,所以在 on_draw 方法,让我们画出精灵列表。
1    def on_draw(self):
2        """ Draw everything """
3        self.clear()
4        self.wall_list.draw()
5        self.bullet_list.draw()
6        self.item_list.draw()
7        self.player_list.draw()
使用以下程序中的新增内容,运行您的程序应该会显示您创建的平铺地图:
添加物理引擎#
下一步是添加物理引擎。
首先,为我们的物理添加一些常量。我们在这里设置:
表示重力的常量。
“减震”的值。如果阻尼值为1.0,则一旦力不再作用于某一项目,该项目将失去其所有速度。阻尼值为0.5会导致50%的速度在1秒内丢失。值为0表示自由落体。
摩擦力值。0.0表示冰,1.0表示橡胶。
弥撒。物品默认为1。我们将玩家设置为2,这样她就可以更容易地推物品了。
极限是运动员的水平和垂直速度。如果玩家被限制在恒定的速度,那么玩起来会更容易。而且更现实,因为它们不是在轮子上。
 1# --- Physics forces. Higher number, faster accelerating.
 2
 3# Gravity
 4GRAVITY = 1500
 5
 6# Damping - Amount of speed lost per second
 7DEFAULT_DAMPING = 1.0
 8PLAYER_DAMPING = 0.4
 9
10# Friction between objects
11PLAYER_FRICTION = 1.0
12WALL_FRICTION = 0.7
13DYNAMIC_ITEM_FRICTION = 0.6
14
15# Mass (defaults to 1)
16PLAYER_MASS = 2.0
17
18# Keep player from going too fast
19PLAYER_MAX_HORIZONTAL_SPEED = 450
20PLAYER_MAX_VERTICAL_SPEED = 1600
第二,在 __init__ 保持我们的物理引擎的方法:
1        # Physics engine
2        self.physics_engine = Optional[arcade.PymunkPhysicsEngine]
第三,在 setup 方法我们创建物理引擎并添加精灵。播放器、墙和动态项都有不同的属性,因此它们是单独添加的。
 1        # Add to player sprite list
 2        self.player_list.append(self.player_sprite)
 3
 4        # --- Pymunk Physics Engine Setup ---
 5
 6        # The default damping for every object controls the percent of velocity
 7        # the object will keep each second. A value of 1.0 is no speed loss,
 8        # 0.9 is 10% per second, 0.1 is 90% per second.
 9        # For top-down games, this is basically the friction for moving objects.
10        # For platformers with gravity, this should probably be set to 1.0.
11        # Default value is 1.0 if not specified.
12        damping = DEFAULT_DAMPING
13
14        # Set the gravity. (0, 0) is good for outer space and top-down.
15        gravity = (0, -GRAVITY)
16
17        # Create the physics engine
18        self.physics_engine = arcade.PymunkPhysicsEngine(damping=damping,
19                                                         gravity=gravity)
20
21        # Add the player.
22        # For the player, we set the damping to a lower value, which increases
23        # the damping rate. This prevents the character from traveling too far
24        # after the player lets off the movement keys.
25        # Setting the moment of inertia to PymunkPhysicsEngine.MOMENT_INF prevents it from
26        # rotating.
27        # Friction normally goes between 0 (no friction) and 1.0 (high friction)
28        # Friction is between two objects in contact. It is important to remember
29        # in top-down games that friction moving along the 'floor' is controlled
30        # by damping.
31        self.physics_engine.add_sprite(self.player_sprite,
32                                       friction=PLAYER_FRICTION,
33                                       mass=PLAYER_MASS,
34                                       moment_of_inertia=arcade.PymunkPhysicsEngine.MOMENT_INF,
35                                       collision_type="player",
36                                       max_horizontal_velocity=PLAYER_MAX_HORIZONTAL_SPEED,
37                                       max_vertical_velocity=PLAYER_MAX_VERTICAL_SPEED)
38
39        # Create the walls.
40        # By setting the body type to PymunkPhysicsEngine.STATIC the walls can't
41        # move.
42        # Movable objects that respond to forces are PymunkPhysicsEngine.DYNAMIC
43        # PymunkPhysicsEngine.KINEMATIC objects will move, but are assumed to be
44        # repositioned by code and don't respond to physics forces.
45        # Dynamic is default.
46        self.physics_engine.add_sprite_list(self.wall_list,
47                                            friction=WALL_FRICTION,
48                                            collision_type="wall",
49                                            body_type=arcade.PymunkPhysicsEngine.STATIC)
50
51        # Create the items
第四,在 on_update 方法,我们将物理引擎的 step 方法。
1    def on_update(self, delta_time):
2        """ Movement and game logic """
3        self.physics_engine.step()
如果您运行该程序,并且您有悬而未决的动态物品,您应该会在游戏开始时看到它们坠落。
添加球员移动#
下一步是让球员动起来。在本节中,我们将介绍如何向左和向右移动。在下一节中,我们将演示如何跳跃。
我们将移动玩家的力定义为 PLAYER_MOVE_FORCE_ON_GROUND 。如果玩家碰巧在空中,我们稍后会施加不同的力。
 1# Force applied while on the ground
 2PLAYER_MOVE_FORCE_ON_GROUND = 8000
 3
 4class GameWindow(arcade.Window):
 5    """ Main Window """
 6
 7    def __init__(self, width, height, title):
 8        """ Create the variables """
 9
10        # Init the parent class
11        super().__init__(width, height, title)
12
13        # Player sprite
14        self.player_sprite: Optional[arcade.Sprite] = None
15
16        # Sprite lists we need
17        self.player_list: Optional[arcade.SpriteList] = None
18        self.wall_list: Optional[arcade.SpriteList] = None
19        self.bullet_list: Optional[arcade.SpriteList] = None
20        self.item_list: Optional[arcade.SpriteList] = None
21
22        # Track the current state of what key is pressed
23        self.left_pressed: bool = False
24        self.right_pressed: bool = False
我们需要跟踪是否按下了左/右键。为此,我们定义了实例变量 left_pressed 和 right_pressed 。在按键和释放处理程序中将这些设置为适当的值。
 1    def on_key_press(self, key, modifiers):
 2        """Called whenever a key is pressed. """
 3
 4        if key == arcade.key.LEFT:
 5            self.left_pressed = True
 6        elif key == arcade.key.RIGHT:
 7            self.right_pressed = True
 8
 9    def on_key_release(self, key, modifiers):
10        """Called when the user releases a key. """
11
12        if key == arcade.key.LEFT:
13            self.left_pressed = False
14        elif key == arcade.key.RIGHT:
15            self.right_pressed = False
最后,我们需要将正确的力量应用于 on_update 。力在元组中指定力,首先是水平力,其次是垂直力。
当我们移动到0和不移动到1时,我们也设置摩擦力。这对于获得逼真的移动很重要。
 1    def on_update(self, delta_time):
 2        """ Movement and game logic """
 3
 4        # Update player forces based on keys pressed
 5        if self.left_pressed and not self.right_pressed:
 6            # Create a force to the left. Apply it.
 7            force = (-PLAYER_MOVE_FORCE_ON_GROUND, 0)
 8            self.physics_engine.apply_force(self.player_sprite, force)
 9            # Set friction to zero for the player while moving
10            self.physics_engine.set_friction(self.player_sprite, 0)
11        elif self.right_pressed and not self.left_pressed:
12            # Create a force to the right. Apply it.
13            force = (PLAYER_MOVE_FORCE_ON_GROUND, 0)
14            self.physics_engine.apply_force(self.player_sprite, force)
15            # Set friction to zero for the player while moving
16            self.physics_engine.set_friction(self.player_sprite, 0)
17        else:
18            # Player's feet are not moving. Therefore up the friction so we stop.
19            self.physics_engine.set_friction(self.player_sprite, 1.0)
20
21        # Move items in the physics engine
22        self.physics_engine.step()
添加运动员跳跃#
要让玩家跳起来,我们需要:
确保球员躺在地上。
向上施加一种冲动力给玩家。
当球员在空中时,改变他们的左/右力量。
我们可以查看精灵下面是否有精灵 is_on_ground 功能。否则,我们将能够在空中跳跃。(两次跳跃将允许这种情况发生一次。)
如果我们不允许球员在空中左右移动,他们将很难控制。如果我们允许他们以与地面相同的力量向左/向右移动,那通常就太多了。所以我们得到了不同的左/右作用力,这取决于我们是否在空中。
对于代码更改,首先我们将定义一些常量:
1# Force applied when moving left/right in the air
2PLAYER_MOVE_FORCE_IN_AIR = 900
3
4# Strength of a jump
5PLAYER_JUMP_IMPULSE = 1800
我们将添加在我们跳跃时施加冲力的逻辑:
 1    def on_key_press(self, key, modifiers):
 2        """Called whenever a key is pressed. """
 3
 4        if key == arcade.key.LEFT:
 5            self.left_pressed = True
 6        elif key == arcade.key.RIGHT:
 7            self.right_pressed = True
 8        elif key == arcade.key.UP:
 9            # find out if player is standing on ground
10            if self.physics_engine.is_on_ground(self.player_sprite):
11                # She is! Go ahead and jump
12                impulse = (0, PLAYER_JUMP_IMPULSE)
13                self.physics_engine.apply_impulse(self.player_sprite, impulse)
然后,我们将根据是否接地来调整左/右力:
 1    def on_update(self, delta_time):
 2        """ Movement and game logic """
 3
 4        is_on_ground = self.physics_engine.is_on_ground(self.player_sprite)
 5        # Update player forces based on keys pressed
 6        if self.left_pressed and not self.right_pressed:
 7            # Create a force to the left. Apply it.
 8            if is_on_ground:
 9                force = (-PLAYER_MOVE_FORCE_ON_GROUND, 0)
10            else:
11                force = (-PLAYER_MOVE_FORCE_IN_AIR, 0)
12            self.physics_engine.apply_force(self.player_sprite, force)
13            # Set friction to zero for the player while moving
14            self.physics_engine.set_friction(self.player_sprite, 0)
15        elif self.right_pressed and not self.left_pressed:
16            # Create a force to the right. Apply it.
17            if is_on_ground:
18                force = (PLAYER_MOVE_FORCE_ON_GROUND, 0)
19            else:
20                force = (PLAYER_MOVE_FORCE_IN_AIR, 0)
21            self.physics_engine.apply_force(self.player_sprite, force)
22            # Set friction to zero for the player while moving
23            self.physics_engine.set_friction(self.player_sprite, 0)
24        else:
25            # Player's feet are not moving. Therefore up the friction so we stop.
26            self.physics_engine.set_friction(self.player_sprite, 1.0)
27
添加播放器动画#
为了创建播放器动画,我们创建了一个自定义子类 Sprite 。我们加载所需的每一帧动画,包括它的镜像。
我们将把玩家翻转到左边或右边。如果玩家在空中,我们还将在跳跃和下降图形之间进行切换。
因为物理引擎使用的是小的浮点数,所以它经常会以很小的幅度在零上和零下翻转。这是个好主意 not 若要在x和y在零附近浮动时更改动画。因此,在这段代码中,我们有一个“死区”。我们不会更改动画,直到它超出该区域。
在更改行走动画之前,我们还需要控制球员移动的距离,以使脚看起来与地面同步。
1DEAD_ZONE = 0.1
2
3# Constants used to track if the player is facing left or right
4RIGHT_FACING = 0
5LEFT_FACING = 1
6
7# How many pixels to move before we change the texture in the walking animation
8DISTANCE_TO_CHANGE_TEXTURE = 20
9
接下来,我们创建一个 Player 类的子级。 arcade.Sprite 。这个类将更新播放器动画。
这个 __init__ 方法加载所有纹理。在这里,我们使用的是Kennedy y.nl Toon Characters 1 打包。它有六个不同的字符,您可以使用相同的布局进行选择,因此它使更改变得与更改启用哪一行一样简单。有八种用于行走的纹理,以及用于空闲、跳跃和坠落的纹理。
由于角色可以面向左侧或右侧,因此我们使用 arcade.load_texture_pair 它将同时加载常规图像和镜像图像。
对于多帧行走动画,我们使用的是“里程表”。在更改动画之前,我们需要移动一定数量的像素。如果该值太小,我们的角色就会像弗雷德·弗林斯通一样移动她的腿,如果太大,看起来就像是在滑冰。我们跟踪当前纹理的索引,0-7,因为有8个。
任何被PyMunk引擎移动的精灵都会有它的 pymunk_moved 方法已调用。这可用于更新动画。
 1class PlayerSprite(arcade.Sprite):
 2    """ Player Sprite """
 3    def __init__(self):
 4        """ Init """
 5        # Let parent initialize
 6        super().__init__()
 7
 8        # Set our scale
 9        self.scale = SPRITE_SCALING_PLAYER
10
11        # Images from Kenney.nl's Character pack
12        # main_path = ":resources:images/animated_characters/female_adventurer/femaleAdventurer"
13        main_path = ":resources:images/animated_characters/female_person/femalePerson"
14        # main_path = ":resources:images/animated_characters/male_person/malePerson"
15        # main_path = ":resources:images/animated_characters/male_adventurer/maleAdventurer"
16        # main_path = ":resources:images/animated_characters/zombie/zombie"
17        # main_path = ":resources:images/animated_characters/robot/robot"
18
19        # Load textures for idle standing
20        self.idle_texture_pair = arcade.load_texture_pair(f"{main_path}_idle.png")
21        self.jump_texture_pair = arcade.load_texture_pair(f"{main_path}_jump.png")
22        self.fall_texture_pair = arcade.load_texture_pair(f"{main_path}_fall.png")
23
24        # Load textures for walking
25        self.walk_textures = []
26        for i in range(8):
27            texture = arcade.load_texture_pair(f"{main_path}_walk{i}.png")
28            self.walk_textures.append(texture)
29
30        # Set the initial texture
31        self.texture = self.idle_texture_pair[0]
32
33        # Default to face-right
34        self.character_face_direction = RIGHT_FACING
35
36        # Index of our current texture
37        self.cur_texture = 0
38
39        # How far have we traveled horizontally since changing the texture
40        self.x_odometer = 0
41
42    def pymunk_moved(self, physics_engine, dx, dy, d_angle):
43        """ Handle being moved by the pymunk engine """
44        # Figure out if we need to face left or right
45        if dx < -DEAD_ZONE and self.character_face_direction == RIGHT_FACING:
46            self.character_face_direction = LEFT_FACING
47        elif dx > DEAD_ZONE and self.character_face_direction == LEFT_FACING:
48            self.character_face_direction = RIGHT_FACING
49
50        # Are we on the ground?
51        is_on_ground = physics_engine.is_on_ground(self)
52
53        # Add to the odometer how far we've moved
54        self.x_odometer += dx
55
56        # Jumping animation
57        if not is_on_ground:
58            if dy > DEAD_ZONE:
59                self.texture = self.jump_texture_pair[self.character_face_direction]
60                return
61            elif dy < -DEAD_ZONE:
62                self.texture = self.fall_texture_pair[self.character_face_direction]
63                return
64
65        # Idle animation
66        if abs(dx) <= DEAD_ZONE:
67            self.texture = self.idle_texture_pair[self.character_face_direction]
68            return
69
70        # Have we moved far enough to change the texture?
71        if abs(self.x_odometer) > DISTANCE_TO_CHANGE_TEXTURE:
72
73            # Reset the odometer
74            self.x_odometer = 0
75
76            # Advance the walking animation
77            self.cur_texture += 1
78            if self.cur_texture > 7:
79                self.cur_texture = 0
80            self.texture = self.walk_textures[self.cur_texture][self.character_face_direction]
很重要!此时,我们仍在创建 arcade.Sprite 和 not PlayerSprite 。我们需要回到 setup 方法,并替换创建 player 实例具有:
        # Create player sprite
        self.player_sprite = PlayerSprite()
我见过程序员犯的一个非常常见的错误(我自己也犯了这个错误)是忘记了最后一个部分。然后,当错误出现在设置中时,您可以花费大量时间查看Player类。
我们还需要返回并更改 __init__ 方法:
        # Player sprite
        self.player_sprite: Optional[PlayerSprite] = None
射出子弹#
让玩家投篮可以给我们的游戏增加很多东西。首先,我们将定义几个要使用的常量。射击子弹的力量有多大,子弹的质量,以及子弹的重力。
如果我们对子弹使用与其他物体相同的重力,它往往会下降得太快。如果我们希望它根本不下降,我们可以将其设置为零。
1# How much force to put on the bullet
2BULLET_MOVE_FORCE = 4500
3
4# Mass of the bullet
5BULLET_MASS = 0.1
6
7# Make bullet less affected by gravity
8BULLET_GRAVITY = 300
接下来,我们将添加一个鼠标按压处理程序来输入子弹射击代码。
我们需要:
创建子弹精灵
我们需要计算从玩家到鼠标点击的角度
在远离玩家的正确方向上创建子弹,因为在玩家内部产生子弹会混淆物理引擎
将子弹添加到物理引擎
如果移动,则对子弹施加作用力。请注意,当我们调整子弹的角度时,我们不需要调整力的角度。
警告
你的平台会滚动吗?
如果您的窗口滚动,您需要添加坐标偏移量,否则角度计算将不正确。
警告
子弹还没消失呢!
如果子弹飞出屏幕,它不会消失,物理引擎仍然必须跟踪它。
 1    def on_mouse_press(self, x, y, button, modifiers):
 2        """ Called whenever the mouse button is clicked. """
 3
 4        bullet = arcade.SpriteSolidColor(width=20, height=5, color=arcade.color.DARK_YELLOW)
 5        self.bullet_list.append(bullet)
 6
 7        # Position the bullet at the player's current location
 8        start_x = self.player_sprite.center_x
 9        start_y = self.player_sprite.center_y
10        bullet.position = self.player_sprite.position
11
12        # Get from the mouse the destination location for the bullet
13        # IMPORTANT! If you have a scrolling screen, you will also need
14        # to add in self.view_bottom and self.view_left.
15        dest_x = x
16        dest_y = y
17
18        # Do math to calculate how to get the bullet to the destination.
19        # Calculation the angle in radians between the start points
20        # and end points. This is the angle the bullet will travel.
21        x_diff = dest_x - start_x
22        y_diff = dest_y - start_y
23        angle = math.atan2(y_diff, x_diff)
24
25        # What is the 1/2 size of this sprite, so we can figure out how far
26        # away to spawn the bullet
27        size = max(self.player_sprite.width, self.player_sprite.height) / 2
28
29        # Use angle to to spawn bullet away from player in proper direction
30        bullet.center_x += size * math.cos(angle)
31        bullet.center_y += size * math.sin(angle)
32
33        # Set angle of bullet
34        bullet.angle = math.degrees(angle)
35
36        # Gravity to use for the bullet
37        # If we don't use custom gravity, bullet drops too fast, or we have
38        # to make it go too fast.
39        # Force is in relation to bullet's angle.
40        bullet_gravity = (0, -BULLET_GRAVITY)
41
42        # Add the sprite. This needs to be done AFTER setting the fields above.
43        self.physics_engine.add_sprite(bullet,
44                                       mass=BULLET_MASS,
45                                       damping=1.0,
46                                       friction=0.6,
47                                       collision_type="bullet",
48                                       gravity=bullet_gravity,
49                                       elasticity=0.9)
50
51        # Add force to bullet
52        force = (BULLET_MOVE_FORCE, 0)
53        self.physics_engine.apply_force(bullet, force)
销毁子弹和物品#
本节有两个目标:
如果子弹飞出屏幕,就把它扔掉
处理子弹和其他物品的碰撞
如果子弹不在屏幕上,就把它销毁#
首先,我们将创建自定义项目符号类。这个类将定义 pymunk_moved 方法,每次子弹移动时检查我们的位置。如果我们的y值太低,我们将删除项目符号。
1class BulletSprite(arcade.SpriteSolidColor):
2    """ Bullet Sprite """
3    def pymunk_moved(self, physics_engine, dx, dy, d_angle):
4        """ Handle when the sprite is moved by the physics engine. """
5        # If the bullet falls below the screen, remove it
6        if self.center_y < -100:
7            self.remove_from_sprite_lists()
当然,一旦我们创建了项目符号,我们必须更新我们的代码以使用它而不是普通的 arcade.Sprite 班级。
1        bullet = BulletSprite(width=20, height=5, color=arcade.color.DARK_YELLOW)
2        self.bullet_list.append(bullet)
3
4        # Position the bullet at the player's current location
5        start_x = self.player_sprite.center_x
6        start_y = self.player_sprite.center_y
处理冲突#
要处理冲突,我们可以添加自定义冲突处理程序回调。如果您还记得我们在物理引擎中添加项目时,我们为每个项目指定了一个碰撞类型,例如“墙”、“子弹”或“项目”。我们可以编写一个函数并注册它来处理所有的子弹/墙碰撞。
在这种情况下,击中墙壁的子弹就会消失。击中物品的子弹会使物品和子弹都消失。我们也可以添加代码来跟踪精灵的伤害,只有在施加了如此多的伤害后才能删除它。甚至根据它的健康状况改变质地。
 1        def wall_hit_handler(bullet_sprite, _wall_sprite, _arbiter, _space, _data):
 2            """ Called for bullet/wall collision """
 3            bullet_sprite.remove_from_sprite_lists()
 4
 5        self.physics_engine.add_collision_handler("bullet", "wall", post_handler=wall_hit_handler)
 6
 7        def item_hit_handler(bullet_sprite, item_sprite, _arbiter, _space, _data):
 8            """ Called for bullet/wall collision """
 9            bullet_sprite.remove_from_sprite_lists()
10            item_sprite.remove_from_sprite_lists()
11
12        self.physics_engine.add_collision_handler("bullet", "item", post_handler=item_hit_handler)
添加移动平台#
我们可以添加对移动平台的支持。可以在对象层中添加平台。对象层允许将平台放置在任何位置,而不仅仅是精确的网格位置。对象层还允许我们为放置的每个瓷砖添加自定义特性。
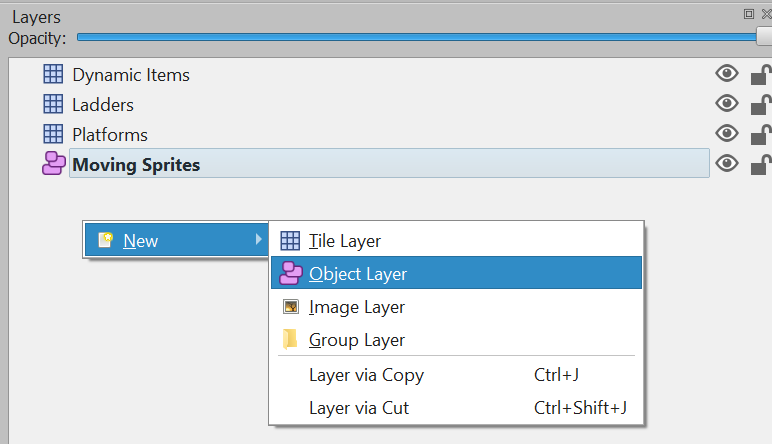
添加对象层。#
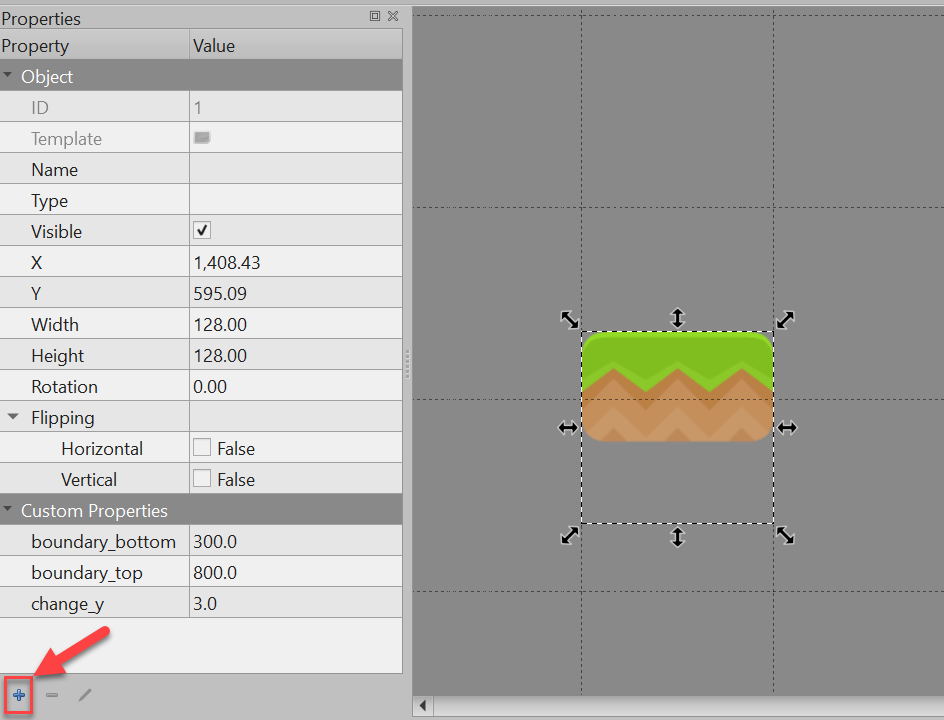
一旦我们放置了瓷砖,我们就可以为它添加自定义属性。单击‘+’图标并添加以下全部或部分属性:
change_xchange_yleft_boundaryright_boundarytop_boundarybottom_boundary
如果它们被命名为精确匹配,它们会自动将它们的值复制到同名的精灵属性中。
添加自定义属性。#
现在我们需要更新代码。在……里面 GameWindow.__init__ 添加一行以为其创建属性 moving_sprites_list :
self.moving_sprites_list: Optional[arcade.SpriteList] = None
在 setup 方法,从TMX层加载精灵列表。
self.moving_sprites_list = tile_map.sprite_lists['Moving Platforms']
也在 setup 方法,我们需要将这些精灵添加到物理引擎中。在本例中,我们将精灵添加为 KINEMATIC 。静止的精灵不会移动。动力学精灵可以移动,并且可以由其他对象对其施加力。运动学精灵确实会移动,但不受其他对象的影响。
        # Add kinematic sprites
        self.physics_engine.add_sprite_list(self.moving_sprites_list,
                                            body_type=arcade.PymunkPhysicsEngine.KINEMATIC)
我们需要画出移动平台的精灵。添加这一行后,您应该能够运行程序并看到来自该层的精灵,即使它们还没有移动。
1    def on_draw(self):
2        """ Draw everything """
3        self.clear()
4        self.wall_list.draw()
5        self.moving_sprites_list.draw()
6        self.bullet_list.draw()
7        self.item_list.draw()
8        self.player_list.draw()
接下来,我们需要让精灵们行动起来。首先,我们将检查是否设置了任何边界,以及是否需要反转方向。
之后,我们将创建一个速度矢量。速度以每秒像素为单位。在本例中,我假设用户以平铺为单位设置了每帧的速度,因此我们将进行转换。
警告
更改center_x和center_y不会移动精灵。如果要更改精灵的位置,请使用物理引擎的 set_position 方法。
此外,设置物品的位置也会将其“传送”到那里。物理引擎将很高兴地将该对象移动到另一个对象中。相反,设置项目的速度将导致物理引擎移动项目,从而将任何动态项目推到一边。
        # For each moving sprite, see if we've reached a boundary and need to
        # reverse course.
        for moving_sprite in self.moving_sprites_list:
            if moving_sprite.boundary_right and \
                    moving_sprite.change_x > 0 and \
                    moving_sprite.right > moving_sprite.boundary_right:
                moving_sprite.change_x *= -1
            elif moving_sprite.boundary_left and \
                    moving_sprite.change_x < 0 and \
                    moving_sprite.left > moving_sprite.boundary_left:
                moving_sprite.change_x *= -1
            if moving_sprite.boundary_top and \
                    moving_sprite.change_y > 0 and \
                    moving_sprite.top > moving_sprite.boundary_top:
                moving_sprite.change_y *= -1
            elif moving_sprite.boundary_bottom and \
                    moving_sprite.change_y < 0 and \
                    moving_sprite.bottom < moving_sprite.boundary_bottom:
                moving_sprite.change_y *= -1

            # Figure out and set our moving platform velocity.
            # Pymunk uses velocity is in pixels per second. If we instead have
            # pixels per frame, we need to convert.
            velocity = (moving_sprite.change_x * 1 / delta_time, moving_sprite.change_y * 1 / delta_time)
            self.physics_engine.set_velocity(moving_sprite, velocity)
添加梯子#
向我们的平台添加阶梯的第一步是修改 __init__ 要跟踪更多项目,请执行以下操作:
有一个梯子精灵列表的参考
为攀登动画添加纹理
跟踪我们在y方向的移动
添加一个布尔值来跟踪我们是否在梯子上/下
 1    def __init__(self,
 2                 ladder_list: arcade.SpriteList,
 3                 hit_box_algorithm: arcade.hitbox.HitBoxAlgorithm):
 4        """ Init """
 5        # Let parent initialize
 6        super().__init__()
 7
 8        # Set our scale
 9        self.scale = SPRITE_SCALING_PLAYER
10
11        # Images from Kenney.nl's Character pack
12        # main_path = ":resources:images/animated_characters/female_adventurer/femaleAdventurer"
13        main_path = ":resources:images/animated_characters/female_person/femalePerson"
14        # main_path = ":resources:images/animated_characters/male_person/malePerson"
15        # main_path = ":resources:images/animated_characters/male_adventurer/maleAdventurer"
16        # main_path = ":resources:images/animated_characters/zombie/zombie"
17        # main_path = ":resources:images/animated_characters/robot/robot"
18
19        # Load textures for idle standing
20        self.idle_texture_pair = arcade.load_texture_pair(f"{main_path}_idle.png",
21                                                          hit_box_algorithm=hit_box_algorithm)
22        self.jump_texture_pair = arcade.load_texture_pair(f"{main_path}_jump.png")
23        self.fall_texture_pair = arcade.load_texture_pair(f"{main_path}_fall.png")
24
25        # Load textures for walking
26        self.walk_textures = []
27        for i in range(8):
28            texture = arcade.load_texture_pair(f"{main_path}_walk{i}.png")
29            self.walk_textures.append(texture)
30
31        # Load textures for climbing
32        self.climbing_textures = []
33        texture = arcade.load_texture(f"{main_path}_climb0.png")
34        self.climbing_textures.append(texture)
35        texture = arcade.load_texture(f"{main_path}_climb1.png")
36        self.climbing_textures.append(texture)
37
38        # Set the initial texture
39        self.texture = self.idle_texture_pair[0]
40
41        # Default to face-right
42        self.character_face_direction = RIGHT_FACING
43
44        # Index of our current texture
45        self.cur_texture = 0
46
47        # How far have we traveled horizontally since changing the texture
48        self.x_odometer = 0
49        self.y_odometer = 0
50
51        self.ladder_list = ladder_list
52        self.is_on_ladder = False
接下来,在我们的 pymunk_moved 方法当我们在梯子上时,我们需要改变物理,并更新我们的玩家纹理。
当我们在梯子上时,我们将关闭重力,增加阻尼,并降低我们的最大垂直速度。如果我们脱离了阶梯,请重置这些属性。
当我们在梯子上,而不是在地面上时,我们将在几个攀登纹理之间交替。
 1    def pymunk_moved(self, physics_engine, dx, dy, d_angle):
 2        """ Handle being moved by the pymunk engine """
 3        # Figure out if we need to face left or right
 4        if dx < -DEAD_ZONE and self.character_face_direction == RIGHT_FACING:
 5            self.character_face_direction = LEFT_FACING
 6        elif dx > DEAD_ZONE and self.character_face_direction == LEFT_FACING:
 7            self.character_face_direction = RIGHT_FACING
 8
 9        # Are we on the ground?
10        is_on_ground = physics_engine.is_on_ground(self)
11
12        # Are we on a ladder?
13        if len(arcade.check_for_collision_with_list(self, self.ladder_list)) > 0:
14            if not self.is_on_ladder:
15                self.is_on_ladder = True
16                self.pymunk.gravity = (0, 0)
17                self.pymunk.damping = 0.0001
18                self.pymunk.max_vertical_velocity = PLAYER_MAX_HORIZONTAL_SPEED
19        else:
20            if self.is_on_ladder:
21                self.pymunk.damping = 1.0
22                self.pymunk.max_vertical_velocity = PLAYER_MAX_VERTICAL_SPEED
23                self.is_on_ladder = False
24                self.pymunk.gravity = None
25
26        # Add to the odometer how far we've moved
27        self.x_odometer += dx
28        self.y_odometer += dy
29
30        if self.is_on_ladder and not is_on_ground:
31            # Have we moved far enough to change the texture?
32            if abs(self.y_odometer) > DISTANCE_TO_CHANGE_TEXTURE:
33
34                # Reset the odometer
35                self.y_odometer = 0
36
37                # Advance the walking animation
38                self.cur_texture += 1
39
40            if self.cur_texture > 1:
41                self.cur_texture = 0
42            self.texture = self.climbing_textures[self.cur_texture]
43            return
44
45        # Jumping animation
46        if not is_on_ground:
47            if dy > DEAD_ZONE:
48                self.texture = self.jump_texture_pair[self.character_face_direction]
49                return
50            elif dy < -DEAD_ZONE:
51                self.texture = self.fall_texture_pair[self.character_face_direction]
52                return
53
54        # Idle animation
55        if abs(dx) <= DEAD_ZONE:
56            self.texture = self.idle_texture_pair[self.character_face_direction]
57            return
58
59        # Have we moved far enough to change the texture?
60        if abs(self.x_odometer) > DISTANCE_TO_CHANGE_TEXTURE:
61
62            # Reset the odometer
63            self.x_odometer = 0
64
65            # Advance the walking animation
66            self.cur_texture += 1
67            if self.cur_texture > 7:
68                self.cur_texture = 0
69            self.texture = self.walk_textures[self.cur_texture][self.character_face_direction]
然后我们只需要将一些变量添加到 __init__ 要追踪梯子,请执行以下操作:
 1    def __init__(self, width, height, title):
 2        """ Create the variables """
 3
 4        # Init the parent class
 5        super().__init__(width, height, title)
 6
 7        # Player sprite
 8        self.player_sprite: Optional[PlayerSprite] = None
 9
10        # Sprite lists we need
11        self.player_list: Optional[arcade.SpriteList] = None
12        self.wall_list: Optional[arcade.SpriteList] = None
13        self.bullet_list: Optional[arcade.SpriteList] = None
14        self.item_list: Optional[arcade.SpriteList] = None
15        self.moving_sprites_list: Optional[arcade.SpriteList] = None
16        self.ladder_list: Optional[arcade.SpriteList] = None
17
18        # Track the current state of what key is pressed
19        self.left_pressed: bool = False
20        self.right_pressed: bool = False
21        self.up_pressed: bool = False
22        self.down_pressed: bool = False
23
24        # Physics engine
25        self.physics_engine: Optional[arcade.PymunkPhysicsEngine] = None
26
27        # Set background color
28        self.background_color = arcade.color.AMAZON
然后将梯形图层加载到 setup :
        # Pull the sprite layers out of the tile map
        self.wall_list = tile_map.sprite_lists["Platforms"]
        self.item_list = tile_map.sprite_lists["Dynamic Items"]
        self.ladder_list = tile_map.sprite_lists["Ladders"]
        self.moving_sprites_list = tile_map.sprite_lists['Moving Platforms']
另外,将梯子列表传递给Player类:
        # Create player sprite
        self.player_sprite = PlayerSprite(self.ladder_list, hit_box_algorithm=arcade.hitbox.algo_detailed)
然后改变跳跃按钮,这样我们在梯子上就不会跳跃了。此外,我们还希望跟踪是否按下了向上键或向下键。
 1    def on_key_press(self, key, modifiers):
 2        """Called whenever a key is pressed. """
 3
 4        if key == arcade.key.LEFT:
 5            self.left_pressed = True
 6        elif key == arcade.key.RIGHT:
 7            self.right_pressed = True
 8        elif key == arcade.key.UP:
 9            self.up_pressed = True
10            # find out if player is standing on ground, and not on a ladder
11            if self.physics_engine.is_on_ground(self.player_sprite) \
12                    and not self.player_sprite.is_on_ladder:
13                # She is! Go ahead and jump
14                impulse = (0, PLAYER_JUMP_IMPULSE)
15                self.physics_engine.apply_impulse(self.player_sprite, impulse)
16        elif key == arcade.key.DOWN:
17            self.down_pressed = True
添加到Key Up处理程序跟踪哪个键被按下。
 1    def on_key_release(self, key, modifiers):
 2        """Called when the user releases a key. """
 3
 4        if key == arcade.key.LEFT:
 5            self.left_pressed = False
 6        elif key == arcade.key.RIGHT:
 7            self.right_pressed = False
 8        elif key == arcade.key.UP:
 9            self.up_pressed = False
10        elif key == arcade.key.DOWN:
11            self.down_pressed = False
接下来,使用阶梯的新更新更改我们的更新。
 1    def on_update(self, delta_time):
 2        """ Movement and game logic """
 3
 4        is_on_ground = self.physics_engine.is_on_ground(self.player_sprite)
 5        # Update player forces based on keys pressed
 6        if self.left_pressed and not self.right_pressed:
 7            # Create a force to the left. Apply it.
 8            if is_on_ground or self.player_sprite.is_on_ladder:
 9                force = (-PLAYER_MOVE_FORCE_ON_GROUND, 0)
10            else:
11                force = (-PLAYER_MOVE_FORCE_IN_AIR, 0)
12            self.physics_engine.apply_force(self.player_sprite, force)
13            # Set friction to zero for the player while moving
14            self.physics_engine.set_friction(self.player_sprite, 0)
15        elif self.right_pressed and not self.left_pressed:
16            # Create a force to the right. Apply it.
17            if is_on_ground or self.player_sprite.is_on_ladder:
18                force = (PLAYER_MOVE_FORCE_ON_GROUND, 0)
19            else:
20                force = (PLAYER_MOVE_FORCE_IN_AIR, 0)
21            self.physics_engine.apply_force(self.player_sprite, force)
22            # Set friction to zero for the player while moving
23            self.physics_engine.set_friction(self.player_sprite, 0)
24        elif self.up_pressed and not self.down_pressed:
25            # Create a force to the right. Apply it.
26            if self.player_sprite.is_on_ladder:
27                force = (0, PLAYER_MOVE_FORCE_ON_GROUND)
28                self.physics_engine.apply_force(self.player_sprite, force)
29                # Set friction to zero for the player while moving
30                self.physics_engine.set_friction(self.player_sprite, 0)
31        elif self.down_pressed and not self.up_pressed:
32            # Create a force to the right. Apply it.
33            if self.player_sprite.is_on_ladder:
34                force = (0, -PLAYER_MOVE_FORCE_ON_GROUND)
35                self.physics_engine.apply_force(self.player_sprite, force)
36                # Set friction to zero for the player while moving
37                self.physics_engine.set_friction(self.player_sprite, 0)
当然,别忘了画梯子:
1    def on_draw(self):
2        """ Draw everything """
3        self.clear()
4        self.wall_list.draw()
5        self.ladder_list.draw()
6        self.moving_sprites_list.draw()
7        self.bullet_list.draw()
8        self.item_list.draw()
9        self.player_list.draw()