
图像实用程序#
概述#
这个 astropy.nddata.utils 模块包括用于阵列操作的通用实用程序函数。
二维剪切图像#
入门#
这个 Cutout2D 类可用于从二维数组创建邮票剪切图像。如果是可选的 WCS 对象被输入到 Cutout2D 然后 Cutout2D 对象将包含更新的 WCS 对应于剪切阵列。
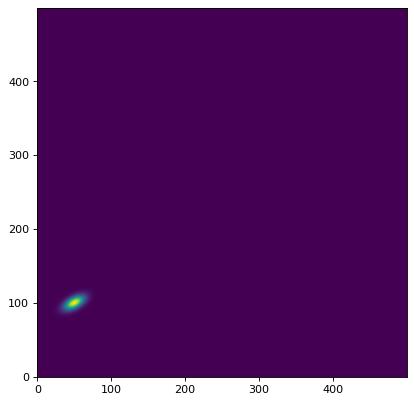
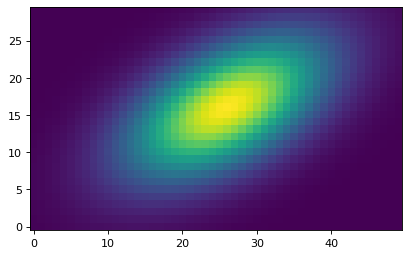
首先,我们在二维数据阵列上模拟单个源。如果要模拟多个源,请参见 基于边界盒的高效模型渲染 .
注意:配对约定不同于 size 和 位置 ! 位置指定为(x,y),但大小指定为(y,x)。
>>> import numpy as np
>>> from astropy.modeling.models import Gaussian2D
>>> y, x = np.mgrid[0:500, 0:500]
>>> data = Gaussian2D(1, 50, 100, 10, 5, theta=0.5)(x, y)
现在,我们可以显示图像:
>>> import matplotlib.pyplot as plt
>>> plt.imshow(data, origin='lower')
接下来,我们可以为这个图像中的单个对象创建一个剪切。我们在位置中心创建一个切口 (x, y) = (49.7, 100.1) 尺寸为 (ny, nx) = (41, 51) 像素::
>>> from astropy.nddata import Cutout2D
>>> from astropy import units as u
>>> position = (49.7, 100.1)
>>> size = (41, 51)     # pixels
>>> cutout = Cutout2D(data, position, size)
这个 size 关键字也可以是 Quantity 对象:
>>> size = u.Quantity((41, 51), u.pixel)
>>> cutout = Cutout2D(data, position, size)
或包含 Quantity 物体::
>>> size = (41*u.pixel, 51*u.pixel)
>>> cutout = Cutout2D(data, position, size)
通过传递整数或标量,可以生成方形剪切图像 Quantity ::
>>> size = 41
>>> cutout2 = Cutout2D(data, position, size)

>>> size = 41 * u.pixel
>>> cutout2 = Cutout2D(data, position, size)
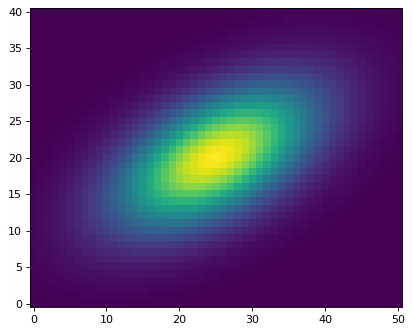
剪切阵列存储在 data 的属性 Cutout2D 实例。如果 copy 关键字是 False (默认),然后 cutout.data 会是一幅原作的风景画 data 数组。如果 copy=True 然后 cutout.data 会有一份原件的副本 data . 现在我们将显示剪切图像:
>>> cutout = Cutout2D(data, position, (41, 51))
>>> plt.imshow(cutout.data, origin='lower')

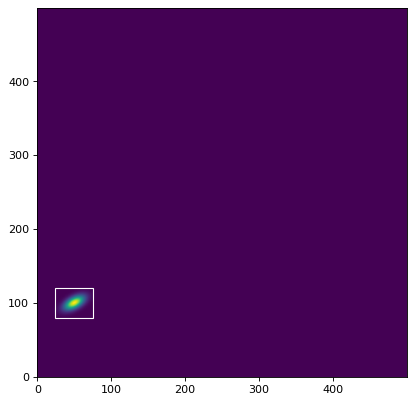
剪切对象可以使用 plot_on_original() 方法:
>>> plt.imshow(data, origin='lower')
>>> cutout.plot_on_original(color='white')

属性也存储在数组中:
>>> # shape of the cutout array
>>> print(cutout.shape)
(41, 51)

>>> # rounded pixel index of the input position
>>> print(cutout.position_original)
(50, 100)

>>> # corresponding position in the cutout array
>>> print(cutout.position_cutout)
(25, 20)

>>> # (non-rounded) input position in both the original and cutout arrays
>>> print((cutout.input_position_original, cutout.input_position_cutout))
((49.7, 100.1), (24.700000000000003, 20.099999999999994))

>>> # the origin pixel in both arrays
>>> print((cutout.origin_original, cutout.origin_cutout))
((25, 80), (0, 0))

>>> # tuple of slice objects for the original array
>>> print(cutout.slices_original)
(slice(80, 121, None), slice(25, 76, None))

>>> # tuple of slice objects for the cutout array
>>> print(cutout.slices_cutout)
(slice(0, 41, None), slice(0, 51, None))
还有两个 Cutout2D 在原始数组和剪切数组之间转换像素位置的方法:
>>> print(cutout.to_original_position((2, 1)))
(27, 81)

>>> print(cutout.to_cutout_position((27, 81)))
(2, 1)
二维剪切模式#
创建剪切阵列有三种模式: 'trim' , 'partial' 和 'strict' . 对于 'partial' 和 'trim' 模式,剪切阵列和输入的部分重叠 data 数组就足够了。对于 'strict' 模式下,剪切数组必须完全包含在 data 数组,否则 PartialOverlapError 提高了。在所有模式下,非重叠数组将引发 NoOverlapError . 在 'partial' 模式,剪切阵列中与 data 数组将被填充 fill_value . 在 'trim' 模式仅返回重叠元素,因此结果的截断数组可能小于请求的 size .
默认使用 mode='trim' ,这会导致截断数组小于请求的数组 size ::
>>> data2 = np.arange(20.).reshape(5, 4)
>>> cutout1 = Cutout2D(data2, (0, 0), (3, 3), mode='trim')
>>> print(cutout1.data)
[[0. 1.]
 [4. 5.]]
>>> print(cutout1.shape)
(2, 2)
>>> print((cutout1.position_original, cutout1.position_cutout))
((0, 0), (0, 0))
用 mode='partial' ,切口将永远不会被修剪。取而代之的是 fill_value (默认为 numpy.nan )如果剪切块未完全包含在数据数组中:
>>> cutout2 = Cutout2D(data2, (0, 0), (3, 3), mode='partial')
>>> print(cutout2.data)
[[nan nan nan]
 [nan  0.  1.]
 [nan  4.  5.]]
注意,对于 'partial' 模式时,将在上计算位置(和其他几个属性) 有效的 (非填充)剪切值:
>>> print((cutout2.position_original, cutout2.position_cutout))
((0, 0), (1, 1))
>>> print((cutout2.origin_original, cutout2.origin_cutout))
((0, 0), (1, 1))
>>> print(cutout2.slices_original)
(slice(0, 2, None), slice(0, 2, None))
>>> print(cutout2.slices_cutout)
(slice(1, 3, None), slice(1, 3, None))
使用 mode='strict' 如果截断未完全包含在数据数组中,将引发异常:
>>> cutout3 = Cutout2D(data2, (0, 0), (3, 3), mode='strict')
PartialOverlapError: Arrays overlap only partially.
a的2D切口 SkyCoord 位置#
输入 position 也可以指定为 SkyCoord ,在这种情况下a WCS 对象必须通过 wcs 关键字。
首先,我们定义 SkyCoord 和一个位置 WCS 对象作为我们的数据(通常来自您的FITS标题):
>>> from astropy.coordinates import SkyCoord
>>> from astropy.wcs import WCS
>>> position = SkyCoord('13h11m29.96s -01d19m18.7s', frame='icrs')
>>> wcs = WCS(naxis=2)
>>> rho = np.pi / 3.
>>> scale = 0.05 / 3600.
>>> wcs.wcs.cd = [[scale*np.cos(rho), -scale*np.sin(rho)],
...               [scale*np.sin(rho), scale*np.cos(rho)]]
>>> wcs.wcs.ctype = ['RA---TAN', 'DEC--TAN']
>>> wcs.wcs.crval = [position.ra.to_value(u.deg),
...                  position.dec.to_value(u.deg)]
>>> wcs.wcs.crpix = [50, 100]
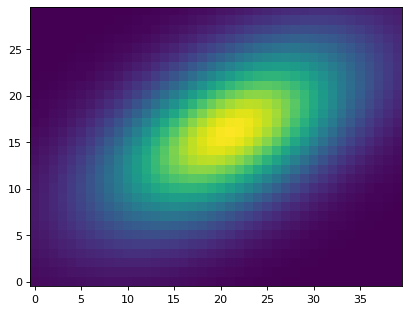
现在我们可以使用 SkyCoord 位置和 wcs 对象:
>>> cutout = Cutout2D(data, position, (30, 40), wcs=wcs)
>>> plt.imshow(cutout.data, origin='lower')
这个 wcs 的属性 Cutout2D 对象现在包含传播的 WCS 对于剪切阵列。现在我们可以在cutout数组中找到给定像素的天空坐标。注意,我们需要使用 cutout.wcs 用于剪切位置的对象:
>>> from astropy.wcs.utils import pixel_to_skycoord
>>> x_cutout, y_cutout = (5, 10)
>>> pixel_to_skycoord(x_cutout, y_cutout, cutout.wcs)
<SkyCoord (ICRS): (ra, dec) in deg
    ( 197.8747893, -1.32207626)>
我们现在在原始图像中找到对应的像素 data 阵列及其天空坐标:
>>> x_data, y_data = cutout.to_original_position((x_cutout, y_cutout))
>>> pixel_to_skycoord(x_data, y_data, wcs)
<SkyCoord (ICRS): (ra, dec) in deg
    ( 197.8747893, -1.32207626)>
正如所料,天空在原始坐标系中 data 并且切口阵列同意。
使用角度 size#
输入 size 也可以指定为 Quantity 以角度单位表示(例如度、弧分、弧秒等)。对于这种情况,a WCS 对象必须通过 wcs 关键字。
在这个例子中,我们将使用数据, SkyCoord 位置,以及 wcs 对象以创建大小为1.5 x 2.5弧秒的剪切:
>>> size = u.Quantity((1.5, 2.5), u.arcsec)
>>> cutout = Cutout2D(data, position, size, wcs=wcs)
>>> plt.imshow(cutout.data, origin='lower')
使用更新的WCS将二维剪切保存到FITS文件#
A Cutout2D 对象可以保存到FITS文件中,包括剪切区域的更新WCS对象。在这个例子中,我们下载了一个FITS-image示例并创建了一个cutout-image。结果 Cutout2D 对象将保存到新的FITS文件中,其中包含剪切区域的更新WCS。
# Download an example FITS file, create a 2D cutout, and save it to a
# new FITS file, including the updated cutout WCS.
from astropy.io import fits
from astropy.nddata import Cutout2D
from astropy.utils.data import download_file
from astropy.wcs import WCS


def download_image_save_cutout(url, position, size):
    # Download the image
    filename = download_file(url)

    # Load the image and the WCS
    hdu = fits.open(filename)[0]
    wcs = WCS(hdu.header)

    # Make the cutout, including the WCS
    cutout = Cutout2D(hdu.data, position=position, size=size, wcs=wcs)

    # Put the cutout image in the FITS HDU
    hdu.data = cutout.data

    # Update the FITS header with the cutout WCS
    hdu.header.update(cutout.wcs.to_header())

    # Write the cutout to a new FITS file
    cutout_filename = "example_cutout.fits"
    hdu.writeto(cutout_filename, overwrite=True)


if __name__ == "__main__":
    url = "https://astropy.stsci.edu/data/photometry/spitzer_example_image.fits"

    position = (500, 300)
    size = (400, 400)
    download_image_save_cutout(url, position, size)