

非标准化核的卷积#
有些任务,如源代码查找,您需要应用一个带有非标准化内核的过滤器。
对于行为良好(不包含缺失值或无限值)的数据,可以通过一个步骤完成:
convolve(image, kernel)
实例#
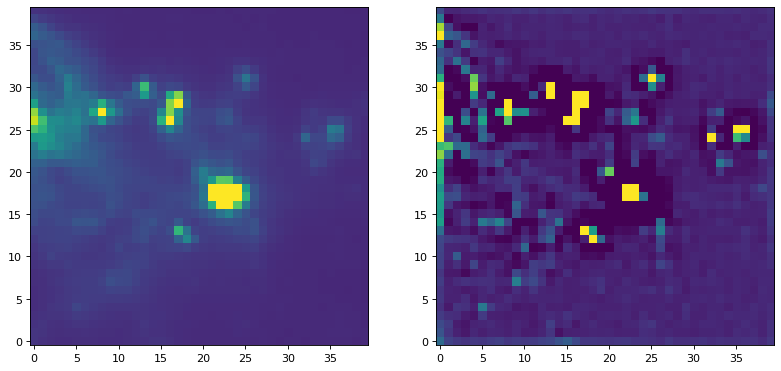
例如,使用非标准化内核的过滤器,我们可以尝试运行一个常用的峰值增强内核:
import numpy as np
import matplotlib.pyplot as plt

from astropy.io import fits
from astropy.utils.data import get_pkg_data_filename
from astropy.convolution import CustomKernel
from scipy.signal import convolve as scipy_convolve
from astropy.convolution import convolve, convolve_fft


# Load the data from data.astropy.org
filename = get_pkg_data_filename('galactic_center/gc_msx_e.fits')
hdu = fits.open(filename)[0]

# Scale the file to have reasonable numbers
# (this is mostly so that colorbars don't have too many digits)
# Also, we crop it so you can see individual pixels
img = hdu.data[50:90, 60:100] * 1e5

kernel = CustomKernel([[-1,-1,-1], [-1, 8, -1], [-1,-1,-1]])

astropy_conv = convolve(img, kernel, normalize_kernel=False, nan_treatment='fill')
#astropy_conv_fft = convolve_fft(img, kernel, normalize_kernel=False, nan_treatment='fill')

fig, axs = plt.subplots(ncols=2, figsize=(12, 12))
ax1 = axs[0]
im = ax1.imshow(img, vmin=-6., vmax=5.e1, origin='lower',
                interpolation='nearest', cmap='viridis')

ax2 = axs[1]
im = ax2.imshow(astropy_conv, vmin=-6., vmax=5.e1, origin='lower',
                interpolation='nearest', cmap='viridis')

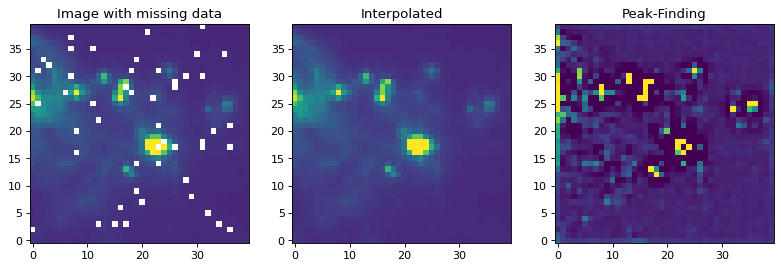
如果有一个缺少值(nan)的图像,必须先用实际值替换它们。通常,最好的方法是用插值值替换NaN值。在下面的例子中,我们在应用寻峰核之前,使用一个大小与我们的寻峰核大小相似的高斯核来替换坏数据。
from astropy.convolution import Gaussian2DKernel, interpolate_replace_nans

# Select a random set of pixels that were affected by some sort of artifact
# and replaced with NaNs (e.g., cosmic-ray-affected pixels)
rng = np.random.default_rng(42)
yinds, xinds = np.indices(img.shape)
img[rng.choice(yinds.flat, 50), rng.choice(xinds.flat, 50)] = np.nan

# We smooth with a Gaussian kernel with x_stddev=1 (and y_stddev=1)
# It is a 9x9 array
kernel = Gaussian2DKernel(x_stddev=1)

# interpolate away the NaNs
reconstructed_image = interpolate_replace_nans(img, kernel)


# apply peak-finding
kernel = CustomKernel([[-1,-1,-1], [-1, 8, -1], [-1,-1,-1]])

# Use the peak-finding kernel
# We have to turn off kernel normalization and set nan_treatment to "fill"
# here because `nan_treatment='interpolate'` is incompatible with non-
# normalized kernels
peaked_image = convolve(reconstructed_image, kernel,
                        normalize_kernel=False,
                        nan_treatment='fill')

fig, axs = plt.subplots(ncols=3, figsize=(12, 12))
ax1 = axs[0]
ax1.set_title("Image with missing data")
im = ax1.imshow(img, vmin=-6., vmax=5.e1, origin='lower',
                interpolation='nearest', cmap='viridis')

ax2 = axs[1]
ax2.set_title("Interpolated")
im = ax2.imshow(reconstructed_image, vmin=-6., vmax=5.e1, origin='lower',
                interpolation='nearest', cmap='viridis')

ax3 = axs[2]
ax3.set_title("Peak-Finding")
im = ax3.imshow(peaked_image, vmin=-6., vmax=5.e1, origin='lower',
                interpolation='nearest', cmap='viridis')