
摄像头模块简介
- 作者
尼拉夫·帕特尔著
- 联系方式
PYGAME 1.9支持接口摄像头,允许您捕获静态图像、观看实况流,以及进行一些简单的计算机视觉。本教程将涵盖所有这些用例,并提供可供您的应用程序或游戏使用的代码示例。您可以参考 reference documentation 获取完整的API。
备注
从PYGAME 1.9开始,摄像头模块为Linux上使用V4L2的摄像头提供本机支持。通过Video Capture或OpenCV可以支持其他平台,但本指南将重点介绍本机模块。大多数代码将在其他平台上有效,但某些功能(如控件)将不起作用。该模块还标记为 EXPERIMENTAL 这意味着API可能会在后续版本中发生变化。
导入和初始化
import pygame
import pygame.camera
from pygame.locals import *

pygame.init()
pygame.camera.init()
由于摄像头模块是可选的,因此需要手动导入和初始化,如上所示。
捕获单个图像
现在,我们将介绍最简单的情况,即打开相机并将帧捕获为曲面。在下面的示例中,我们假设计算机上的/dev/Video0处有一个摄像头,并将其初始化为640 x 480的大小。调用GET_IMAGE()时摄影机所看到的就是名为Image的曲面。**
cam = pygame.camera.Camera("/dev/video0",(640,480))
cam.start()
image = cam.get_image()
列出已连接的摄像头
你可能会想,如果我们不知道摄像机的确切路径怎么办?我们可以要求模块提供连接到计算机的摄像机列表,并初始化列表中的第一台摄像机。**
camlist = pygame.camera.list_cameras()
if camlist:
    cam = pygame.camera.Camera(camlist[0],(640,480))
使用摄像机控件
大多数摄像头都支持翻转图像和更改亮度等控制。在使用Start()之后,可以随时使用Set_Controls()和Get_Controls()。**
cam.set_controls(hflip = True, vflip = False)
print camera.get_controls()
捕获实时流
本教程的其余部分将围绕捕获实时图像流展开。为此,我们将使用下面的类。如上所述,它将简单地将持续不断的摄像头帧传输到屏幕上,有效地显示实时视频。这基本上是您所期望的,循环GET_IMAGE(),在显示表面上进行blit,然后翻转它。出于性能原因,我们将为相机提供相同的表面以供每次使用。**
class Capture:
    def __init__(self):
        self.size = (640,480)
        # create a display surface. standard pygame stuff
        self.display = pygame.display.set_mode(self.size, 0)

        # this is the same as what we saw before
        self.clist = pygame.camera.list_cameras()
        if not self.clist:
            raise ValueError("Sorry, no cameras detected.")
        self.cam = pygame.camera.Camera(self.clist[0], self.size)
        self.cam.start()

        # create a surface to capture to.  for performance purposes
        # bit depth is the same as that of the display surface.
        self.snapshot = pygame.surface.Surface(self.size, 0, self.display)

    def get_and_flip(self):
        # if you don't want to tie the framerate to the camera, you can check
        # if the camera has an image ready.  note that while this works
        # on most cameras, some will never return true.
        if self.cam.query_image():
            self.snapshot = self.cam.get_image(self.snapshot)

        # blit it to the display surface.  simple!
        self.display.blit(self.snapshot, (0,0))
        pygame.display.flip()

    def main(self):
        going = True
        while going:
            events = pygame.event.get()
            for e in events:
                if e.type == QUIT or (e.type == KEYDOWN and e.key == K_ESCAPE):
                    # close the camera safely
                    self.cam.stop()
                    going = False

            self.get_and_flip()
由于GET_IMAGE()是一个阻塞调用,在慢速相机上可能需要相当长的时间,因此本例使用Query_Image()来查看相机是否已准备好。这使您可以将游戏的帧速率与相机的帧速率分开。如果您发现您的摄影机不正确地支持QUERY_IMAGE()函数,也可以让摄影机在单独的线程中捕获图像,以获得大致相同的性能提升。
计算机视觉基础
通过使用相机、变换和遮罩模块,pyGame可以进行一些基本的计算机视觉。
色彩空间
在初始化相机时,Colorspace是一个可选参数,可以选择‘RGB’、‘YUV’和‘HSV’。对于计算机视觉来说,YUV和HSV通常都比RGB更有用,并且允许您更容易地根据颜色设置阈值,这一点我们将在本教程的后面部分看到。
self.cam = pygame.camera.Camera(self.clist[0], self.size, "RGB")
self.cam = pygame.camera.Camera(self.clist[0], self.size, "YUV")

self.cam = pygame.camera.Camera(self.clist[0], self.size, "HSV")
阈值设置
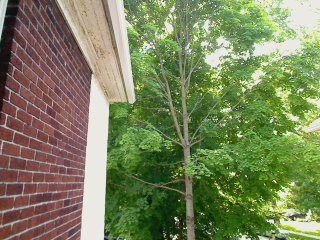
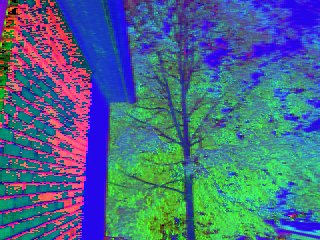
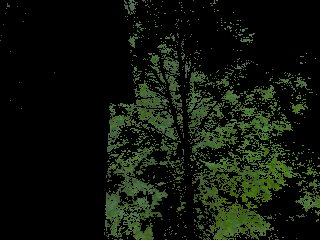
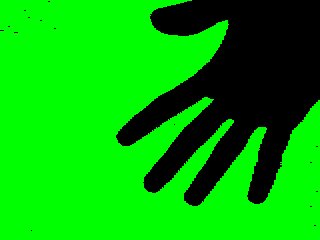
使用Transform模块中的Threshold()函数,可以实现简单的类似绿色屏幕的效果,或在场景中隔离特定颜色的对象。在下面的示例中,我们只将绿色的树设置为阈值,并将图像的其余部分设置为黑色。有关的详细信息,请查看参考文档 threshold function .
self.thresholded = pygame.surface.Surface(self.size, 0, self.display)
self.snapshot = self.cam.get_image(self.snapshot)
pygame.transform.threshold(self.thresholded,self.snapshot,(0,255,0),(90,170,170),(0,0,0),2)
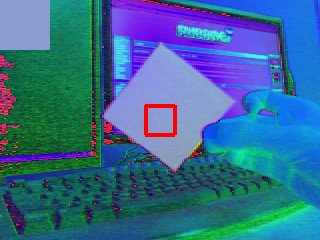
当然,这仅在您已经知道要查找的对象的确切颜色时才有用。为了解决这一问题并使阈值在现实世界中可用,我们需要添加一个校准阶段,在那里我们识别对象的颜色并使用它来对其进行阈值处理。我们将使用转换模块的Average_COLOR()函数来完成此操作。下面是一个示例校准函数,您可以循环该函数,直到发生像按键这样的事件,以及它将是什么样子的图像。框内的颜色将是用于阈值的颜色。请注意,我们在下图中使用的是HSV色彩空间。
def calibrate(self):
    # capture the image
    self.snapshot = self.cam.get_image(self.snapshot)
    # blit it to the display surface
    self.display.blit(self.snapshot, (0,0))
    # make a rect in the middle of the screen
    crect = pygame.draw.rect(self.display, (255,0,0), (145,105,30,30), 4)
    # get the average color of the area inside the rect
    self.ccolor = pygame.transform.average_color(self.snapshot, crect)
    # fill the upper left corner with that color
    self.display.fill(self.ccolor, (0,0,50,50))
    pygame.display.flip()
pygame.transform.threshold(self.thresholded,self.snapshot,self.ccolor,(30,30,30),(0,0,0),2)

您可以使用相同的想法来制作简单的绿屏/蓝屏,方法是首先获取背景图像,然后对其进行阈值处理。下面的示例将相机指向HSV色彩空间中的一面空白白墙。
def calibrate(self):
    # capture a bunch of background images
    bg = []
    for i in range(0,5):
      bg.append(self.cam.get_image(self.background))
    # average them down to one to get rid of some noise
    pygame.transform.average_surfaces(bg,self.background)
    # blit it to the display surface
    self.display.blit(self.background, (0,0))
    pygame.display.flip()

pygame.transform.threshold(self.thresholded,self.snapshot,(0,255,0),(30,30,30),(0,0,0),1,self.background)
使用遮罩模块
如果您只想显示图像,上面的内容是很棒的,但使用 mask module ,您还可以使用摄像头作为游戏的输入设备。例如,回到对特定对象设置阈值的示例,我们可以找到该对象的位置,并使用它来控制屏幕上的对象。
def get_and_flip(self):
    self.snapshot = self.cam.get_image(self.snapshot)
    # threshold against the color we got before
    mask = pygame.mask.from_threshold(self.snapshot, self.ccolor, (30, 30, 30))
    self.display.blit(self.snapshot,(0,0))
    # keep only the largest blob of that color
    connected = mask.connected_component()
    # make sure the blob is big enough that it isn't just noise
    if mask.count() > 100:
        # find the center of the blob
        coord = mask.centroid()
        # draw a circle with size variable on the size of the blob
        pygame.draw.circle(self.display, (0,255,0), coord, max(min(50,mask.count()/400),5))
    pygame.display.flip()

这只是最基本的例子。您可以跟踪多个不同颜色的水滴,找到对象的轮廓,在现实生活和游戏对象之间进行碰撞检测,获得对象的角度以实现更精细的控制,等等。玩得开心!
Edit on GitHub