
-
pygame.joystick - Pygame module for interacting with joysticks, gamepads, and trackballs.
— Initialize the joystick module. — Uninitialize the joystick module. — Returns True if the joystick module is initialized. — Returns the number of joysticks. — Create a new Joystick object. 操纵杆模块管理计算机上的操纵杆设备。操纵杆设备包括跟踪球和视频游戏式游戏手柄,该模块允许使用多个按钮和“帽子”。计算机可以同时管理多个操纵杆。
JoyStick类的每个实例代表一个插入计算机的游戏设备。如果游戏板上有多个操纵杆,那么操纵杆对象实际上可以代表单个游戏设备上的多个操纵杆。
要快速初始化操纵杆模块并获取操纵杆实例列表,请使用以下代码:
pygame.joystick.init()
joysticks = [pygame.joystick.Joystick(x) for x in range(pygame.joystick.get_count())]
操纵杆将生成以下事件类型:
JOYAXISMOTION JOYBALLMOTION JOYBUTTONDOWN JOYBUTTONUP JOYHATMOTION
而在支持热插拔的pyGame 2中:
JOYDEVICEADDED JOYDEVICEREMOVED
请注意,在pyGame 2中,操纵杆事件使用唯一的“实例ID”。在添加和删除设备后,传递给JoyStick对象的构造函数中的设备索引不是唯一的。你必须打电话给我
Joystick.get_instance_id()以查找在打开时分配给操纵杆的实例ID。要使某些方法起作用,需要频繁地抽出事件队列。因此,定期调用pygame.vent.get、pygame.vent.Wait或pygame.vent.ump中的一个。
- pygame.joystick.init()
- Initialize the joystick module.init() -> None
此函数由自动调用
pygame.init()。它初始化操纵杆模块。在执行任何其他功能之前,必须先初始化该模块。
多次调用此函数是安全的。
- pygame.joystick.quit()
- Uninitialize the joystick module.quit() -> None
取消初始化操纵杆模块。在您调用它之后,任何现有的操纵杆对象都将不再起作用。
多次调用此函数是安全的。
- pygame.joystick.get_init()
- Returns True if the joystick module is initialized.get_init() -> bool
测试是否
pygame.joystick.init()函数已被调用。
- pygame.joystick.get_count()
- Returns the number of joysticks.get_count() -> count
返回系统上的操纵杆设备的数量。伯爵将会是
0如果系统上没有操纵杆。使用创建操纵杆对象时
Joystick(id),则传递一个必须小于此计数的整数。
- pygame.joystick.Joystick
- Create a new Joystick object.Joystick(id) -> Joystick
— initialize the Joystick — uninitialize the Joystick — check if the Joystick is initialized — get the device index (deprecated) — get the joystick instance id — get the joystick GUID — get the approximate power status of the device — get the Joystick system name — get the number of axes on a Joystick — get the current position of an axis — get the number of trackballs on a Joystick — get the relative position of a trackball — get the number of buttons on a Joystick — get the current button state — get the number of hat controls on a Joystick — get the position of a joystick hat — Start a rumbling effect — Stop any rumble effect playing 创建新的操纵杆以访问物理设备。Id参数必须是来自
0至pygame.joystick.get_count() - 1。操纵杆在创建时初始化,并在释放时关闭。一旦设备初始化,PYGAME事件队列将开始接收有关其输入的事件。
Changed in pygame 2.0.0: 操纵杆对象现在在创建时立即打开。
- init()
- initialize the Joystickinit() -> None
如果操纵杆已关闭,则对其进行初始化。即使操纵杆已经初始化,调用它也是安全的。
Deprecated since pygame 2.0.0: 以后将不可能重新初始化关闭的操纵杆对象。将在PYGAME 2.1中删除。
- quit()
- uninitialize the Joystickquit() -> None
关闭操纵杆对象。在此之后,PYGAME事件队列将不再从设备接收事件。
可以安全地不止一次地调用它。
- get_init()
- check if the Joystick is initializedget_init() -> bool
如果操纵杆对象当前已初始化,则返回True。
- get_id()
- get the device index (deprecated)get_id() -> int
返回此设备的原始设备索引。该值与传递给
Joystick()构造函数。在未初始化操纵杆的情况下,可以安全地调用此方法。Deprecated since pygame 2.0.0: 原始设备索引在pyGame 2中没有用处。使用
get_instance_id()取而代之的是。将在PYGAME 2.1中删除。
- get_instance_id() int
- get the joystick instance idget_instance_id() -> int
获取操纵杆实例ID。这与
instance_id操纵杆事件中给出的字段。New in pygame 2.0.0dev11.
- get_guid() str
- get the joystick GUIDget_guid() -> str
获取GUID字符串。这将标识操纵杆设备的确切硬件。
New in pygame 2.0.0dev11.
- get_power_level() str
- get the approximate power status of the deviceget_power_level() -> str
获取一个字符串,该字符串提供设备的电源状态。
以下选项之一:
empty,low,medium,full,wired,max,或unknown。New in pygame 2.0.0dev11.
- get_name()
- get the Joystick system nameget_name() -> string
返回此操纵杆设备的系统名称。目前尚不清楚系统将为操纵杆指定什么名称,但它应该是标识设备的唯一名称。在未初始化操纵杆的情况下,可以安全地调用此方法。
- get_numaxes()
- get the number of axes on a Joystickget_numaxes() -> int
返回操纵杆上的输入轴的数目。这个职位通常会有两个人。像方向舵和油门这样的控制装置被视为附加轴。
这个
pygame.JOYAXISMOTION活动的范围将在-1.0至1.0。值为0.0表示轴居中。GamePad设备通常是-1,0,或1没有介于两者之间的值。较旧的模拟操纵杆轴不会始终使用完整的-1至1范围,居中的值将是周围的某个区域0。模拟操纵杆的轴线通常会有一点噪音,这会产生很多快速的小运动事件。
- get_axis()
- get the current position of an axisget_axis(axis_number) -> float
返回操纵杆轴的当前位置。该值的范围为
-1至1值为0居中。您可能需要考虑一些容差来处理抖动,而操纵杆漂移可能会使操纵杆偏离中心位置0或使用全范围的位置值。轴号必须是从
0至get_numaxes() - 1。当使用游戏手柄时,操纵杆和模拟触发器通常都报告为轴。
- get_numballs()
- get the number of trackballs on a Joystickget_numballs() -> int
返回操纵杆上的轨迹球设备的数量。这些设备的工作原理类似于鼠标,但它们没有绝对位置;它们只有相对的移动量。
这个
pygame.JOYBALLMOTION事件将在轨迹球滚动时发送。它将报告轨迹球上的移动量。
- get_ball()
- get the relative position of a trackballget_ball(ball_number) -> x, y
返回操纵杆按钮的相对移动。该值为
x, y保持自上次调用get_ball以来的相对移动的对。球号必须是从
0至get_numballs() - 1。
- get_numbuttons()
- get the number of buttons on a Joystickget_numbuttons() -> int
返回操纵杆上可按的按钮数。这些按钮具有布尔型(开或关)状态。
按钮会生成一个
pygame.JOYBUTTONDOWN和pygame.JOYBUTTONUP在按下并释放它们时引发。
- get_button()
- get the current button stateget_button(button) -> bool
返回操纵杆按钮的当前状态。
- get_numhats()
- get the number of hat controls on a Joystickget_numhats() -> int
返回操纵杆上的操纵杆帽子的数量。HAT设备就像操纵杆上的微型数字操纵杆。每顶帽子都有两个输入轴。
这个
pygame.JOYHATMOTION事件在帽子改变位置时生成。这个position属性包含一对值,它们是-1,0,或1。一个职位(0, 0)表示帽子居中。
- get_hat()
- get the position of a joystick hatget_hat(hat_number) -> x, y
返回位置HAT的当前位置。位置以两个值的形式给出,表示
x和y帽子的位置。(0, 0)意思是以中心为中心。值为-1表示向左/向下,值为1意思是右/上:所以(-1, 0)意味着向左;(1, 0)意思是正确;(0, 1)意思是向上;(1, 1)表示右上角;等等。该值是数字的,
i.e.,每个坐标可以是-1,0或1但绝不会介于两者之间。帽子编号必须介于
0和get_numhats() - 1。
- rumble()
- Start a rumbling effectrumble(low_frequency, high_frequency, duration) -> bool
在操纵杆上开始隆隆效果,指定强度从0到1。持续时间是效果的长度,以毫秒为单位。将持续时间设置为0将播放该效果,直到另一个覆盖它或
Joystick.stop_rumble()叫做。如果效果已经在播放,则它将被覆盖。如果成功播放隆隆声,则返回True;如果操纵杆不支持,则返回False;或者
pygame.version.SDL()tupled integers of the SDL library version 低于2.0.9。New in pygame 2.0.2.
- stop_rumble()
- Stop any rumble effect playingstop_rumble() -> None
停止操纵杆上播放的任何隆隆效果。看见
Joystick.rumble()了解更多信息。New in pygame 2.0.2.
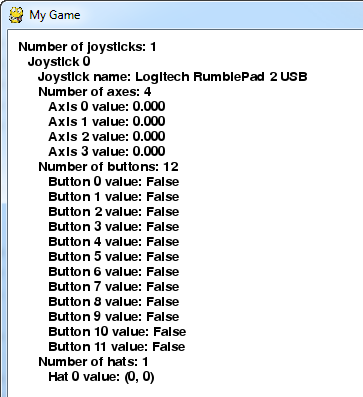
操纵杆模块的示例代码。
import pygame


# Define some colors.
BLACK = pygame.Color('black')
WHITE = pygame.Color('white')


# This is a simple class that will help us print to the screen.
# It has nothing to do with the joysticks, just outputting the
# information.
class TextPrint:
    def __init__(self):
        self.reset()
        self.font = pygame.font.Font(None, 20)

    def tprint(self, screen, textString):
        textBitmap = self.font.render(textString, True, BLACK)
        screen.blit(textBitmap, (self.x, self.y))
        self.y += self.line_height

    def reset(self):
        self.x = 10
        self.y = 10
        self.line_height = 15

    def indent(self):
        self.x += 10

    def unindent(self):
        self.x -= 10


pygame.init()

# Set the width and height of the screen (width, height).
screen = pygame.display.set_mode((500, 700))

pygame.display.set_caption("My Game")

# Loop until the user clicks the close button.
done = False

# Used to manage how fast the screen updates.
clock = pygame.time.Clock()

# Initialize the joysticks.
pygame.joystick.init()

# Get ready to print.
textPrint = TextPrint()

# -------- Main Program Loop -----------
while not done:
    #
    # EVENT PROCESSING STEP
    #
    # Possible joystick actions: JOYAXISMOTION, JOYBALLMOTION, JOYBUTTONDOWN,
    # JOYBUTTONUP, JOYHATMOTION
    for event in pygame.event.get(): # User did something.
        if event.type == pygame.QUIT: # If user clicked close.
            done = True # Flag that we are done so we exit this loop.
        elif event.type == pygame.JOYBUTTONDOWN:
            print("Joystick button pressed.")
        elif event.type == pygame.JOYBUTTONUP:
            print("Joystick button released.")

    #
    # DRAWING STEP
    #
    # First, clear the screen to white. Don't put other drawing commands
    # above this, or they will be erased with this command.
    screen.fill(WHITE)
    textPrint.reset()

    # Get count of joysticks.
    joystick_count = pygame.joystick.get_count()

    textPrint.tprint(screen, "Number of joysticks: {}".format(joystick_count))
    textPrint.indent()

    # For each joystick:
    for i in range(joystick_count):
        joystick = pygame.joystick.Joystick(i)
        joystick.init()

        try:
            jid = joystick.get_instance_id()
        except AttributeError:
            # get_instance_id() is an SDL2 method
            jid = joystick.get_id()
        textPrint.tprint(screen, "Joystick {}".format(jid))
        textPrint.indent()

        # Get the name from the OS for the controller/joystick.
        name = joystick.get_name()
        textPrint.tprint(screen, "Joystick name: {}".format(name))

        try:
            guid = joystick.get_guid()
        except AttributeError:
            # get_guid() is an SDL2 method
            pass
        else:
            textPrint.tprint(screen, "GUID: {}".format(guid))

        # Usually axis run in pairs, up/down for one, and left/right for
        # the other.
        axes = joystick.get_numaxes()
        textPrint.tprint(screen, "Number of axes: {}".format(axes))
        textPrint.indent()

        for i in range(axes):
            axis = joystick.get_axis(i)
            textPrint.tprint(screen, "Axis {} value: {:>6.3f}".format(i, axis))
        textPrint.unindent()

        buttons = joystick.get_numbuttons()
        textPrint.tprint(screen, "Number of buttons: {}".format(buttons))
        textPrint.indent()

        for i in range(buttons):
            button = joystick.get_button(i)
            textPrint.tprint(screen,
                             "Button {:>2} value: {}".format(i, button))
        textPrint.unindent()

        hats = joystick.get_numhats()
        textPrint.tprint(screen, "Number of hats: {}".format(hats))
        textPrint.indent()

        # Hat position. All or nothing for direction, not a float like
        # get_axis(). Position is a tuple of int values (x, y).
        for i in range(hats):
            hat = joystick.get_hat(i)
            textPrint.tprint(screen, "Hat {} value: {}".format(i, str(hat)))
        textPrint.unindent()

        textPrint.unindent()

    #
    # ALL CODE TO DRAW SHOULD GO ABOVE THIS COMMENT
    #

    # Go ahead and update the screen with what we've drawn.
    pygame.display.flip()

    # Limit to 20 frames per second.
    clock.tick(20)

# Close the window and quit.
# If you forget this line, the program will 'hang'
# on exit if running from IDLE.
pygame.quit()
公共控制器轴映射
控制器映射是从pyGame使用的底层SDL库中提取的,它们在pyGame 1和pyGame 2之间有所不同。下面是两个流行的游戏板的映射。
《火拼游戏2》
轴和HAT映射按从-1到+1的顺序列出。
X-Box 360 Controller (name: "Xbox 360 Controller")
在PYGAME 2中,X360控制器映射有6个轴、11个按钮和1顶帽子。
左手杖 ::
Left -> Right   - Axis 0
Up   -> Down    - Axis 1
右手杖 ::
Left -> Right   - Axis 3
Up   -> Down    - Axis 4
左触发器 ::
Out -> In - Axis 2
右触发器 ::
Out -> In - Axis 5
按钮 ::
A Button        - Button 0
B Button        - Button 1
X Button        - Button 2
Y Button        - Button 3
Left Bumper     - Button 4
Right Bumper    - Button 5
Back Button     - Button 6
Start Button    - Button 7
L. Stick In     - Button 8
R. Stick In     - Button 9
Guide Button    - Button 10
Hat/D-pad ::
Down -> Up      - Y Axis
Left -> Right   - X Axis
PlayStation 4控制器(名称:“PS4控制器”)
在PYGAME 2中,PS4控制器映射有6个轴和16个按钮。
左手杖 ::
Left -> Right   - Axis 0
Up   -> Down    - Axis 1
右手杖 ::
Left -> Right   - Axis 2
Up   -> Down    - Axis 3
左触发器 ::
Out -> In - Axis 4
右触发器 ::
Out -> In - Axis 5
按钮 ::
Cross Button    - Button 0
Circle Button   - Button 1
Square Button   - Button 2
Triangle Button - Button 3
Share Button    - Button 4
PS Button       - Button 5
Options Button  - Button 6
L. Stick In     - Button 7
R. Stick In     - Button 8
Left Bumper     - Button 9
Right Bumper    - Button 10
D-pad Up        - Button 11
D-pad Down      - Button 12
D-pad Left      - Button 13
D-pad Right     - Button 14
Touch Pad Click - Button 15
《侏儒游戏1》
轴和HAT映射按从-1到+1的顺序列出。
X-Box 360 Controller (name: "Controller (XBOX 360 For Windows)")
在PYGAME 1中,X360控制器映射有5个轴、10个按钮和1顶帽子。
左手杖 ::
Left -> Right   - Axis 0
Up   -> Down    - Axis 1
右手杖 ::
Left -> Right   - Axis 4
Up   -> Down    - Axis 3
左触发器和右触发器 ::
RT -> LT - Axis 2
按钮 ::
A Button        - Button 0
B Button        - Button 1
X Button        - Button 2
Y Button        - Button 3
Left Bumper     - Button 4
Right Bumper    - Button 5
Back Button     - Button 6
Start Button    - Button 7
L. Stick In     - Button 8
R. Stick In     - Button 9
Hat/D-pad ::
Down -> Up      - Y Axis
Left -> Right   - X Axis
PlayStation 4控制器(名称:“无线控制器”)
在PYGAME 1中,PS4控制器映射有6个轴、14个按钮和1顶帽子。
左手杖 ::
Left -> Right   - Axis 0
Up   -> Down    - Axis 1
右手杖 ::
Left -> Right   - Axis 2
Up   -> Down    - Axis 3
左触发器 ::
Out -> In - Axis 5
右触发器 ::
Out -> In - Axis 4
按钮 ::
Cross Button    - Button 0
Circle Button   - Button 1
Square Button   - Button 2
Triangle Button - Button 3
Left Bumper     - Button 4
Right Bumper    - Button 5
L. Trigger(Full)- Button 6
R. Trigger(Full)- Button 7
Share Button    - Button 8
Options Button  - Button 9
L. Stick In     - Button 10
R. Stick In     - Button 11
PS Button       - Button 12
Touch Pad Click - Button 13
Hat/D-pad ::
Down -> Up      - Y Axis
Left -> Right   - X Axis
Edit on GitHub