10.9. 使用要素类型
特征类型与数据存储严格相关;后者是数据容器,前者是几何同质数据集。 在某些情况下,特征类型和数据存储之间存在一对一的关系, 就像我们创建的tiger的单个shapefile的数据存储一样。 通常,数据存储连接到许多要素类型。与其他资源一样, 您可以使用REST操作列出信息、添加和删除项以及修改配置。
资源公开如下:
/workspaces/< ws >/datastores/featuretypes/
在这里, ws 指系统中存在的工作区,以及 ft 要对其执行操作的功能类型。
检索有关要素类型的信息时,将使用前面资源使用的GET操作。 输出相当长,这取决于它拥有多少属性。如下所示:
<featureType>
<name>ne_110m_admin_0_countries</name>
<nativeName>ne_110m_admin_0_countries</nativeName>
<namespace>
<name>NaturalEarth</name>
<atom:link xmlns:atom="http://www.w3.org/2005/Atom"rel="alternate" href="http://localhost:8080/geoserver/rest/namespaces/NaturalEarth.xml" type="application/xml"/>
</namespace>
<title>ne_110m_admin_0_countries</title>
<description>Contents of file</description>
<keywords>
<string>features</string>
<string>ne_110m_admin_0_countries</string>
<nativeCRS>GEOGC S["GCS_WGS_1984",DATUM["D_WGS_1984",[SPHEROID["WGS_1984", 6378137.0, 298.257223563]],][PRIMEM["Greenwich", 0.0],][UNIT["degree", 0.017453292519943295], AXIS["Longitude", EAST],][AXIS["Latitude", NORTH]]</nativeCRS>]
<srs>EPSG:4326</srs>
<nativeBoundingBox>
<minx>-179.99999999999997</minx>
<maxx>180.00000000000014</maxx>
<miny>-90.00000000000003</miny>
<maxy>83.64513000000001</maxy>
<crs>GEOGC S["GCS_WGS_1984",DATUM["D_WGS_1984",[SPHEROID["WGS_1984", 6378137.0, 298.257223563]],][PRIMEM["Greenwich", 0.0],][UNIT["degree", 0.017453292519943295],][AXIS["Longitude", EAST],][AXIS["Latitude", NORTH]]</crs>]
</nativeBoundingBox>
<latLonBoundingBox>
<minx>-179.99999999999997</minx>
<maxx>180.00000000000014</maxx>
<miny>-90.00000000000003</miny>
<maxy>83.64513000000001</maxy>
<crs>GEOGC S["WGS84(DD)",基准面[";WGS84";,[SPHEROID["WGS84", 6378137.0, 298.257223563]],][PRIMEM["Greenwich", 0.0],][UNIT["degree", 0.017453292519943295],][AXIS["Geodetic longitude", EAST],][AXIS["Geodetic latitude", NORTH]]</crs>]
</latLonBoundingBox>
<projectionPolicy>NONE</projectionPolicy>
<enabled>true</enabled>
<store class="dataStore">
<name>Natural Earth Countries</name>
<atom:link xmlns:atom="http://www.w3.org/2005/Atom" rel="alternate" href="http://localhost:8080/geoserver/rest/workspaces/NaturalEarth/datastores/Natural+Earth+Countries.xml" type="application/xml"/>
</store>
<maxFeatures>0</maxFeatures>
<numDecimals>0</numDecimals>
<attributes>
<attribute>
<name>the_geom</name>
<minOccurs>0</minOccurs>
<maxOccurs>1</maxOccurs>
<nillable>true</nillable>
<binding>com.vividsolutions.jts.geom.MultiPolygon</binding>
</attribute>
…
</attributes>
</featureType>
10.10. 行动时间–添加新的shapefile
我们已经添加了一个shapefile数据存储,现在我们要上载一个新shapefile并在GeoServer 上配置它。 当然,我们将只使用 HTTP 操作来完成任务。
1.我们将使用自然地球资源库中的一个新层。我们将使用一个小型shapefile,即小型世界管理边界:
~$ wget http://www.naturalearthdata.com/http//www.naturalearthdata.com/download/110m/cultural/110m-admin-0countries.zip
2.不要解压缩存档;我们将以ZIP格式将其转发给GeoServer ,并使用PUT操作。 注意,对于指定内容类型的头,我们将向GeoServer 传输一个zip文件; 这样,我们就可以在远程节点上发布数据集,而无需访问远程文件系统。 我们也在创建一个新的数据存储, 自然+地球+国家 ;URL指向此不存在的数据存储:
>>> !curl -v -u admin:geoserver -XPUT -H 'Content-type: application/zip' -T ne_10m_admin_0_countries.zip.zip http://118.190.135.194:8080/geoserver/rest/workspaces/geonode/datastores/Natural+Earth+Countries/file.shp
* Expire in 0 ms for 6 (transfer 0x564c364a0f50)
*   Trying 118.190.135.194...
* TCP_NODELAY set
* Expire in 200 ms for 4 (transfer 0x564c364a0f50)
* Connected to 118.190.135.194 (118.190.135.194) port 8080 (#0)
* Server auth using Basic with user 'admin'
> PUT /geoserver/rest/workspaces/geonode/datastores/Natural+Earth+Countries/file.shp HTTP/1.1
> Host: 118.190.135.194:8080
> Authorization: Basic YWRtaW46Z2Vvc2VydmVy
> User-Agent: curl/7.64.0
> Accept: /
> Content-type: application/zip
> Content-Length: 4899605
> Expect: 100-continue
>
* Expire in 1000 ms for 0 (transfer 0x564c364a0f50)
< HTTP/1.1 100
* We are completely uploaded and fine
< HTTP/1.1 201
< Set-Cookie: JSESSIONID=6C0FAC28480235CB228566DFF90251C2; Path=/geoserver; HttpOnly
< Content-Length: 0
< Date: Sat, 16 May 2020 11:05:11 GMT
<
* Connection #0 to host 118.190.135.194 left intact
3.当然,Python也可以这样做。请注意,读取ZIP文件与读取XML文件几乎相同。
这个 rb 参数指定要读取二进制文件:
>>> import requests
>>> myUrl = 'http://118.190.135.194:8080/geoserver/rest/workspaces/geonode/datastores/Natural+Earth+Countries/file.shp'
>>> file = open('ne_10m_admin_0_countries.zip.zip','rb')
>>> payload = file.read()
>>> headers = {'Content-type': 'application/zip'}
>>> resp = requests.put(myUrl, auth=('admin','geoserver'),data=payload, headers=headers)
>>> resp.status_code
201
4.现在看看web界面,列出数据存储;有一个新的界面:

图 10.3 nec
5.如果查看详细信息,可以看到shapefile现在存储在GeoServer 数据文件夹中:
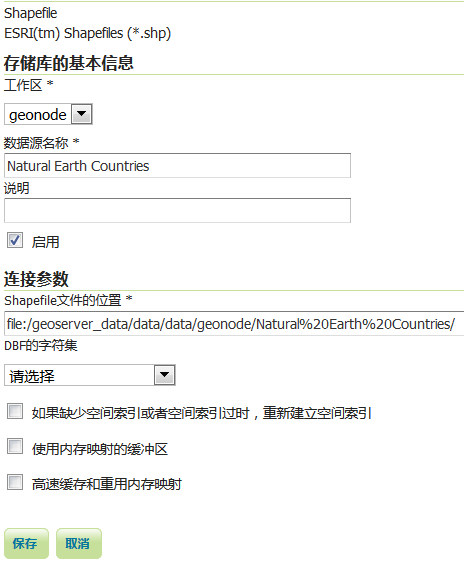
图 10.4 nec_sto
6.当然,GeoServer 为要素类型创建了一个新图层, 填充所有参数并启用它们:

图 10.5 postgis_sto
7.根据几何图形类型,GeoServer 将指定默认样式, 以便您还可以查看数据预览:
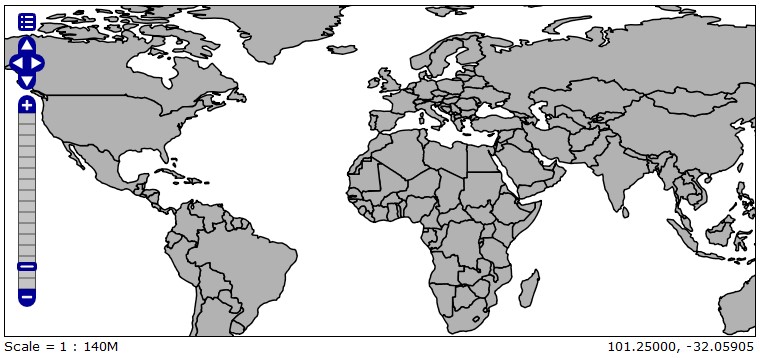
图 10.6 image224
只需执行一个操作即可创建数据存储、要素类型和图层。 GeoServer 可以管理从数据集中检索所有需要的信息, 并且可以使用许多默认值进行管理。当然,您可能希望使用不同的样式, 但是REST接口确实使远程管理非常容易。
10.11. 操作时间-添加 PostGIS 表
PostGIS 数据存储是连接到许多要素类型的数据存储之一。 在创建数据存储之后,您可能需要添加新的空间数据。 让我们看看如何做到这一点:
1.在第五章,添加数据,你在 PostGIS 中加载了 tiger counties 。
现在对来自自然地球的管理边界shapefile执行同样的操作; 调用表
ne_110m_admin . 然后使用 PostGIS 连接将表作为新的要素类型添加到工作空间中
NaturalEarth .
请注意,我们向GeoServer 提供的功能类型信息很少;表名是唯一的必需字段:
>>> !curl -v -u admin:geoserver -XPOST -H 'Content-type: text/xml' -H 'Accept: text/xml' -d '<featureType><name>irn_roads_v56d</name></featureType>' http://118.190.135.194:8080/geoserver/rest/workspaces/geonode/datastores/my PostGIS /featuretypes
Note: Unnecessary use of -X or --request, POST is already inferred.
* Expire in 0 ms for 6 (transfer 0x55a878e56f50)
*   Trying 118.190.135.194...
* TCP_NODELAY set
* Expire in 200 ms for 4 (transfer 0x55a878e56f50)
* Connected to 118.190.135.194 (118.190.135.194) port 8080 (#0)
* Server auth using Basic with user 'admin'
> POST /geoserver/rest/workspaces/geonode/datastores/my  PostGIS /featuretypes HTTP/1.1
> Host: 118.190.135.194:8080
> Authorization: Basic YWRtaW46Z2Vvc2VydmVy
> User-Agent: curl/7.64.0
> Content-type: text/xml
> Accept: text/xml
> Content-Length: 54
>
* upload completely sent off: 54 out of 54 bytes
< HTTP/1.1 500
< Set-Cookie: JSESSIONID=90FD59D79CE315BB148B8FCE575ACBF7; Path=/geoserver; HttpOnly
< Transfer-Encoding: chunked
< Date: Sat, 16 May 2020 11:05:47 GMT
< Connection: close
<
* Closing connection 0
Resource named 'irn_roads_v56d' already exists in store: 'my  PostGIS '
2.Python语法如下:
>>> import requests
>>> myUrl = 'http://118.190.135.194:8080/geoserver/rest/workspaces/geonode/datastores/my  PostGIS /featuretypes'
>>> payload = '<featureType><name>irn_rails_ve15</name></featureType>'
>>> headers = {'Content-type': 'text/xml','Accept':'text/xml'}
>>> resp = requests.post(myUrl, auth=('admin','geoserver'),data=payload, headers=headers)
>>> resp.status_code
500
3.查看图层列表,我们可以看到新添加的工作区:

图 10.7 image225
4.新的特性类型工作得很好,当然,我们可以向XML代码添加更多的参数, 以获得更好的层配置。这些示例添加了更详细的说明、一些关键字和默认样式以外的样式:
<featureType>
    <name>World boundaries</name>
    <nativeName>ne_110m_admin</nativeName>
    <title>World boundaries</title>
    <abstract>World administrative boundaries at small scale</ abstract>
    <keywords>
        <string>Political</string>
        <string>World</string>
    </keywords>
<featureType>
5.但还有更多。不仅可以添加现有表,还可以创建新表。 创建新表时,必须指定图层所需的所有属性:
<featureType>
    <name>rivers</name>
    <nativeName>rivers</nativeName>
    <title>World River</title>
    <srs>EPSG:4326</srs>
    <attributes>
        <attribute>
            <name>geom</name>
            <binding>com.vividsolutions.jts.geom.Polyline</binding>
        </attribute>
        <attribute>
            <name>name</name>
            <binding>java.lang.String</binding>
            <length>30</length>
        </attribute>
        <attribute>
            <name>country_code</name>
            <binding>java.lang.String</binding>
            <length>8</length>
        </attribute>
    </attributes>
</featureType>
6.现在您必须发送POST请求来创建功能。 当然,您必须将其发送到 PostGIS 数据存储:
>>> !curl -v -u admin:geoserver -XPOST -T rivers.xml -H 'Content-type:text/xml' -H 'Accept: text/xml' http://118.190.135.194:8080/geoserver/rest/workspaces/geonode/datastores/my PostGIS /featuretypes
* Expire in 0 ms for 6 (transfer 0x559d474adf50)
*   Trying 118.190.135.194...
* TCP_NODELAY set
* Expire in 200 ms for 4 (transfer 0x559d474adf50)
* Connected to 118.190.135.194 (118.190.135.194) port 8080 (#0)
* Server auth using Basic with user 'admin'
> POST /geoserver/rest/workspaces/geonode/datastores/my  PostGIS /featuretypes HTTP/1.1
> Host: 118.190.135.194:8080
> Authorization: Basic YWRtaW46Z2Vvc2VydmVy
> User-Agent: curl/7.64.0
> Content-type:text/xml
> Accept: text/xml
> Content-Length: 629
> Expect: 100-continue
>
* Expire in 1000 ms for 0 (transfer 0x559d474adf50)
< HTTP/1.1 100
* We are completely uploaded and fine
< HTTP/1.1 500
< Set-Cookie: JSESSIONID=E6C2537C36E953CCFCF2C0D8249E4F32; Path=/geoserver; HttpOnly
< Transfer-Encoding: chunked
< Date: Sat, 16 May 2020 11:05:47 GMT
< Connection: close
<
* Closing connection 0
Resource named 'rivers' already exists in store: 'my  PostGIS '
7.Python中的相同请求类似于以下代码:
>>> myUrl = 'http://118.190.135.194:8080/geoserver/rest/workspaces/geonode/datastores/my  PostGIS /featuretypes'
>>> file = open('rivers.xml','r')
>>> payload = file.read()
>>> headers = {'Content-type': 'text/xml','Accept':'text/xml'}
>>> resp = requests.post(myUrl, auth=('admin','geoserver'), data=payload, headers=headers)
>>> resp.status_code
500
8.现在看看图层列表;有一个新项:
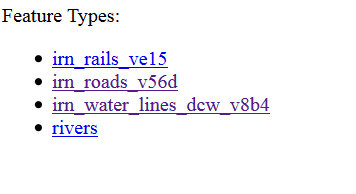
图 10.8 postgis_att
9.如果转到层的详细信息页,可以看到SRS已正确设置为4326。 但作为空特征类型,边界框不一致。以下屏幕截图中提到的属性是您指定的属性:

图 10.9 postgis_rr
您学习了如何管理指向数据的链接的要素类型。要素类型严格连接到图层, 即地图表示。添加或创建新要素类型时,已经隐式创建了图层。 要修改数据的发布方式,必须管理发布元素。
在 PostGIS 中创建一个新表非常简单。现在是探索其他数据存储的时候了。 创建新shapefile的文件夹数据存储并在其中创建新shapefile。 使用多边形几何体和三个属性、对象创建日期的日期类型、 验证字段的布尔值和对象代码的字符串字段。