10.2. 管理数据
每个地图服务的核心是数据。我们需要创建用于将数据集分组、 连接包含数据的数据库和文件夹、添加要素类型以及配置其选项的工作空间。 GeoServer 的REST接口为它们中的每一个公开资源。
10.3. 使用工作区和名称空间
工作区 是可用于对数据分组的逻辑实体。 工作区始终链接到 命名空间URI 它为它定义了一个web引用。 REST接口定义了两个可以用来访问这些元素的资源。具体如下:
/workspace
/namespace
URI:统一资源标识符(Uniform Resource Identifier,URI)是一个用于标识某一互联网资源名称的字符串。 该种标识允许用户对任何(包括本地和互联网)的资源通过特定的协议进行交互操作。 URI由包括确定语法和相关协议的方案所定义。 Web上可用的每种资源 -HTML文档、图像、视频片段、程序等 - 由一个通用资源标识符(Uniform Resource Identifier, 简称“URI”)进行定位。
为这两个资源定义了GET、POST、PUT和DELETE操作,是使用REST接口的方法, 允许您查看、创建、更新和删除工作区和名称空间。
10.4. 行动时间-管理工作区
我们将对工作区使用REST操作。在本节中,与本章中包含的其他部分一样, 我们将使用cURL和Python执行相同的操作。这些示例在Linux shell中显示, 但是cURL和Python语法在Windows shell中是相同的。
1.第一步是查看在GeoServer 实例中定义了哪些工作空间。这需要一个GET操作。 下面的代码向您展示了语法。cURL有很多选项, 您可以查看所有这些选项 curl –help 来自Linux和Windows的命令。 在Linux上,您还可以使用命令查看手册 man curl . 我们使用的第一个选项是 –u . 它代表用户身份验证,您必须插入在中设置的用户ID和密码,在第二章, GeoServer 入门 ,我们修改默认的密码。
这个 -v 选项告诉cURL详细运行,因此它将输出有关请求处理的详细信息。 这个 -X 选项定义要用于发送请求的 HTTP 操作。如果不插入它, cURL将假定GET为其默认值。您可以避免编写该选项,尽管插入该选项可能会使代码更清晰。 这个 -H 选项允许您向请求添加标题。您可以根据需要重复此选项多次,以指定多个标题。 在本例中,我们使用它使服务器知道我们将接受XML格式作为响应。在那之后, 我们有我们想要的URL请求。URL由一个基本部分组成,对于所有操作都是相同的, 也就是说, http://yourhostname:yourport/geoserver/rest , 以及指定操作的操作部分。最后,我们添加 -o 将响应写入文件的选项:
>>> !curl -v -u admin:geoserver -XGET http://118.190.135.194:8080/geoserver/rest/workspaces -o workspaces.xml
Note: Unnecessary use of -X or --request, GET is already inferred.
* Expire in 0 ms for 6 (transfer 0x55afb2926f50)
*   Trying 118.190.135.194...
* TCP_NODELAY set
* Expire in 200 ms for 4 (transfer 0x55afb2926f50)
  % Total    % Received % Xferd  Average Speed   Time    Time     Time  Current
                                 Dload  Upload   Total   Spent    Left  Speed
  0     0    0     0    0     0      0      0 --:--:-- --:--:-- --:--:--     0* Connected to 118.190.135.194 (118.190.135.194) port 8080 (#0)
* Server auth using Basic with user 'admin'
> GET /geoserver/rest/workspaces HTTP/1.1
> Host: 118.190.135.194:8080
> Authorization: Basic YWRtaW46Z2Vvc2VydmVy
> User-Agent: curl/7.64.0
> Accept: /
>
< HTTP/1.1 200
< Set-Cookie: JSESSIONID=579DE416D4DB78FEDE833990AD7D162C; Path=/geoserver; HttpOnly
< Content-Type: application/json
< Transfer-Encoding: chunked
< Date: Sat, 16 May 2020 10:28:07 GMT
<
{ [234 bytes data]
100   228    0   228    0     0   2375      0 --:--:-- --:--:-- --:--:--  2375
* Connection #0 to host 118.190.135.194 left intact
>>> !cat workspaces.xml
{"workspaces":{"workspace":[{"name":"tiger","href":"http://118.190.135.194:8080/geoserver/rest/workspaces/tiger.json"},{"name":"geonode","href":"http://118.190.135.194:8080/geoserver/rest/workspaces/geonode.json"}]}}
>>> import json
>>> json.loads(open('workspaces.xml').read())
{'workspaces': {'workspace': [{'name': 'tiger',
    'href': 'http://118.190.135.194:8080/geoserver/rest/workspaces/tiger.json'},
   {'name': 'geonode',
    'href': 'http://118.190.135.194:8080/geoserver/rest/workspaces/geonode.json'}]}}
2.显示了很多信息。当遇到麻烦时,这可能非常有用,您需要调试错误。 以
> 开头的行表示“由cURL发送的头数据”,而 <
表示“cURL接收的头数据”。
在本例中,我们只查看从GeoServer 接收到的状态代码;它报告
200 ,即 HTTP 代码OK:
3.您可能需要检查 workspaces.xml 文件已创建。为此,请运行以下命令:
~/REST$ ls -al
total 12 drwxrwxr-x 2 stefano stefano 4096 Oct 16 21:59 ./
drwxr-xr-x 9 stefano stefano 4096 Oct 16 21:11 ../
-rw-rw-r-- 1 stefano stefano 1100 Oct 16 21:59 workspaces.xml
4.在分析响应文件内容之前,让我们使用Python执行相同的请求。 从控制台启动它并导入 requests 模块如图所示:
>>> import requests
5.现在为URL定义一个新的字符串变量:
>>> myUrl = 'http://118.190.135.194:8080/geoserver/rest/workspaces'
6.此外,还提供了一个用于标题的Python字典:
>>> headers = {'Accept': 'text/xml'}
7.我们已经准备好发送请求 requests对象对每个 HTTP 操作都有一个方法, 并且以一种真正的“Pythonic”方式,名称就是操作。 必须通过传递URL、头和身份验证的参数来调用该方法:
>>> resp = requests.get(myUrl,auth=('admin','geoserver'),headers=headers)
>>> resp.status_code
401
>>> # resp = requests.get(myUrl,auth=('admin','geoserver'),headers=headers)
>>> resp = requests.get(myUrl,auth=('admin','geoserver'))
>>> resp.status_code
200
如果不返回200响应码,可以将,headers=headers删除再进行测试。
8.所以响应被保存在名为 resp . Python解释器没有抛出任何异常, 所以一切都应该正常;但是我们如何检查GeoServer 回复了什么? 这个 resp 变量实际上是在请求库中定义的响应对象, 它有方法来提取有关响应的信息。从查看响应的状态代码开始。
>>> resp.status_code
200
9.很好!它成功了。但是,如果要提取响应体以列出它或将其保存到文件中, 该怎么办?这个 response.text 方法是您要查找的内容,因此让我们将结果保存到一个文件中:
>>> file = open('/tmp/workspaces_py.xml','w')
>>> file.write(resp.text)
>>> file.close()
10.现在应该有两个看起来完全相同的XML文件了。打开其中一个并查看其内容。 它列出了在GeoServer 上定义的工作区,还提供了一个URL来引用其中的每个工作区。具体如下:
>>> with open('workspaces_py.xml') as fo:
>>>     for x in fo.readlines():
>>>         print(x)
{"workspaces":{"workspace":[{"name":"geonode","href":"http://118.190.135.194:8080/geoserver/rest/workspaces/geonode.json"}]}}
11.现在使用XML文件中的信息来检索关于第一个工作区的信息。 在cURL中,键入以下命令:
>>> !curl -u admin:password -XGET -H 'Accept: text/xml' http://118.190.135.194:8080/geoserver/rest/workspaces/geonode -o /tmp/NaturalEarth.xml
  % Total    % Received % Xferd  Average Speed   Time    Time     Time  Current
                                 Dload  Upload   Total   Spent    Left  Speed
100  1068  100  1068    0     0    226      0  0:00:04  0:00:04 --:--:--   303
12.在Python中执行同样的操作:
>>> myUrl = 'http://118.190.135.194:8080/geoserver/rest/workspaces/geonode'
>>> headers = {'Accept': 'text/xml'}
>>> # resp = requests.get(myUrl,auth=('admin','password'),headers=he aders)
>>> resp = requests.get(myUrl,auth=('admin','geoserver'))
13.检索到的信息包含用于浏览链接到工作区的数据存储的URL:
>>> import json
>>> from pprint import pprint
>>> cnt = json.loads(resp.text)
>>> pprint(cnt)
{'workspace': {'coverageStores': 'http://118.190.135.194:8080/geoserver/rest/workspaces/geonode/coveragestores.json',
               'dataStores': 'http://118.190.135.194:8080/geoserver/rest/workspaces/geonode/datastores.json',
               'isolated': False,
               'name': 'geonode',
               'wmsStores': 'http://118.190.135.194:8080/geoserver/rest/workspaces/geonode/wmsstores.json',
               'wmtsStores': 'http://118.190.135.194:8080/geoserver/rest/workspaces/geonode/wmtsstores.json'}}
14.现在检索cURL中有关名称空间的信息:
>>> !curl -v -u admin:geoserver -XGET http://118.190.135.194:8080/geoserver/rest/namespaces -o namespaces.xml
Note: Unnecessary use of -X or --request, GET is already inferred.
* Expire in 0 ms for 6 (transfer 0x561bc2d52f50)
*   Trying 118.190.135.194...
* TCP_NODELAY set
* Expire in 200 ms for 4 (transfer 0x561bc2d52f50)
  % Total    % Received % Xferd  Average Speed   Time    Time     Time  Current
                                 Dload  Upload   Total   Spent    Left  Speed
  0     0    0     0    0     0      0      0 --:--:-- --:--:-- --:--:--     0* Connected to 118.190.135.194 (118.190.135.194) port 8080 (#0)
* Server auth using Basic with user 'admin'
> GET /geoserver/rest/namespaces HTTP/1.1
> Host: 118.190.135.194:8080
> Authorization: Basic YWRtaW46Z2Vvc2VydmVy
> User-Agent: curl/7.64.0
> Accept: /
>
< HTTP/1.1 200
< Set-Cookie: JSESSIONID=DDE73E827AD04DCD43E6B07661C9B6B0; Path=/geoserver; HttpOnly
< Content-Type: application/json
< Transfer-Encoding: chunked
< Date: Thu, 07 May 2020 03:20:23 GMT
<
{ [234 bytes data]
100   228    0   228    0     0   2451      0 --:--:-- --:--:-- --:--:--  2451
* Connection #0 to host 118.190.135.194 left intact
>>> !cat namespaces.xml
{"namespaces":{"namespace":[{"name":"tiger","href":"http://118.190.135.194:8080/geoserver/rest/namespaces/tiger.json"},{"name":"geonode","href":"http://118.190.135.194:8080/geoserver/rest/namespaces/geonode.json"}]}}
15.在Python中检索相同的内容:
>>> myUrl = 'http://118.190.135.194:8080/geoserver/rest/namespaces'
>>> headers = {'Accept': 'text/xml'}
>>> resp = requests.get(myUrl,auth=('admin','geoserver'))
>>> cnt = json.loads(resp.text)
>>> pprint(cnt)
{'namespaces': {'namespace': [{'href': 'http://118.190.135.194:8080/geoserver/rest/namespaces/geonode.json',
                               'name': 'geonode'}]}}
16.在响应中,您可以看到名称空间列表,它与工作区列表非常相似。 正如我们之前所写的,它们被限制在一起.
17.现在看看关于单个名称空间的信息。第一个cURL:
>>> !curl -v -u admin:geoserver -XGET -H 'Content-type: text/xml' http://118.190.135.194:8080/geoserver/rest/workspaces/geonode -o NaturalEarth.xml
Note: Unnecessary use of -X or --request, GET is already inferred.
* Expire in 0 ms for 6 (transfer 0x55f6072b1f50)
*   Trying 118.190.135.194...
* TCP_NODELAY set
* Expire in 200 ms for 4 (transfer 0x55f6072b1f50)
  % Total    % Received % Xferd  Average Speed   Time    Time     Time  Current
                                 Dload  Upload   Total   Spent    Left  Speed
  0     0    0     0    0     0      0      0 --:--:-- --:--:-- --:--:--     0* Connected to 118.190.135.194 (118.190.135.194) port 8080 (#0)
* Server auth using Basic with user 'admin'
> GET /geoserver/rest/workspaces/geonode HTTP/1.1
> Host: 118.190.135.194:8080
> Authorization: Basic YWRtaW46Z2Vvc2VydmVy
> User-Agent: curl/7.64.0
> Accept: /
> Content-type: text/xml
>
< HTTP/1.1 200
< Set-Cookie: JSESSIONID=E651B0BBB0AA0DF0F6087D2937B2794E; Path=/geoserver; HttpOnly
< Content-Type: application/json
< Transfer-Encoding: chunked
< Date: Mon, 27 Apr 2020 01:18:46 GMT
<
{ [462 bytes data]
100   455    0   455    0     0   4690      0 --:--:-- --:--:-- --:--:--  4690
* Connection #0 to host 118.190.135.194 left intact
18.然后在Python中:
>>> import requests
>>> myURL='http://118.190.135.194:8080/geoserver/rest/namespaces/geonode'
>>> resp=requests.get(myURL,auth=('admin','geoserver'))
>>> resp.status_code
200
19.响应包含命名空间的前缀名称,即链接的工作区、 命名空间URI和用于检索链接到命名空间的功能类型的URL:
>>> import json
>>> from pprint import pprint
>>> cnt = json.loads(resp.text)
>>> pprint(cnt)
>>> resp.text
{'namespace': {'isolated': False,
               'prefix': 'geonode',
               'uri': 'http://www.geonode.org/'}}
'{"namespace":{"prefix":"geonode","uri":"http:\/\/www.geonode.org\/","isolated":false}}'
20.到目前为止,您已经检索了信息;现在尝试创建一个新的命名空间。 在cURL中,我们需要用 -X 选项并向GeoServer 发送一些数据, 即包含要创建的命名空间信息的XML代码。我们使用 -d 选择:
>>> !curl -v -u admin:geoserver -XPOST -H "Content-type: text/xml" -d '<namespace><prefix>newWorkspace</prefix><uri>http://geoserver.org/</uri></namespace>' http://118.190.135.194:8080/geoserver/rest/namespaces
Note: Unnecessary use of -X or --request, POST is already inferred.
* Expire in 0 ms for 6 (transfer 0x556614888f50)
*   Trying 118.190.135.194...
* TCP_NODELAY set
* Expire in 200 ms for 4 (transfer 0x556614888f50)
* Connected to 118.190.135.194 (118.190.135.194) port 8080 (#0)
* Server auth using Basic with user 'admin'
> POST /geoserver/rest/namespaces HTTP/1.1
> Host: 118.190.135.194:8080
> Authorization: Basic YWRtaW46Z2Vvc2VydmVy
> User-Agent: curl/7.64.0
> Accept: /
> Content-type: text/xml
> Content-Length: 84
>
* upload completely sent off: 84 out of 84 bytes
< HTTP/1.1 201
< Set-Cookie: JSESSIONID=DD2BF93667267C4AF6FC0797F46CF791; Path=/geoserver; HttpOnly
< Location: http://118.190.135.194:8080/geoserver/rest/namespaces/newWorkspace
< Content-Type: application/json;charset=ISO-8859-1
< Content-Length: 12
< Date: Sun, 26 Apr 2020 13:23:47 GMT
<
* Connection #0 to host 118.190.135.194 left intact
newWorkspace
21.要在Python中执行同样的操作,可以将XML代码预先保存在文件中:
>>> import requests
>>> myUrl = 'http://118.190.135.194:8080/geoserver/rest/namespaces'
>>> headers = {'Content-type': 'text/xml'}
>>> payload = '<namespace><prefix>newWorkspace</prefix><uri>http://geoserver.org/</uri></namespace>'
>>> resp = requests.post(myUrl,auth=('admin','geoserver'), data=payload,headers=headers)
>>> resp.status_code
500
创建图层,发布等更多的操作可以参考官方文档(https://docs.geoserver.org/stable/en/user/rest/workspaces.html)
22.呵呵!我们有个错误。500是内部服务器错误的 HTTP 代码。实际上, 不能创建重复的命名空间。查看GeoServer 日志时,您应该看到如下内容:
org.geoserver.rest.RestletException:
java.lang.IllegalArgumentException: Namespace with prefix
'newWorkspace' already exists.
at
org.geoserver.rest.ReflectiveResource.handleException(ReflectiveResource.
at
org.geoserver.rest.ReflectiveResource.handlePost(ReflectiveResource
23.打开 GeoServer web界面并查看工作区列表;现在可以看到您创建的工作区列表, 如果单击它,您将看到您定义的命名空间URI:
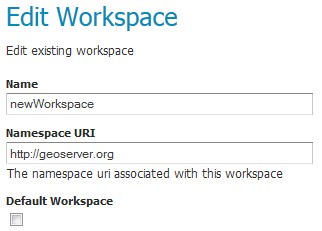
图 10.1 image219
24.现在我们要为新工作区设置一个更合适的URI。为此,我们将使用PUT操作。 使用cURL,如下所示:
>>> !curl -u admin:geoserver -XPUT -H 'Content-type: text/xml' -H 'Accept: text/xml' -d '<namespace><prefix>newWorkspace</ prefix><uri>http://localhost:8080/geoserver</uri></namespace>' http://118.190.135.194:8080/geoserver/rest/workspaces/newWorkspace
25.在Python中,如下所示:
>>> myUrl = 'http://118.190.135.194:8080/geoserver/rest/namespaces/newWorkspace'
>>> payload = '<namespace><prefix>newWorkspace</ prefix><uri>http://localhost:8080/geoserver</uri></namespace>'
>>> headers = {'Content-type': 'text/xml'}
>>> resp = requests.put(myUrl,auth=('admin','geoserver'),data=payload,headers=headers)
>>> resp.status_code
500
26.最后一个操作是删除。要从cURL中的GeoServer 配置中删除新工作区, 请运行以下命令:
>>> !curl -v -u admin:geoserver -XDELETE -H 'Content-type: text/xml' http://118.190.135.194:8080/geoserver/rest/workspaces/newWorkspace
* Expire in 0 ms for 6 (transfer 0x564203dd7f50)
*   Trying 118.190.135.194...
* TCP_NODELAY set
* Expire in 200 ms for 4 (transfer 0x564203dd7f50)
* Connected to 118.190.135.194 (118.190.135.194) port 8080 (#0)
* Server auth using Basic with user 'admin'
> DELETE /geoserver/rest/workspaces/newWorkspace HTTP/1.1
> Host: 118.190.135.194:8080
> Authorization: Basic YWRtaW46Z2Vvc2VydmVy
> User-Agent: curl/7.64.0
> Accept: /
> Content-type: text/xml
>
< HTTP/1.1 200
< Set-Cookie: JSESSIONID=B33842C9BF8F43BD7B404EC74A485DDC; Path=/geoserver; HttpOnly
< Content-Length: 0
< Date: Sun, 26 Apr 2020 13:23:55 GMT
<
* Connection #0 to host 118.190.135.194 left intact
27.在Python中,运行以下代码:
>>> myUrl = 'http://118.190.135.194:8080/geoserver/rest/workspaces/newWorkspace'
>>> headers = {'Content-type':'text/xml'}
>>> resp = requests.delete(myUrl, auth=('admin','geoserver'),headers=headers)
>>> resp.status_code
404
28.当然,不能两次删除同一个工作区;这就是为什么出现错误的原因。 404是不存在文档的 HTTP 代码。
10.5. 刚刚发生了什么?
您学习了如何与REST接口交互。您对名称空间和工作空间进行了此操作, 但所学的基本概念适用于所有REST操作。重要的是,您要了解REST是无状态的。 您在示例中发送的每个请求都完全不知道您以前做了什么。 您可以将REST操作链接到一个链中,但这取决于您从响应中提取信息并相应地构建请求。
如果您对Python代码有点困惑,那么有很多免费资源可以用来探索这种语言。 你将学习它非常快,并添加一个强大的工具,你的地理信息系统技能。 以下链接将帮助您学习Python: