阈值设置
本节中的示例位于源代码中的 mahotas/demos/thresholding.py 。
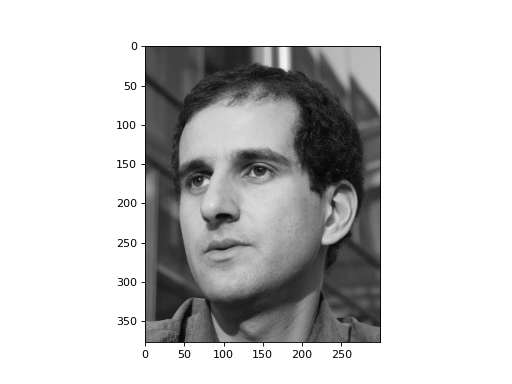
我们从一幅图像开始,一幅灰度图像::
import mahotas.demos
photo = mahotas.demos.load('luispedro')
photo = photo.astype(np.uint8)
在2013年10月之前, mahotas.demos.load 函数不存在,您需要明确指定路径::
luispedro_image = '../../mahotas/demos/data/luispedro.jpg'
photo = mahotas.imread(luispedro_image, as_grey=True)
我们转换为 np.uint8 是因为 as_grey 返回浮点图像(这样做有很好的理由,也有反对它的很好的理由,因为截断比返回更容易,它返回 np.uint8 )。
import mahotas
import mahotas.demos
import numpy as np
from pylab import imshow, gray, show
from os import path

photo = mahotas.demos.load('luispedro', as_grey=True)
photo = photo.astype(np.uint8)

gray()
imshow(photo)
show()
(Source code, png, hires.png, pdf)

阈值函数有一个简单的接口:它们获取图像并返回值。最著名的阈值方法之一是Otsu的方法:
T_otsu = mahotas.otsu(photo)
print(T_otsu)
imshow(photo > T_otsu)
show()
指纹 115 。
import mahotas
import mahotas.demos
import numpy as np
from pylab import imshow, gray, show
from os import path

photo = mahotas.demos.load('luispedro', as_grey=True)
photo = photo.astype(np.uint8)


T_otsu = mahotas.otsu(photo)
print(T_otsu)
gray()
imshow(photo > T_otsu)
show()
(Source code, png, hires.png, pdf)
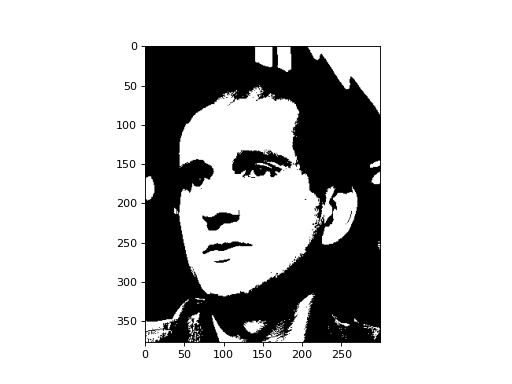
另一种方法是Riddler-Calvard方法:
T_rc = mahotas.rc(photo)
print(T_rc)
imshow(photo > T_rc)
show()
在这张图片中,它打印的内容与大津几乎相同: 115.68 。阈值图像完全相同:
import mahotas
import mahotas.demos
import numpy as np
from pylab import imshow, gray, show
from os import path

photo = mahotas.demos.load('luispedro', as_grey=True)
photo = photo.astype(np.uint8)


T_rc = mahotas.rc(photo)
print(T_rc)
gray()
imshow(photo > T_rc)
show()
(Source code, png, hires.png, pdf)

另请参阅 labeled documentation 这与阈值相结合会非常有帮助。
API文档
这个 mahotas.thresholding 模块包含阈值函数,但它们在Main中也可用 mahotas 命名空间。
阈值模块
阈值函数。
这些函数返回 the numeric threshold 。为了获得一个 thresholded image ,您可以执行以下操作:
T_otsu = mh.otsu(image)
binarized_image = (image > T_otsu)
具有 ignore_zeros 参数在计算阈值时将仅考虑非零像素。
- 大津(Otsu):
大津法
- RC():
里德勒-卡尔瓦德法
- 伯恩森:
Bernsen阈值
- 格本森:
广义Bernsen阈值
- mahotas.thresholding.bernsen(f, radius, contrast_threshold, gthresh={128})
Bernsen局部阈值
- 参数:
- fNdarray
输入图像
- radius整数
圆的半径(考虑“局部”)
- contrast_threshold整数
对比度阈值
- gthresh数字,可选
在低对比度区域回落的全局阈值
- 退货:
- thresholded二元ndarray
参见
gbernsen函数广义Bernsen阈值
- mahotas.thresholding.gbernsen(f, se, contrast_threshold, gthresh)
广义Bernsen局部阈值
- 参数:
- fNdarray
输入图像
- se布尔ndarray
用于“Locality”的结构化元素
- contrast_threshold整数
对比度阈值
- gthresh数字,可选
在低对比度区域回落的全局阈值
- 退货:
- thresholded二元ndarray
参见
bernsen圆形区域下的函数Bernsen阈值
- mahotas.thresholding.otsu(img, ignore_zeros=False)
根据最大类间方差法计算阈值。
示例::
import mahotas as mh
import mahotas.demos

im = mahotas.demos.nuclear_image()
# im is stored as RGB, let's convert to single 2D format:
im = im.max(2)

#Now, we compute Otsu:
t = mh.otsu(im)

# finally, we use the value to form a binary image:
bin = (im > t)
有关方法的详细信息,请参阅维基百科:https://en.wikipedia.org/wiki/Otsu‘s_method
- 参数:
- img将图像表示为一个模糊的数组。
它应该是无符号整数类型。
- ignore_zeros布尔型
是否忽略零值像素(默认值:FALSE)
- 退货:
- T整数
门槛
- mahotas.thresholding.rc(img, ignore_zeros=False)
根据Riddler-Calvard方法计算阈值。
示例::
import mahotas as mh
import mahotas.demos

im = mahotas.demos.nuclear_image()
# im is stored as RGB, let's convert to single 2D format:
im = im.max(2)

#Now, we compute a threshold:
t = mh.rc(im)

# finally, we use the value to form a binary image:
bin = (im > t)
- 参数:
- imgNdarray
任何类型的图像
- ignore_zeros布尔型,可选
是否忽略零值像素(默认值:FALSE)
- 退货:
- T浮动
阀值
- mahotas.thresholding.soft_threshold(f, tval)
软阈值函数::
                    ^
                    |           /
                    |          /
                    |         /
                    |        /
                    |       /
- - - - - - - - - - - - - - - - - ->
             /      |
            /       |
           /        |
          /         |
         /          |
        /           |
- 参数:
- fNdarray
- tval标量
- 退货:
- thresholdedNdarray