安装scikit-learn的开发版本#
本节介绍如何安装 main branch scikit-learn的。这可以通过安装夜间构建或从源代码构建来实现。
安装夜间构建#
scikit-learn项目的持续集成服务器每晚都会为最新Python版本构建、测试和上传轮子包。
安装夜间构建是最快的方法:
尝试将在下一个版本中提供的新功能(即,来自最近合并到主分支的拉取请求的功能);
检查您遇到的错误自上次发布以来是否已修复。
您可以使用 scientific-python-nightly-wheels 来自PyPI注册表的索引 anaconda.org :
pip install --pre --extra-index https://pypi.anaconda.org/scientific-python-nightly-wheels/simple scikit-learn
请注意,首先卸载scikit-learn可能需要能够安装scikit-learn的夜间版本。
从源头建设#
需要从源代码构建才能做出贡献(错误修复、新功能、代码或文档改进)。
使用 Git 查看最新来源 scikit-learn repository 在Github上。:
git clone git@github.com:scikit-learn/scikit-learn.git  # add --depth 1 if your connection is slow
cd scikit-learn
如果您计划提交拉取请求,则应该从您的fork克隆。
Install a recent version of Python (3.10 or later) for instance using conda-forge. Conda-forge provides a conda-based distribution of Python and the most popular scientific libraries.
如果您安装了带有conda的Python,我们建议创建一个专门的 conda environment 具有scikit-learn的所有构建依赖项(即 NumPy, SciPy, Cython, meson-python 和 Ninja) :
conda create -n sklearn-env -c conda-forge python numpy scipy cython meson-python ninja这并不总是必要的,但在激活新创建的conda环境之前打开新提示会更安全。
conda activate sklearn-envAlternative to conda: 您可以使用Python的替代安装,前提是它们足够新( 3.10 或更高)。以下是如何为Linux系统的Python创建构建环境的示例。构建依赖项已安装
pip在专用 virtualenv 为了避免中断系统上安装的其他Python程序:python3 -m venv sklearn-env source sklearn-env/bin/activate pip install wheel numpy scipy cython meson-python ninja
安装编译器 OpenMP 支持您的平台。请参阅说明 Windows , macOS , Linux 和 FreeBSD .
备注
If OpenMP is not supported by the compiler, the build will be done with OpenMP functionalities disabled. This is not recommended since it will force some estimators to run in sequential mode instead of leveraging thread-based parallelism. Setting the
SKLEARN_FAIL_NO_OPENMPenvironment variable (before cythonization) will force the build to fail if OpenMP is not supported.用pip构建项目:
pip install --editable . \
   --verbose --no-build-isolation \
   --config-settings editable-verbose=true
检查安装的scikit-learn是否有以结尾的版本号
.dev0:python -c "import sklearn; sklearn.show_versions()"请参阅 Developer's Guide 和 有用的pytest别名和标志 在您选择的模块上运行测试。
备注
--config-settings editable-verbose=true is optional but recommended
to avoid surprises when you import sklearn. meson-python implements
editable installs by rebuilding sklearn when executing import sklearn.
With the recommended setting you will see a message when this happens,
rather than potentially waiting without feedback and wondering
what is taking so long. Bonus: this means you only have to run the pip
install command once, sklearn will automatically be rebuilt when
importing sklearn.
注意 --config-settings 才支持 pip 版本23.1或更高版本。升级 pip 到兼容版本,运行 pip install -U pip .
从标签构建特定版本#
如果您想构建一个稳定的版本,您可以 git checkout <VERSION> 获取该特定版本的代码,或从github下载该版本的压缩存档。
平台特定指令#
以下是安装具有BEP支持的工作C/C++编译器的说明,以便为每个支持的平台构建scikit-learn Cython扩展。
Windows#
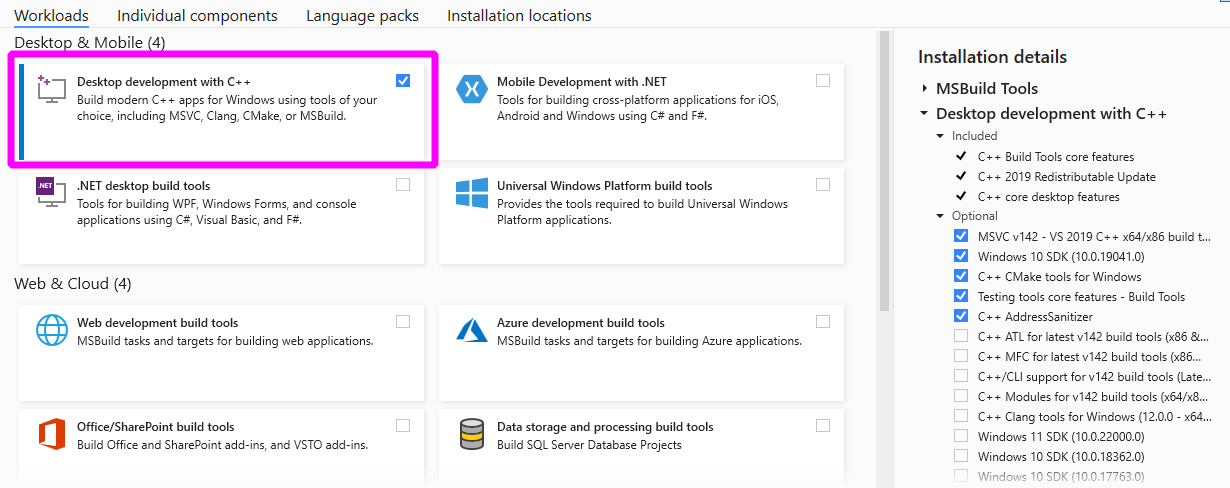
首先,下载 Build Tools for Visual Studio installer .
运行下载的 vs_buildtools.exe 文件,在安装过程中,您需要确保选择“使用C++桌面开发”,类似于此屏幕截图:
通过在您的中运行以下命令来构建scikit-learn sklearn-env conda环境或virtualLev:
pip install --editable . --verbose --no-build-isolation --config-settings editable-verbose=true
macOS#
macOS上的默认C编译器,Apple clang(混淆地别名为 /usr/bin/gcc ),不直接支持BEP。我们提供了两种启用BEP支持的替代方案:
请安装
conda-forge::compilers有孔达;or install
libompwith Homebrew to extend the default Apple clang compiler.
对于Apple Silicon M1硬件,在撰写本文时(2021年1月),已知只有以下conda-forge方法有效。您可以安装 macos/arm64 distribution of conda using the conda-forge installer
来自conda-forge的macOS编译器#
如果您使用conda包管理器(版本>= 4.7),则可以安装 compilers 来自conda-forge渠道的元包,该渠道提供基于llvm工具链的支持BEP的C/C++编译器。
首先安装macOS命令行工具:
xcode-select --install
建议使用专用的 conda environment 要从源代码构建scikit-learn:
conda create -n sklearn-dev -c conda-forge python numpy scipy cython \
    joblib threadpoolctl pytest compilers llvm-openmp meson-python ninja
这并不总是必要的,但在激活新创建的conda环境之前打开新提示会更安全。
conda activate sklearn-dev
make clean
pip install --editable . \
    --verbose --no-build-isolation \
    --config-settings editable-verbose=true
备注
如果您收到任何冲突的依赖性错误消息,请尝试在 $HOME/.condarc 文件.特别是 channel_priority: strict 已知指令会导致此设置出现问题。
您可以使用以下命令检查自定义编译器是否已从conda forge正确安装:
conda list
其中应包括 compilers 和 llvm-openmp .
编译器元包将自动设置自定义环境变量:
echo $CC
echo $CXX
echo $CFLAGS
echo $CXXFLAGS
echo $LDFLAGS
They point to files and folders from your sklearn-dev conda environment
(in particular in the bin/, include/ and lib/ subfolders). For instance
-L/path/to/conda/envs/sklearn-dev/lib should appear in LDFLAGS.
在日志中,您应该看到正在使用conda安装的clang和clang++编译器构建的已编译扩展 -fopenmp 命令行标志。
来自Homebrew的macOS编译器#
另一种解决方案是对macOS上默认附带的clang编译器启用BEP支持。
首先安装macOS命令行工具:
xcode-select --install
安装 Homebrew macOS的包管理器。
安装LLVMBEP库:
brew install libomp
设置以下环境变量:
export CC=/usr/bin/clang
export CXX=/usr/bin/clang++
export CPPFLAGS="$CPPFLAGS -Xpreprocessor -fopenmp"
export CFLAGS="$CFLAGS -I/usr/local/opt/libomp/include"
export CXXFLAGS="$CXXFLAGS -I/usr/local/opt/libomp/include"
export LDFLAGS="$LDFLAGS -Wl,-rpath,/usr/local/opt/libomp/lib -L/usr/local/opt/libomp/lib -lomp"
最后,以详细模式构建scikit-learn(检查是否存在 -fopenmp 编译器命令中的标志):
make clean
pip install --editable . \
    --verbose --no-build-isolation \
    --config-settings editable-verbose=true
Linux#
系统中的Linux编译器#
从源代码安装scikit-learn而不使用conda需要安装scikit-learn Python开发头文件和支持OpenMP的C/C++编译器(通常是GCC工具链)。
安装基于Debian的操作系统的构建依赖项,例如,Ubuntu:
sudo apt-get install build-essential python3-dev python3-pip
然后照常进行:
pip3 install cython
pip3 install --editable . \
    --verbose --no-build-isolation \
    --config-settings editable-verbose=true
Cython和运行时依赖项(numpy、scipy和joblib)的预编译轮应自动安装在 $HOME/.local/lib/pythonX.Y/site-packages .或者,您可以从 virtualenv 或 conda environment 与通过系统打包器安装的Python包完全隔离。当使用隔离环境时, pip3 应改为 pip 在上面的命令中。
当运行时依赖项的预编译轮不适用于您的体系结构(例如ARM)时,您可以安装系统版本:
sudo apt-get install cython3 python3-numpy python3-scipy
在Red Hat和克隆(例如CentOS)上,使用以下方式安装依赖项:
sudo yum -y install gcc gcc-c++ python3-devel numpy scipy
来自conda-forge的Linux编译器#
或者,使用conda在用户文件夹中安装最新版本的NU C编译器工具链(GCC):
conda create -n sklearn-dev -c conda-forge python numpy scipy cython \
    joblib threadpoolctl pytest compilers meson-python ninja
这并不总是必要的,但在激活新创建的conda环境之前打开新提示会更安全。
conda activate sklearn-dev
pip install --editable . \
    --verbose --no-build-isolation \
    --config-settings editable-verbose=true
FreeBSD#
FreeBSD 12.0和11.2基本系统中包含的clang编译器不包括BEP支持。您需要安装 openmp 来自包(或端口)的库:
sudo pkg install openmp
这将在 /usr/local/include 和libs在 /usr/local/lib .由于默认情况下不搜索这些目录,因此您可以将环境变量设置为以下位置:
export CFLAGS="$CFLAGS -I/usr/local/include"
export CXXFLAGS="$CXXFLAGS -I/usr/local/include"
export LDFLAGS="$LDFLAGS -Wl,-rpath,/usr/local/lib -L/usr/local/lib -lomp"
最后,使用标准命令构建包:
pip install --editable . \
    --verbose --no-build-isolation \
    --config-settings editable-verbose=true
对于即将推出的FreeBSD 12.1和11.3版本,BEP将包含在基本系统中,并且这些步骤是不必要的。