2. 开始
2.1. 在基于Debian的系统上安装
我们将给出一个简短而简单的安装方法,以便在基于Debian的系统(包括Ubuntu和衍生品)上实现最小的工作配置。然而,许多其他发行版和操作系统都提供了用于QGIS Server的包。
备注
在Ubuntu中,您可以使用您的常规用户,前缀 sudo 到需要管理员权限的命令。在Debian中,您可以作为管理员工作 (root ),而不使用 sudo 。
中提供了添加官方QGIS资源库以在基于Debian的系统上安装QGIS服务器的要求和步骤 QGIS installers page 。您可能希望至少安装最新的长期版本。
一旦配置了目标版本存储库并安装了QGIS Server,您就可以使用以下命令测试安装:
/usr/lib/cgi-bin/qgis_mapserv.fcgi
如果您得到以下输出,则表示服务器已正确安装。
备注
根据QGIS的版本不同,运行时报告的输出可能略有不同 qgis_mapserv.fcgi 。
QFSFileEngine::open: No file name specified
Warning 1: Unable to find driver ECW to unload from GDAL_SKIP environment variable.
Warning 1: Unable to find driver ECW to unload from GDAL_SKIP environment variable.
Warning 1: Unable to find driver JP2ECW to unload from GDAL_SKIP environment variable.
Warning 1: Unable to find driver ECW to unload from GDAL_SKIP environment variable.
Warning 1: Unable to find driver JP2ECW to unload from GDAL_SKIP environment variable.
Content-Length: 206
Content-Type: text/xml; charset=utf-8

<ServiceExceptionReport version="1.3.0" xmlns="https://www.opengis.net/ogc">
 <ServiceException code="Service configuration error">Service unknown or unsupported</ServiceException>
</ServiceExceptionReport>
备注
如下所示,QGIS报告了一个状态码400,它正确地标识了请求已经失败,因为没有活动的http会话。这不是错误,表明服务器运行正常。
Application path not initialized
Application path not initialized
Warning 1: Unable to find driver ECW to unload from GDAL_SKIP environment variable.
Warning 1: Unable to find driver ECW to unload from GDAL_SKIP environment variable.
Warning 1: Unable to find driver JP2ECW to unload from GDAL_SKIP environment variable.
"Loading native module /usr/lib/qgis/server/libdummy.so"
"Loading native module /usr/lib/qgis/server/liblandingpage.so"
"Loading native module /usr/lib/qgis/server/libwcs.so"
"Loading native module /usr/lib/qgis/server/libwfs.so"
"Loading native module /usr/lib/qgis/server/libwfs3.so"
"Loading native module /usr/lib/qgis/server/libwms.so"
"Loading native module /usr/lib/qgis/server/libwmts.so"
QFSFileEngine::open: No file name specified
Content-Length: 102
Content-Type: application/json
Server:  QGIS FCGI server - QGIS version 3.22.6-Białowieża
Status:  400
[{"code":"Bad request error","description":"Requested URI does not match any registered API handler"}]
让我们添加一个示例项目。您可以使用自己的,也可以使用来自 Training demo data :
mkdir /home/qgis/projects/
cd /home/qgis/projects/
wget https://github.com/qgis/QGIS-Training-Data/archive/release_3.22.zip
unzip release_3.22.zip
mv QGIS-Training-Data-release_3.22/exercise_data/qgis-server-tutorial-data/world.qgs .
mv QGIS-Training-Data-release_3.22/exercise_data/qgis-server-tutorial-data/naturalearth.sqlite .
当然,您可以使用您最喜欢的地理信息系统软件打开此文件并查看配置和可用的层。
要正确部署QGIS服务器,您需要一个HTTP服务器。推荐的选项包括 Apache or NGINX 。
2.1.1. 阿帕奇HTTP服务器
备注
在以下内容中,请替换 qgis.demo 使用您的服务器的名称或IP地址。
安装阿帕奇和 mod_fcgid :
apt install apache2 libapache2-mod-fcgid
您可以在默认网站上运行QGIS服务器,但让我们配置一个 virtualhost 具体来说,如下所示。
在
/etc/apache2/sites-available目录中,创建一个名为qgis.demo.conf,内容如下:<VirtualHost *:80> ServerAdmin webmaster@localhost ServerName qgis.demo DocumentRoot /var/www/html # Apache logs (different than QGIS Server log) ErrorLog ${APACHE_LOG_DIR}/qgis.demo.error.log CustomLog ${APACHE_LOG_DIR}/qgis.demo.access.log combined # Longer timeout for WPS... default = 40 FcgidIOTimeout 120 FcgidInitialEnv LC_ALL "en_US.UTF-8" FcgidInitialEnv PYTHONIOENCODING UTF-8 FcgidInitialEnv LANG "en_US.UTF-8" # QGIS log FcgidInitialEnv QGIS_SERVER_LOG_STDERR 1 FcgidInitialEnv QGIS_SERVER_LOG_LEVEL 0 # default QGIS project SetEnv QGIS_PROJECT_FILE /home/qgis/projects/world.qgs # QGIS_AUTH_DB_DIR_PATH must lead to a directory writeable by the Server's FCGI process user FcgidInitialEnv QGIS_AUTH_DB_DIR_PATH "/home/qgis/qgisserverdb/" FcgidInitialEnv QGIS_AUTH_PASSWORD_FILE "/home/qgis/qgisserverdb/qgis-auth.db" # Set pg access via pg_service file SetEnv PGSERVICEFILE /home/qgis/.pg_service.conf FcgidInitialEnv PGPASSFILE "/home/qgis/.pgpass" # if qgis-server is installed from packages in debian based distros this is usually /usr/lib/cgi-bin/ # run "locate qgis_mapserv.fcgi" if you don't know where qgis_mapserv.fcgi is ScriptAlias /cgi-bin/ /usr/lib/cgi-bin/ <Directory "/usr/lib/cgi-bin/"> AllowOverride None Options +ExecCGI -MultiViews -SymLinksIfOwnerMatch Require all granted </Directory> <IfModule mod_fcgid.c> FcgidMaxRequestLen 26214400 FcgidConnectTimeout 60 </IfModule> </VirtualHost>
备注
上面的一些配置选项在服务器中进行了说明 environment variables 和 pg_service file 横断面。
现在让我们创建将存储QGIS服务器日志和身份验证数据库的目录:
mkdir -p /var/log/qgis/
chown www-data:www-data /var/log/qgis
mkdir -p /home/qgis/qgisserverdb
chown www-data:www-data /home/qgis/qgisserverdb
备注
www-data是基于Debian的系统上的阿帕奇用户,我们需要阿帕奇才能访问这些位置或文件。这个chown www-data...命令会将相应目录和文件的所有者更改为www-data。
现在,我们可以启用虚拟主机和
fcgidMOD(如果尚未完成):a2enmod fcgid a2ensite qgis.demo
现在重新启动Apache,以将新配置考虑在内:
systemctl restart apache2
既然阿帕奇知道他应该回答对http://qgis.demo的请求,我们还需要设置客户端系统,以便它知道是谁
qgis.demo是。我们通过添加127.0.0.1 qgis.demo在 hosts 文件。# Replace 127.0.0.1 with the IP of your server. sh -c "echo '127.0.0.1 qgis.demo' >> /etc/hosts"
重要
Remember that both the qgis.demo.conf and /etc/hosts files should
be configured for your setup to work.
You can also test the access to your QGIS Server from other clients on the
network (e.g. Windows or macos machines) by going to their /etc/hosts
file and point the qgis.demo name to whatever IP the server machine has on the
network (not 127.0.0.1 as it is the local IP, only accessible from the
local machine). On *nix machines the
hosts file is located in /etc, while on Windows it's under
the C:\Windows\System32\drivers\etc directory. Under Windows you
need to start your text editor with administrator privileges before opening
the hosts file.
QGIS服务器现已在http://qgis.demo.上提供要进行检查,请在浏览器中键入,如下例所示:
http://qgis.demo/cgi-bin/qgis_mapserv.fcgi?SERVICE=WMS&VERSION=1.3.0&REQUEST=GetCapabilities
2.1.2. Nginx HTTP服务器
备注
在以下内容中,请替换 qgis.demo 使用您的服务器的名称或IP地址。
您还可以将QGIS服务器用于 NGINX 。与阿帕奇不同,Nginx不会自动产生FastCGI进程。FastCGI进程将由其他程序启动。
安装Nginx:
apt install nginx
作为第一个选项,您可以使用 spawn-fcgi 或 fcgiwrap 启动和管理QGIS服务器进程。官方的Debian包同时适用于这两个版本。当您没有运行X服务器而需要打印时,您可以使用 xvfb 。
另一种选择是依靠 Systemd ,目前大多数Linux发行版都在使用GNU/Linux的init系统。这种方法的优点之一是它不需要其他组件或过程。它应该是简单的,但对于生产部署来说却是健壮和高效的。
Nginx配置
这个 include fastcgi_params; 在前面的配置中使用是很重要的,因为它从 /etc/nginx/fastcgi_params :
fastcgi_param  QUERY_STRING       $query_string;
fastcgi_param  REQUEST_METHOD     $request_method;
fastcgi_param  CONTENT_TYPE       $content_type;
fastcgi_param  CONTENT_LENGTH     $content_length;

fastcgi_param  SCRIPT_NAME        $fastcgi_script_name;
fastcgi_param  REQUEST_URI        $request_uri;
fastcgi_param  DOCUMENT_URI       $document_uri;
fastcgi_param  DOCUMENT_ROOT      $document_root;
fastcgi_param  SERVER_PROTOCOL    $server_protocol;
fastcgi_param  REQUEST_SCHEME     $scheme;
fastcgi_param  HTTPS              $https if_not_empty;

fastcgi_param  GATEWAY_INTERFACE  CGI/1.1;
fastcgi_param  SERVER_SOFTWARE    nginx/$nginx_version;

fastcgi_param  REMOTE_ADDR        $remote_addr;
fastcgi_param  REMOTE_PORT        $remote_port;
fastcgi_param  SERVER_ADDR        $server_addr;
fastcgi_param  SERVER_PORT        $server_port;
fastcgi_param  SERVER_NAME        $server_name;

# PHP only, required if PHP was built with --enable-force-cgi-redirect
fastcgi_param  REDIRECT_STATUS    200;
此外,您还可以使用一些 环境变量 配置QGIS服务器。在Nginx配置文件中, /etc/nginx/nginx.conf ,你必须使用 fastcgi_param 定义这些变量的指令如下所示:
location /qgisserver {
     gzip           off;
     include        fastcgi_params;
     fastcgi_param  QGIS_SERVER_LOG_STDERR  1;
     fastcgi_param  QGIS_SERVER_LOG_LEVEL   0;
     fastcgi_pass   unix:/var/run/qgisserver.socket;
 }
FastCGI包装器
警告
fcgiwrap 比设置更容易设置 spawn-fcgi ,因为它已经包装在一个系统服务中。但它也导致了一种比使用spawn-fcgi慢得多的解决方案。使用fcgiwork,将为每个请求创建一个新的QGIS Server进程,这意味着QGIS Server初始化过程,包括读取和解析QGIS项目文件,将针对每个请求完成。使用spawn-fcgi,QGIS Server进程在请求之间保持活动状态,从而产生更好的性能。因此,建议将spawn-fcgi用于生产。
产卵-fcgi
如果您想使用 spawn-fcgi :
第一步是安装程序包:
apt install spawn-fcgi
然后,在您的Nginx服务器配置中引入以下块:
location /qgisserver {
    gzip           off;
    include        fastcgi_params;
    fastcgi_pass   unix:/var/run/qgisserver.socket;
}
并重新启动Nginx以考虑新配置:
systemctl restart nginx
最后,考虑到spawn-fcgi没有默认的服务文件,您必须在您的终端手动启动QGIS Server:
spawn-fcgi -s /var/run/qgisserver.socket \
                -U www-data -G www-data -n \
                /usr/lib/cgi-bin/qgis_mapserv.fcgi
QGIS服务器现已在http://qgis.demo/qgisserver.上提供
备注
当使用spawn-fcgi时,您可以在运行服务器之前直接定义环境变量。例如: export QGIS_SERVER_LOG_STDERR=1
当然,您可以添加一个init脚本,以便在引导时或您想要的任何时候启动QGIS服务器。例如,使用 systemd :
编辑文件
/etc/systemd/system/qgis-server.service内容如下:[Unit] Description=QGIS server After=network.target [Service] ;; set env var as needed ;Environment="LANG=en_EN.UTF-8" ;Environment="QGIS_SERVER_PARALLEL_RENDERING=1" ;Environment="QGIS_SERVER_MAX_THREADS=12" ;Environment="QGIS_SERVER_LOG_LEVEL=0" ;Environment="QGIS_SERVER_LOG_STDERR=1" ;; or use a file: ;EnvironmentFile=/etc/qgis-server/env ExecStart=spawn-fcgi -s /var/run/qgisserver.socket -U www-data -G www-data -n /usr/lib/cgi-bin/qgis_mapserv.fcgi [Install] WantedBy=multi-user.target
然后启用并启动服务:
systemctl enable --now qgis-server
警告
使用上面的命令,spawn-fcgi只派生一个QGIS服务器进程。
FCGIPRAP
vbl.使用 fcgiwrap 比起设置要容易得多 spawn-fcgi 但速度要慢得多。
您首先必须安装相应的程序包:
apt install fcgiwrap
然后,在您的Nginx服务器配置中引入以下块:
1 location /qgisserver {
2     gzip           off;
3     include        fastcgi_params;
4     fastcgi_pass   unix:/var/run/fcgiwrap.socket;
5     fastcgi_param  SCRIPT_FILENAME /usr/lib/cgi-bin/qgis_mapserv.fcgi;
6 }
最后,重启Nginx并 fcgiwrap 要考虑新配置,请执行以下操作:
systemctl restart nginx
systemctl restart fcgiwrap
QGIS服务器现已在http://qgis.demo/qgisserver.上提供
系统
QGIS Server需要一个正在运行的X Server才能完全可用,特别是用于打印。如果您已经有一个正在运行的X服务器,您可以使用system d服务。
这种部署QGIS服务器的方法依赖于两个系统单元来配置:a Socket unit 以及一个 Service unit 。
这个 QGIS Server Socket unit 定义并创建文件系统套接字,Nginx使用该套接字启动QGIS服务器并与其通信。插座单元必须配置有
Accept=false,这意味着对accept()系统调用被委托给由服务单元创建的进程。它位于/etc/systemd/system/qgis-server@.socket,它实际上是一个模板:[Unit] Description=QGIS Server Listen Socket (instance %i) [Socket] Accept=false ListenStream=/var/run/qgis-server-%i.sock SocketUser=www-data SocketGroup=www-data SocketMode=0600 [Install] WantedBy=sockets.target
现在启用并启动套接字:
for i in 1 2 3 4; do systemctl enable --now qgis-server@$i.socket; done
这个 QGIS Server Service unit 定义并启动QGIS服务器进程。重要的部分是服务进程的标准输入连接到由套接字单元定义的套接字。必须使用以下命令进行配置
StandardInput=socket在位于中的服务单元配置中/etc/systemd/system/qgis-server@.service:[Unit] Description=QGIS Server Service (instance %i) [Service] User=www-data Group=www-data StandardOutput=null StandardError=journal StandardInput=socket ExecStart=/usr/lib/cgi-bin/qgis_mapserv.fcgi EnvironmentFile=/etc/qgis-server/env [Install] WantedBy=multi-user.target
备注
QGIS服务器 environment variables 在单独的文件中定义,
/etc/qgis-server/env。它可能如下所示:QGIS_PROJECT_FILE=/etc/qgis/myproject.qgs QGIS_SERVER_LOG_STDERR=1 QGIS_SERVER_LOG_LEVEL=3
现在启动套接字服务:
for i in 1 2 3 4; do systemctl enable --now qgis-server@$i.service; done
最后,对于Nginx HTTP服务器,让我们介绍此设置的配置:
upstream qgis-server_backend {
   server unix:/var/run/qgis-server-1.sock;
   server unix:/var/run/qgis-server-2.sock;
   server unix:/var/run/qgis-server-3.sock;
   server unix:/var/run/qgis-server-4.sock;
}

server {
   …

   location /qgis-server {
       gzip off;
       include fastcgi_params;
       fastcgi_pass qgis-server_backend;
   }
}
现在重新启动Nginx,以考虑新配置:
systemctl restart nginx
感谢奥斯兰迪亚分享 their tutorial 。
2.1.3. Xvfb
QGIS Server需要一个正在运行的X Server才能完全可用,特别是用于打印。在服务器上,通常建议不要安装它,因此您可以使用 xvfb 拥有一个虚拟的X环境。
如果您在GRAPH/X11环境中运行服务器,则不需要安装xvfb。欲了解更多信息,请访问https://www.itopen.it/qgis-server-setup-notes/.
要安装程序包,请执行以下操作:
apt install xvfb
创建服务文件,
/etc/systemd/system/xvfb.service,内容如下:[Unit] Description=X Virtual Frame Buffer Service After=network.target [Service] ExecStart=/usr/bin/Xvfb :99 -screen 0 1024x768x24 -ac +extension GLX +render -noreset [Install] WantedBy=multi-user.target
启用、启动和检查
xvfb.service:systemctl enable --now xvfb.service systemctl status xvfb.service
然后,根据您的HTTP服务器,您应该配置 DISPLAY 参数或直接使用 xvfb-run 。
使用阿帕奇:
添加到您的 Fcgid 配置(请参见 阿帕奇HTTP服务器 ):
FcgidInitialEnv DISPLAY ":99"
重新启动Apache以考虑新配置:
systemctl restart apache2
使用Nginx
使用spawn-fcgi使用
xvfb-run:xvfb-run /usr/bin/spawn-fcgi -f /usr/lib/cgi-bin/qgis_mapserv.fcgi \ -s /tmp/qgisserver.socket \ -G www-data -U www-data -n
与 DISPLAY HTTP服务器配置中的环境变量。
fastcgi_param DISPLAY ":99";
2.2. 在Windows上安装
QGIS服务器也可以使用64位版本的OSGeo4W网络安装程序(https://qgis.org/en/site/forusers/download.html).安装在Windows系统上
以下是一个简单的过程:
下载并运行OSGeo4W安装程序
Follow the "Advanced Install" and install the QGIS Desktop, QGIS Server apache and mod_fcgid packages.
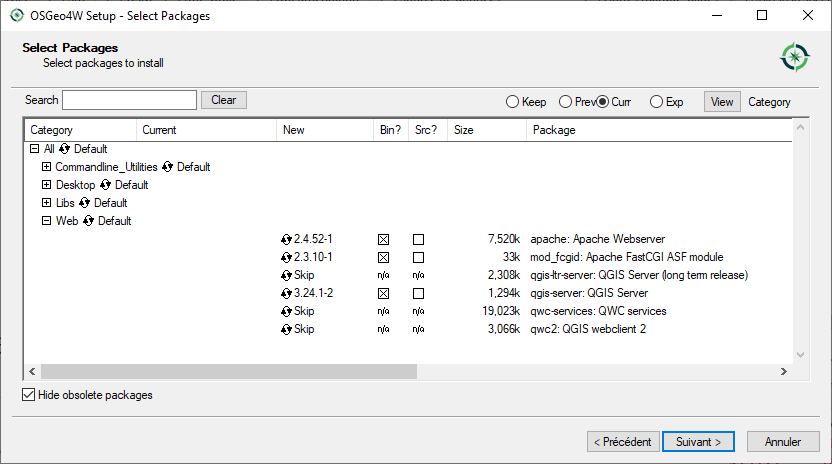
在Windows上,不会直接将Apache作为一项服务进行安装。您需要:
Right-click the
OSGeo4W.batfile at the root of theC:\OSGeo4W\folder (if the default installation paths have been used) and select Run as administrator在控制台中,运行
apache-install.bat,它将输出> apache-install.bat Installing the 'Apache OSGeo4W Web Server' service The 'Apache OSGeo4W Web Server' service is successfully installed. Testing httpd.conf.... Errors reported here must be corrected before the service can be started. ...
正如您在报告中注意到的那样,该服务已启动。但服务器可能会因为缺少自定义配置而无法运行。
Edit the
C:\OSGeo4w\apps\apache\conf\httpd.conffile with the following changes (various other combinations are possible):目的
现有配置
更换
(可选)使用IP和/或端口自定义要侦听的地址,您可以根据需要添加任意数量的条目。
Listen ${SRVPORT}
Listen localhost:8080
指明在哪里可以找到脚本文件
ScriptAlias /cgi-bin/ "${SRVROOT}/cgi-bin/"
ScriptAlias /cgi-bin/ "C:/OSGeo4W/apps/qgis/bin/"
提供对脚本文件夹的权限
<Directory "${SRVROOT}/cgi-bin">
    AllowOverride None
    Options None
    Require all granted
</Directory>
<Directory "C:/OSGeo4W/apps/qgis/bin">
    SetHandler cgi-script
    AllowOverride None
    Options ExecCGI
    Require all granted
</Directory>
启用要用于脚本文件的文件扩展名。取消注释并完成
#AddHandler cgi-script .cgiAddHandler cgi-script .cgi .exe
添加更多OSGeo4W自定义配置变量
# parse OSGeo4W apache conf files
IncludeOptional "C:/OSGeo4W/httpd.d/httpd_*.conf"
# parse OSGeo4W apache conf files
IncludeOptional "C:/OSGeo4W/httpd.d/httpd_*.conf"
SetEnv GDAL_DATA "C:/OSGeo4W/share/gdal"
SetEnv QGIS_AUTH_DB_DIR_PATH "C:/OSGeo4W/apps/qgis/resources"
重新启动ApacheWeb服务器
> apache-restart.bat
打开浏览器窗口以测试对QGIS服务器的GetCapability请求。替换
localhost:8080使用您设置为侦听的IP和端口。http://localhost:8080/cgi-bin/qgis_mapserv.fcgi.exe?SERVICE=WMS&VERSION=1.3.0&REQUEST=GetCapabilities
A
XML应返回具有该功能的文件。您的服务器已准备好可以使用。
2.3. 为项目服务
现在QGIS服务器已经安装并运行,我们只需使用它。
显然,我们需要一个QGIS项目来工作。当然,您可以通过定义联系信息、精确限制CRS,甚至排除某些层来完全定制您的项目。您需要了解的所有内容都将在后面的 配置您的项目 。
但现在,我们将使用一个简单的项目,该项目已经配置并以前在 /home/qgis/projects/world.qgs ,如上所述。
通过打开项目并快速查看层,我们知道当前有4个层可用:
机场
地点
国家
countries_shapeburst
您目前不必了解完整的请求,但您可以通过在Web浏览器中执行类似操作来检索包含一些先前图层的地图,这要感谢QGIS Server countries 层:
如果您按照上面的说明安装了一台ApacheHTTP服务器:
http://qgis.demo/cgi-bin/qgis_mapserv.fcgi?
  MAP=/home/qgis/projects/world.qgs&
  LAYERS=countries&
  SERVICE=WMS&
  VERSION=1.3.0&
  REQUEST=GetMap&
  CRS=EPSG:4326&
  WIDTH=400&
  HEIGHT=200&
  BBOX=-90,-180,90,180
如果您按照上述说明安装了Nginx HTTP服务器:
http://qgis.demo/qgisserver?
  MAP=/home/qgis/projects/world.qgs&
  LAYERS=countries&
  SERVICE=WMS&
  VERSION=1.3.0&
  REQUEST=GetMap&
  CRS=EPSG:4326&
  WIDTH=400&
  HEIGHT=200&
  BBOX=-90,-180,90,180
如果您获得了下一张图像,则QGIS服务器运行正常:
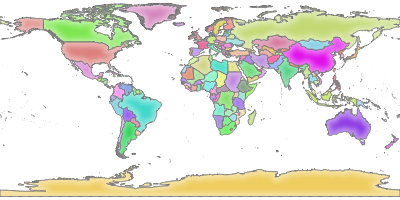
图 2.1 服务器对基本GetMap请求的响应
请注意,您可以定义 QGIS_PROJECT_FILE 环境变量来默认使用项目,而不是提供 MAP 参数(请参见 环境变量 )。
例如,使用spawn-fcgi:
export QGIS_PROJECT_FILE=/home/qgis/projects/world.qgs
spawn-fcgi -f /usr/lib/bin/cgi-bin/qgis_mapserv.fcgi \
           -s /var/run/qgisserver.socket \
           -U www-data -G www-data -n
2.4. 配置您的项目
要提供新的QGIS服务器WMS、WFS、OAPIF或WCS,您必须创建包含一些数据的QGIS项目文件或使用当前项目之一。定义QGIS和项目CRS中的层的颜色和样式(如果尚未定义)。然后,转到 QGIS Server 菜单中的 对话框中并提供有关OWS的一些信息 Service Capabilities 标签。
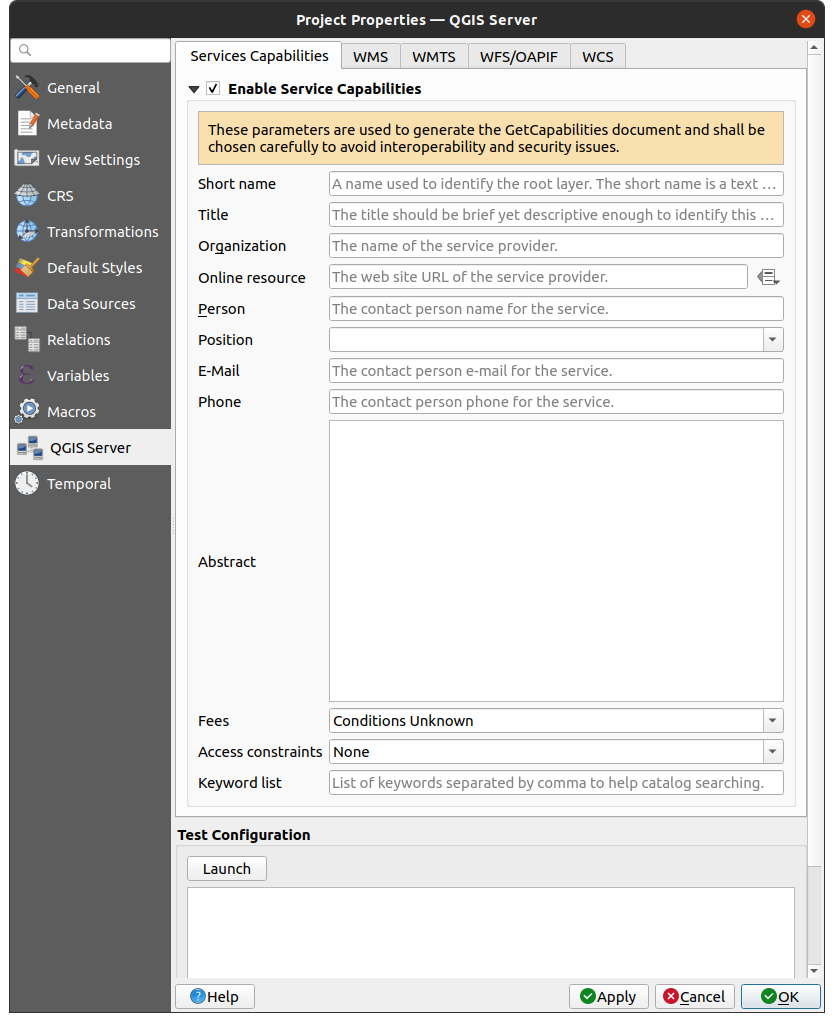
图 2.2 QGIS服务器WMS/WFS/WCS项目的定义
你不得不 Enable Service Capabilities 首先,如果它被停用。这将出现在WMS、WFS或WCS的GetCapability响应中。如果你不检查  Enable Service capabilities ,QGIS服务器将使用中提供的信息
 wms_metadata.xml 文件位于 cgi-bin 文件夹。
2.4.1. WMS功能
在 WMS capabilities 选项卡中,您可以通过在以下项下的字段中输入最小和最大X和Y值来定义在WMS GetCapability响应中通告的范围 Advertised extent 。
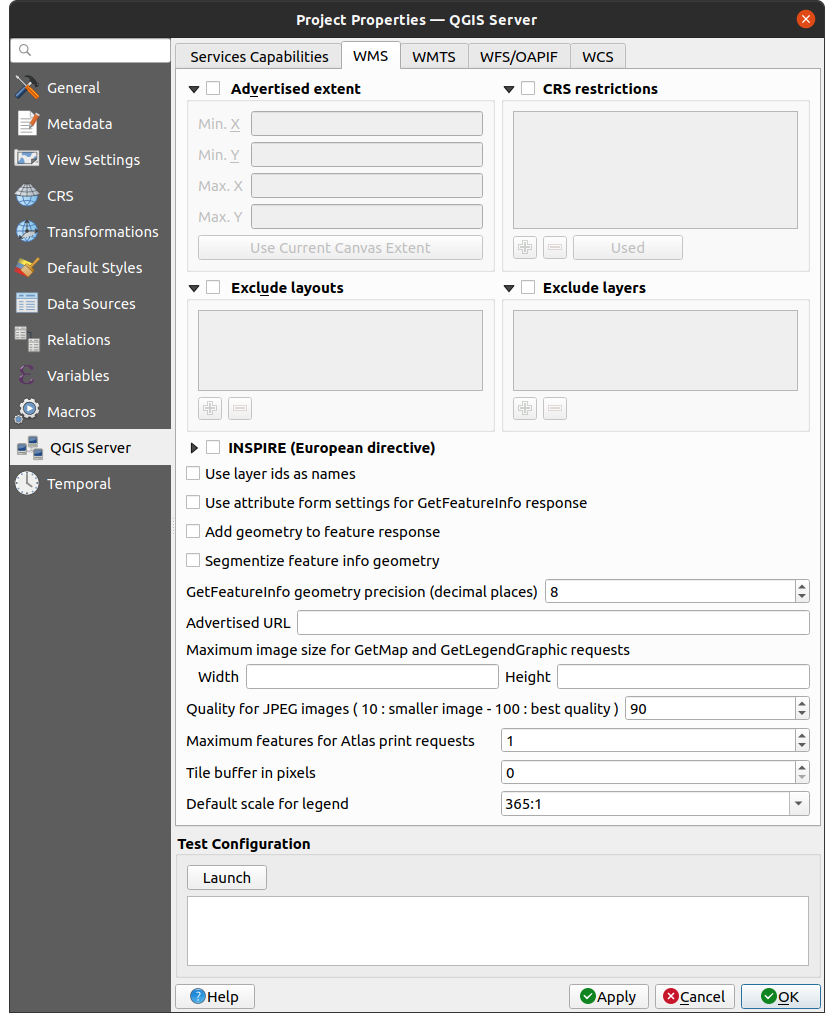
图 2.3 WMS选项卡中的定义
点击 Use Current Canvas Extent 将这些值设置为当前显示在QGIS地图画布中的范围。通过检查 CRS restrictions ,您可以限制QGIS服务器将在哪个坐标参考系(CRS)中提供渲染地图。建议您限制提供的CRS,因为这会减小WMS GetCapables响应的大小。使用  按钮从坐标参考系选择器中选择这些CRS,或单击 Used 将QGIS工程中使用的CRSS添加到列表中。
如果您在项目中定义了打印布局,它们将列在 GetProjectSettings 响应,GetPrint请求可以使用它们来创建打印,并将其中一个打印布局用作模板。这是特定于QGIS的WMS 1.3.0规范的扩展。如果要排除WMS发布的任何打印布局,请选中 Exclude layouts 并单击 下面的按钮。然后,从 Select print layout 对话框以将其添加到排除的布局列表中。
如果要排除WMS发布的任何图层或图层组,请选中 Exclude Layers 并单击 下面的按钮。这将打开 Select restricted layers and groups 对话框,该对话框允许您选择不想发布的层和组。使用 Shift 或 Ctrl 如果要选择多个条目,请按键。建议您从发布不需要的层中排除,因为这会减小WMS GetCapables响应的大小,从而加快客户端的加载速度。
如果你勾选 Use layer ids as name ,层ID将用于引用中的层 GetCapabilities 回应或 GetMap LAYERS 参数。如果未定义,则显示图层名或短名称(请参见 QGIS服务器属性 )被使用。
您可以接收请求的纯文本、XML和GML格式的GetFeatureInfo。缺省值为XML。
如果您愿意,您可以查看 Add geometry to feature response 。这将在GetFeatureInfo响应中包含每个要素的边界框。另请参阅 WITH_GEOMETRY 参数。
由于许多Web客户端不能显示几何图形中的圆弧,因此您可以选择分割几何图形,然后在GetFeatureInfo响应中将其发送给客户端。这允许这样的客户端仍然显示特征的几何图形(例如,用于突出显示特征)。你需要检查一下 Segmentize feature info geometry 以激活该选项。
您也可以使用 GetFeatureInfo geometry precision 选项以设置GetFeatureInfo几何图形的精度。这使您可以在不需要完全精度的情况下节省带宽。
如果希望QGIS服务器在WMS GetCapability响应中通告特定的请求URL,请在 Advertised URL 菲尔德。
此外,您可以通过在下的相应字段中输入最大宽度和最大高度来限制GetMap请求返回的地图的最大大小 Maximums for GetMap request 。
您可以更改 Quality for JPEG images 因素。品质因数必须在0到100的范围内。指定0表示最大压缩,指定100表示无压缩。
属性,可以更改在一个请求中打印地图集要素的限制 Maximum features for Atlas print requests 菲尔德。
在切片模式下使用QGIS服务器时(请参阅 TILED parameter ),您可以设置 Tile buffer in pixels 。推荐值是QGIS项目中最大符号或线宽的大小。
如果您的某个层使用 Map Tip display (即使用表达式显示文本)这将列在GetFeatureInfo输出中。如果层为其属性之一使用值图,则此信息也将显示在GetFeatureInfo输出中。
2.4.2. WMTS功能
在 WMTS capabilities 选项卡中,您可以选择要发布为WMT的层,并指定要发布为PNG还是JPEG。
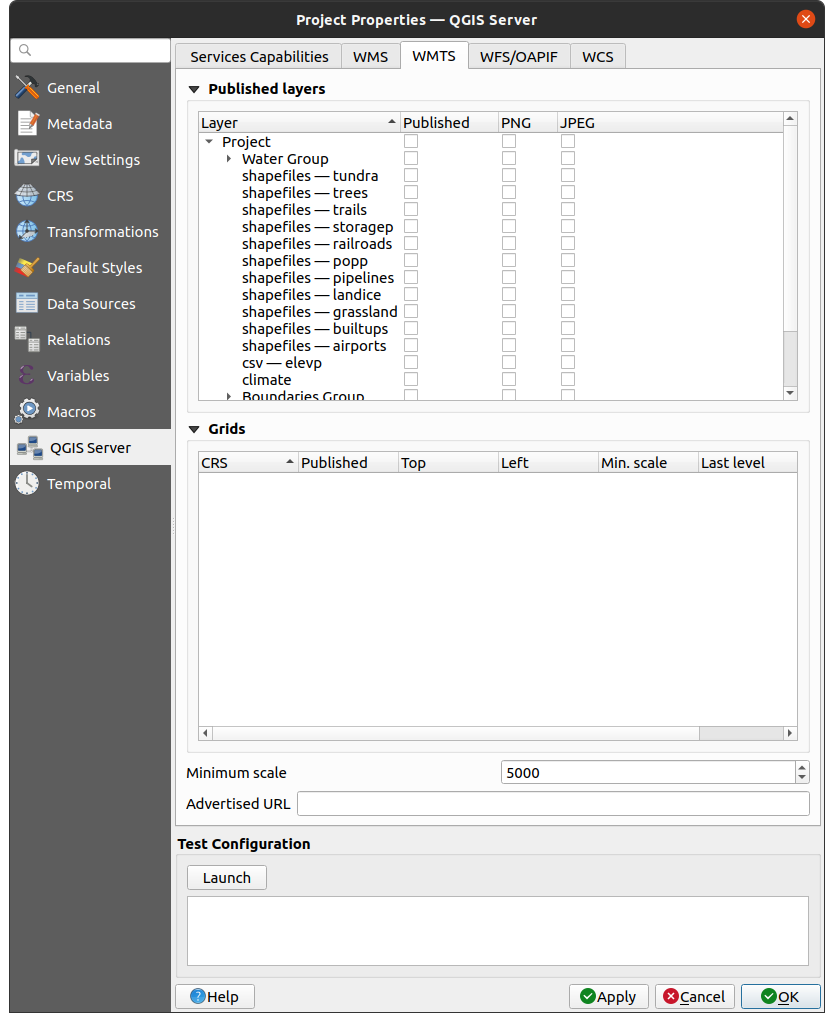
图 2.4 WMTS选项卡中的定义
如果您在 Advertised URL 中的字段 WMTS capabilities 部分中,QGIS服务器将在WMTS GetCapability响应中通告此特定URL。
2.4.3. WFS/OAPIF功能
在 WFS/OAPIF capabilities 选项卡中,可以选择要发布为WFS或OAPIF的层,并指定它们是否允许更新、插入和删除操作。
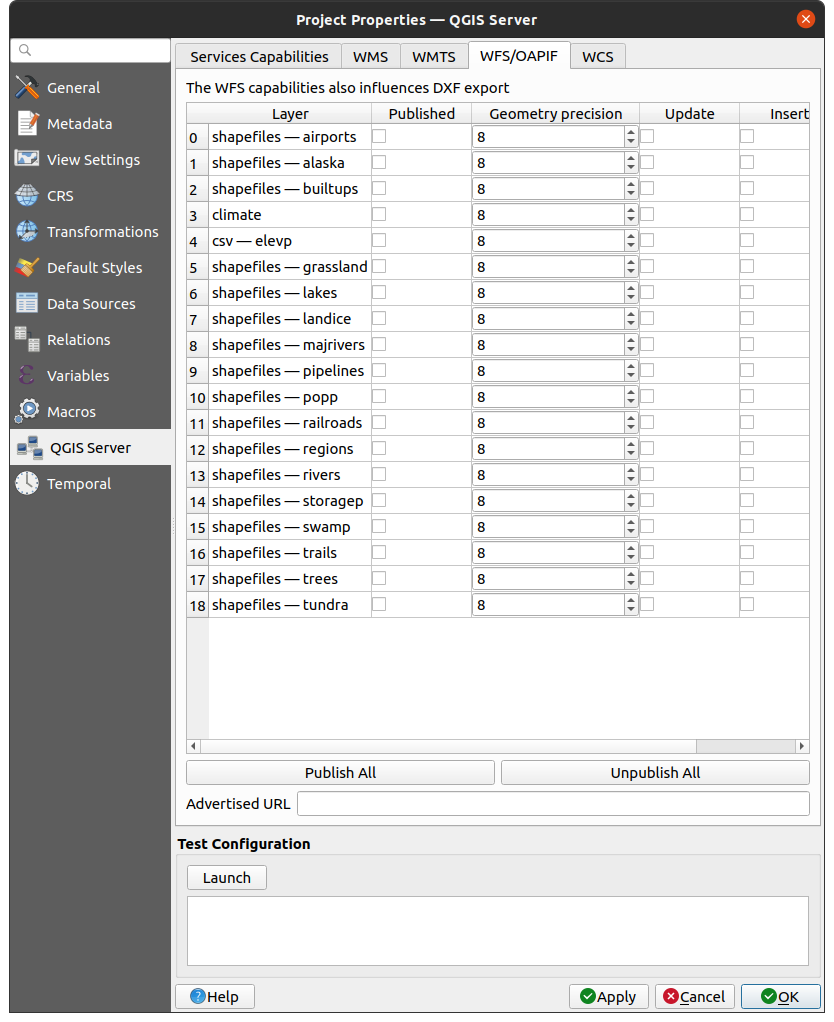
图 2.5 WFS/OAPIF选项卡中的定义
如果您在 Advertised URL 中的字段 WFS capabilities 部分中,QGIS服务器将在WFS GetCapability响应中通告此特定URL。
2.4.4. WCS功能
在 WCS capabilities 选项卡中,可以选择要发布为WCS的层。
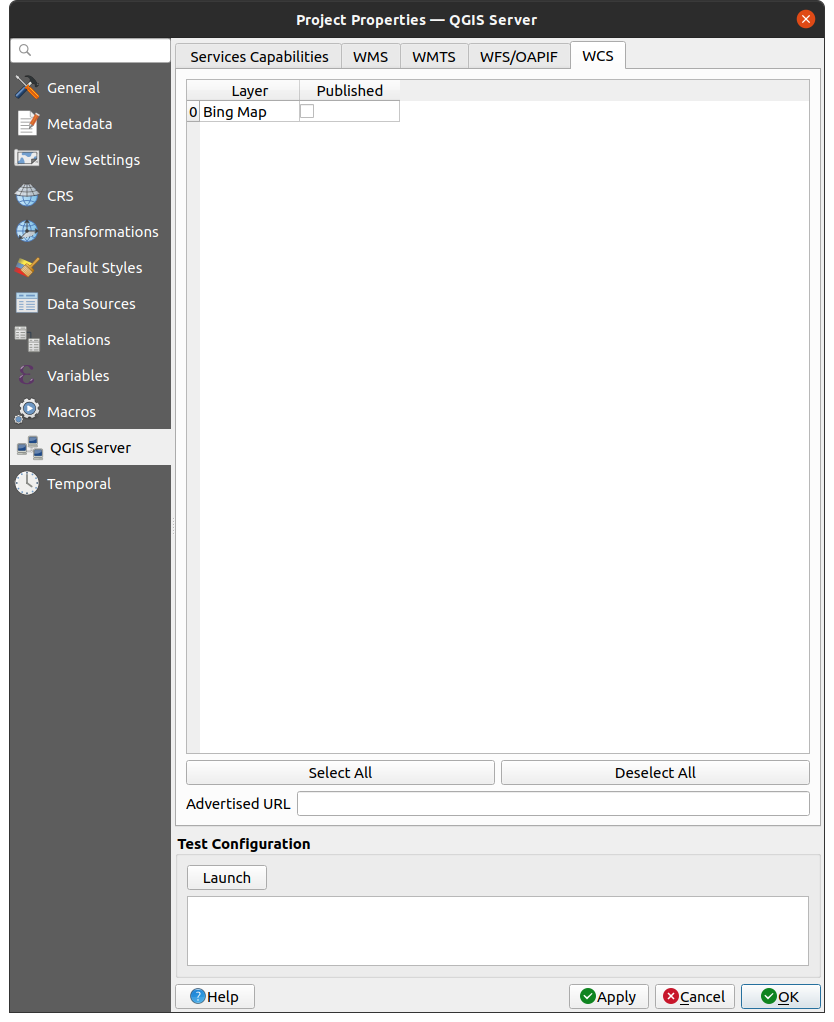
图 2.6 WCS选项卡中的定义
如果您在 Advertised URL 中的字段 WCS capabilities 部分中,QGIS服务器将在WCS GetCapability响应中通告此特定URL。
2.4.5. 微调您的OWS
对于矢量层, Fields 菜单中的 对话框允许您为每个属性定义是否发布它。默认情况下,所有属性都由您的WMS和WFS发布。如果不希望发布特定属性,请取消选中 WMS 或 WFS 纵队。
通过向项目文件添加文本批注或SVG批注,可以在WMS生成的地图上覆盖水印。请参阅 批注工具 一节,了解有关创建批注的说明。对于要在WMS输出上显示为水印的批注, Fixed map position 复选框中的 Annotation text 对话框必须取消选中。当其中一个注释工具处于活动状态时,可以通过双击注释来访问它。对于SVG批注,您需要将项目设置为保存绝对路径(在 General 菜单中的 对话框)或手动修改SVG图像的路径,以使其表示有效的相对路径。
2.5. 与第三方集成
QGIS服务器提供标准的OGC Web服务,如 WMS, WFS, etc. 因此,它可以被各种终端用户工具使用。
2.5.1. 与QGIS Desktop集成
QGIS Desktop是地图设计器,其中QGIS Server是地图服务器。地图或QGIS项目将由QGIS服务器提供服务,以提供OGC标准。这些QGIS项目可以是数据库中的文件或条目(通过使用 在QGIS Desktop中)。
此外,必须建立专用更新工作流来刷新QGIS服务器使用的项目(即。将项目文件复制到服务器位置并重新启动QGIS服务器)。目前,自动化流程(如通过消息队列服务重新加载服务器)尚未实现。
2.5.2. 与MapProxy集成
MapProxy 是一个切片缓存服务器,由于它可以读取和服务任何WMS/WMTS地图服务器,它可以直接连接到QGIS服务器Web服务,并改善最终用户体验。
2.5.3. 与QWC2集成
QWC2 是一个响应迅速的Web应用程序,专用于QGIS服务器。它可以帮助您构建高度定制的地图查看器,其中包含层选择、要素信息等。此外,还有许多插件可用,如身份验证或打印服务,完整的列表可在此获得 repository 。