摘要: 在 Python 中处理Excel 文件并没有想象中的那么难。在本教程中,我们将学习如何使用 Python创建、读取和修改.xlsx 文件。 简介 Xlsx 文件是技术领域中使用最广泛的文件。数据科学家们使用电子表格的次数比世界上任何人都多,显然他们不会手动执...
在 Python 中处理Excel 文件并没有想象中的那么难。在本教程中,我们将学习如何使用 Python创建、读取和修改.xlsx 文件。
简介
Xlsx 文件是技术领域中使用最广泛的文件。数据科学家们使用电子表格的次数比世界上任何人都多,显然他们不会手动执行此操作。
我们需要一个名为Openpyxl的模块,用于在Python中读取、创建和处理.xlsx文件。 此外还有一些其他模块,如 Xlsxwriter、Xlrd、Xlwt等,然而它们未对 Excel 文件执行所有操作的方法。要安装Openpyxl 模块,请在命令行中运行以下命令:
pip install openpyxl以下所示代码中导入模块后使用 Openpyxl 模块可以执行的所有操作,这很简单:
import openpyxl一旦在代码中导入了模块,需要使用模块的各种方法来读取、编写和创建 .xlsx 文件。
创建新的 .xlsx 文件
在此程序中将创建一个新的.xlsx文件。
import openpyxl
## CREATING XLSX FILE
## initializing the xlsx
xlsx = openpyxl.Workbook()
## creating an active sheet to enter data
sheet = xlsx.active
## entering data into the A1 and B1 cells in the sheet
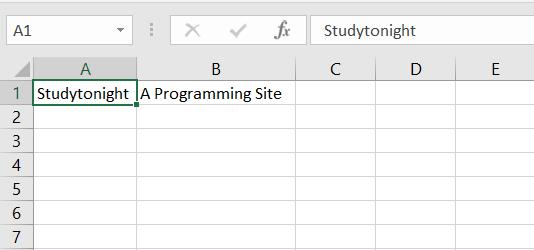
sheet['A1'] = 'Studytonight'
sheet['B1'] = 'A Programming Site'
## saving the xlsx file using 'save' method
xlsx.save('sample.xlsx')以上程序在当前工作目录中创建了一个名为sample.xlsx的.xlsx文件。
写入单元格
有多种方法可以写入单元格。第一种方法是在以上程序中使用的方法,第二种方法是使用 cell()传递行号和列号的方法。
以下是第二种方法:
import openpyxl

## initializing the xlsx
xlsx = openpyxl.Workbook()

## creating an active sheet to enter data
sheet = xlsx.active

## entering data into the cells using 1st method
sheet['A1'] = 'Studytonight'
sheet['B2'] = 'Cell B2'

## entering data into the cells using 2nd method
sheet.cell(row = 1, column = 2).value = 'A Programming Site'
sheet.cell(row = 2, column = 1).value = "B1"

## saving the xlsx file using 'save' method
xlsx.save('write_to_cell.xlsx')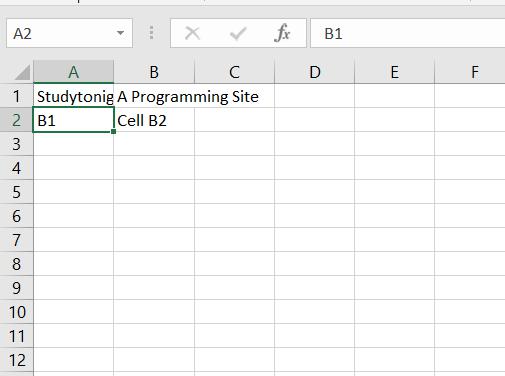
在第二种方法中,我们将获得具有行和列值的 cell()。获取单元格后,使用 value 变量为其赋值。
将数据附加到 .xlsx 文件
append() 方法用于将数据附加到任何单元格。示例:
import openpyxl

## initializing the xlsx
xlsx = openpyxl.Workbook()

## creating an active sheet to enter data
sheet = xlsx.active

## creating data to append
data = [
         [1, 2, 3],
         [4, 5, 6],
         [7, 8, 9],
         [10, 11, 12]
       ]

## appending row by row to the sheet
for row in data:
    ## append method is used to append the data to a cell
    sheet.append(row)

## saving the xlsx file using 'save' method
xlsx.save('appending.xlsx')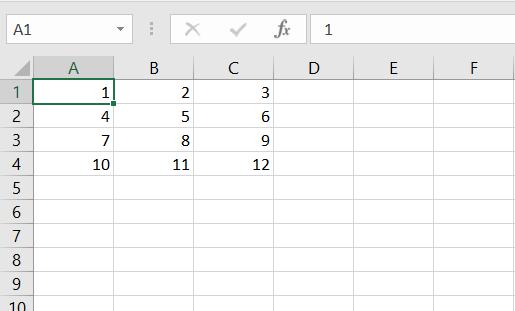
通过上述程序,在 .xlsx 文件中附加了 4 行和 3 列值,还可以使用 tuples 或任何可迭代对象来代替列表。
从单元格中读取数据
现在将学习如何从 Xlsx 文件中的单元格读取数据。利用之前创建的.xlsx文件从单元格中读取数据。
import openpyxl

## opening the previously created xlsx file using 'load_workbook()' method
xlsx = openpyxl.load_workbook('sample.xlsx')

## getting the sheet to active
sheet = xlsx.active

## getting the reference of the cells which we want to get the data from
name = sheet['A1']
tag = sheet.cell(row = 1, column = 2)

## printing the values of cells
print(name.value)
print(tag.value)
上述程序的输出:
Studytonight
A Programming Site
从多个单元格读取数据
现在我们将使用appending.xlsx文件来读取数据,包含从1到12的数值,以 4 行和 3 列的形式保存在单元格中。
import openpyxl

## opening the previously created xlsx file using 'load_workbook()' method
xlsx = openpyxl.load_workbook('appending.xlsx')

## getting the sheet to active
sheet = xlsx.active

## getting the reference of the cells which we want to get the data from
values = sheet['A1' : 'C4']

## printing the values of cells
for c1, c2, c3 in values:
print("{} {} {}".format(c1.value, c2.value, c3.value))
上述程序的输出:
1 2 3
4 5 6
7 8 9
10 11 12
应用于单元格的切片方法返回一个 tuple,其中包含每行作为元组,
可以使用循环打印所有单元格的数据。
获取 .xlsx 工作表的尺寸
使用 dimensions方法也可以获得.xlsx板的尺寸,并且非常容易。
import openpyxl

## opening the previously created xlsx file using 'load_workbook()' method
xlsx = openpyxl.load_workbook('appending.xlsx')

## getting the sheet to active
sheet = xlsx.active

## getting the reference of the cells which we want to get the data from
dimensions = sheet.dimensions

## printing the dimensions of the sheet
print(dimensions)
上述程序的输出:
A1:C4dimensions方法的输出是数据从某个单元格到某个单元格的工作表范围。
从 .xlsx 文件的行中获取数据
可以使用 rows方法从一个 Xlsx 文件的所有行中获取数据。
import openpyxl

## opening the previously created xlsx file using 'load_workbook()' method
xlsx = openpyxl.load_workbook('appending.xlsx')

## getting the sheet to active
sheet = xlsx.active

## getting the reference of the cells which we want to get the data from
rows = sheet.rows

## printing the values of cells using rows
for row in rows:
    for cell in row:
        print(cell.value, end = ' ')

    print("\n")
上述程序的输出:
1 2 3
4 5 6
7 8 9
10 11 12
rows 方法返回 generator, 其中包含工作表的所有行。
从 .xlsx 文件的列中获取数据
使用 columns 方法从 Xlsx 文件的所有列中获取数据。
import openpyxl

## opening the previously created xlsx file using 'load_workbook()' method
xlsx = openpyxl.load_workbook('appending.xlsx')

## getting the sheet to active
sheet = xlsx.active

## getting the reference of the cells which we want to get the data from
columns = sheet.columns

## printing the values of cells using rows
for column in columns:
    for cell in column:
        print(cell.value, end = ' ')
    print("\n")
上述程序的输出:
1 4 7 10
2 5 8 11
3 6 9 12
columns 方法返回 generator ,其中包含工作表的所有列。
使用 Excel 表格
在本节中,我们将了解如何创建更多工作表、获取工作表名称甚至更改任何给定工作表的名称等。
1. 更改Excel工作表的名称
使用 title 变量更改给定 Excel 工作表的名称。示例:
import openpyxl

## initializing the xlsx
xlsx = openpyxl.Workbook()

## creating an active sheet to enter data
sheet = xlsx.active

## entering data into the A1 and B1 cells in the sheet
sheet['A1'] = 'Studytonight'
sheet['B1'] = 'A Programming Site'

## setting the title for the sheet
sheet.title = "Sample"

## saving the xlsx file using 'save' method
xlsx.save('sample.xlsx')
2. 获取Excel工作表名称
使用 Openpyxl 模块获取 Xlsx 文件中存在的所有工作表的名称非常容易。
我们可以使用名为 get_sheet_names() 的方法来获取 Excel 文件中所有工作表的名称。
import openpyxl

## initializing the xlsx
xlsx = openpyxl.load_workbook('sample.xlsx')

## getting all sheet names
names = xlsx.get_sheet_names()

print(names)
上述程序的输出:
['Sample']3. 在 Excel 文件中创建多个工作表
在创建第一个 Xlsx 文件时,只创建了一个工作表。 那么如何创建多个工作表并为其命名,如下所示:
import openpyxl

## initializing the xlsx
xlsx = openpyxl.Workbook()

## creating sheets
xlsx.create_sheet("School")
xlsx.create_sheet("College")
xlsx.create_sheet("University")

## saving the xlsx file using 'save' method
xlsx.save('multiple_sheets.xlsx')
如上所述,使用在程序中提供的 3 个具有不同名称的新工作表创建了一个新的 Excel 文件。
4. 将数据添加到多个工作表
也可以轻松地将数据输入到Xlsx文件中的不同工作表中。在下面的程序中,我们将按其名称单独或一次性获取所有工作表,如上所述。接下来看一下如何使用工作表的名称获取工作表并在其中输入数据。
我们将使用先前创建的名为multiple_sheets.xlsx的Xlsx文件将数据输入工作表。
import openpyxl

## initializing the xlsx
xlsx = openpyxl.Workbook()

## creating sheets
xlsx.create_sheet("School")
xlsx.create_sheet("College")
xlsx.create_sheet("University")

## getting sheet by it's name
school = xlsx.get_sheet_by_name("School")
school['A1'] = 1

## getting sheet by it's name
college = xlsx.get_sheet_by_name("College")
college['A1'] = 2

## getting sheet by it's name
university = xlsx.get_sheet_by_name("University")
university['A1'] = 3

## saving the xlsx file using 'save' method
xlsx.save('multiple_sheets.xlsx')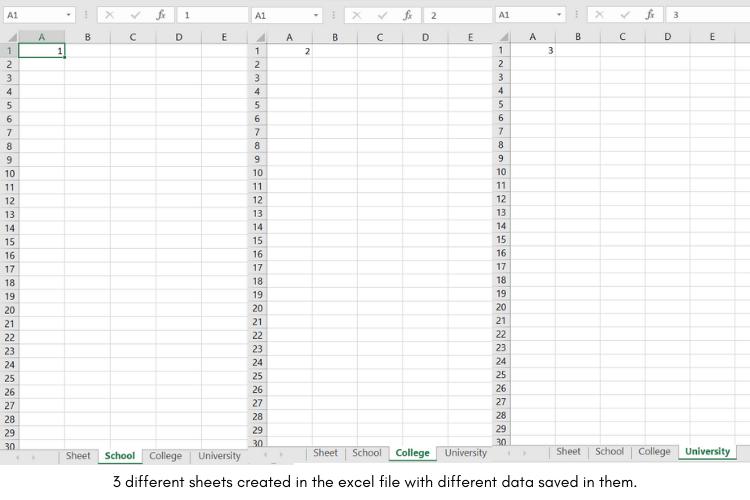
我们无法使用 Openpyxl 模块修改现有的 Xlsx 文件,但可以从中读取数据。
结论
我们已经看到了在使用 Python 处理 Xlsx 文件时可以使用的不同方法。
如果您想探索 Openpyxl 模块中可用的更多方法,可以使用 dir() 方法尝试,以获取有关 Openpyxl 模块所有方法的信息,还可以查看其他模块,如 Xlsxwriter、Xlrd、Xlwt 等,以获得更多功能。