All guides will first install and configure the system to run it in DEBUG mode (also known as DEVELOPMENT mode)
and then by configuring an HTTPD server to serve GeoNode through the standard HTTP (80) port.
which python3.8 # copy the path of python executable# Create the GeoNode Virtual Environment (first time only)exportWORKON_HOME=~/.virtualenvs
source /usr/share/virtualenvwrapper/virtualenvwrapper.sh
mkvirtualenv --python=/usr/bin/python3.8 geonode # Use the python path from above# Alterantively you can also create the virtual env like below
mkdir -p ~/.virtualenvs
python3.8 -m venv ~/.virtualenvs/geonode
source ~/.virtualenvs/geonode/bin/activate
此时,您的命令提示符会显示一个 (geonode) 前缀,则表示您的viralenv处于活动状态。
注解
下次需要访问虚拟环境时,只需运行
source /usr/share/virtualenvwrapper/virtualenvwrapper.sh
workon geonode
# Alterantively you can also create the virtual env like belowsource ~/.virtualenvs/geonode/bin/activate
注解
为了永久保存viralenvwrapper环境
vim ~/.bashrc
# Write to the bottom of the file the following linesexportWORKON_HOME=~/.virtualenvs
source /usr/share/virtualenvwrapper/virtualenvwrapper.sh
# Let's create the GeoNode core base folder and clone it
sudo mkdir -p /opt/geonode/; sudo usermod -a -G www-data $USER; sudo chown -Rf $USER:www-data /opt/geonode/; sudo chmod -Rf 775 /opt/geonode/
# Clone the GeoNode source code on /opt/geonodecd /opt; git clone https://github.com/GeoNode/geonode.git -b 3.2.x geonode
sudo -u postgres psql -d geonode -c 'CREATE EXTENSION postgis;'
sudo -u postgres psql -d geonode -c 'GRANT ALL ON geometry_columns TO PUBLIC;'
sudo -u postgres psql -d geonode -c 'GRANT ALL ON spatial_ref_sys TO PUBLIC;'
sudo -u postgres psql -d geonode -c 'GRANT ALL PRIVILEGES ON ALL TABLES IN SCHEMA public TO geonode;'
sudo -u postgres psql -d geonode -c 'GRANT ALL PRIVILEGES ON ALL SEQUENCES IN SCHEMA public TO geonode;'

sudo -u postgres psql -d geonode_data -c 'CREATE EXTENSION postgis;'
sudo -u postgres psql -d geonode_data -c 'GRANT ALL ON geometry_columns TO PUBLIC;'
sudo -u postgres psql -d geonode_data -c 'GRANT ALL ON spatial_ref_sys TO PUBLIC;'
sudo -u postgres psql -d geonode_data -c 'GRANT ALL PRIVILEGES ON ALL TABLES IN SCHEMA public TO geonode;'
sudo -u postgres psql -d geonode_data -c 'GRANT ALL PRIVILEGES ON ALL SEQUENCES IN SCHEMA public TO geonode;'
最后一步是更改文件中本地连接的用户访问策略 pg_hba.conf
sudo vim /etc/postgresql/13/main/pg_hba.conf
向下滚动到文档底部。我们想在当地转机。 trusted 对于默认用户。
确保您的配置与下面的配置类似。
...
# DO NOT DISABLE!# If you change this first entry you will need to make sure that the# database superuser can access the database using some other method.# Noninteractive access to all databases is required during automatic# maintenance (custom daily cronjobs, replication, and similar tasks).## Database administrative login by Unix domain socketlocal all postgres trust
# TYPE DATABASE USER ADDRESS METHOD# "local" is for Unix domain socket connections onlylocal all all md5
# IPv4 local connections:
host all all 127.0.0.1/32 md5
# IPv6 local connections:
host all all ::1/128 md5
# Allow replication connections from localhost, by a user with the# replication privilege.local replication all peer
host replication all 127.0.0.1/32 md5
host replication all ::1/128 md5
psql -U postgres geonode
# This should not ask for any password
psql -U geonode geonode
# This should ask for the password geonode# Repeat the test with geonode_data DB
psql -U postgres geonode_data
psql -U geonode geonode_data
# Check the correct JAVA_HOME locationJAVA_HOME=$(readlink -f /usr/bin/java | sed "s:bin/java::")echo$JAVA_HOME
$> /usr/lib/jvm/java-8-openjdk-amd64/jre/
# Let's create a symbolic link to the JRE
sudo ln -s /usr/lib/jvm/java-8-openjdk-amd64/jre/ /usr/lib/jvm/jre
# Let's create the tomcat service
sudo vim /etc/init.d/tomcat9
#!/bin/bash### BEGIN INIT INFO# Provides: tomcat9# Required-Start: $local_fs $remote_fs $network $time# Required-Stop: $local_fs $remote_fs $network $time# Should-Start: $syslog# Should-Stop: $syslog# Default-Start: 2 3 4 5# Default-Stop: 0 1 6# Short-Description: Apache Tomcat init script### END INIT INFO#Location of JAVA_HOME (bin files)exportJAVA_HOME=/usr/lib/jvm/jre
exportJAVA_OPTS=-Djava.security.egd=file:///dev/urandom
#Add Java binary files to PATHexportPATH=$JAVA_HOME/bin:$PATH#CATALINA_HOME is the location of the bin files of TomcatexportCATALINA_HOME=/opt/tomcat/latest
#CATALINA_BASE is the location of the configuration files of this instance of TomcatexportCATALINA_BASE=/opt/tomcat/latest
exportCATALINA_PID=/opt/tomcat/latest/temp/tomcat.pid
#TOMCAT_USER is the default user of tomcatexportTOMCAT_USER=tomcat
#TOMCAT_USAGE is the message if this script is called without any optionsTOMCAT_USAGE="Usage: $0 {\e[00;32mstart\e[00m|\e[00;31mstop\e[00m|\e[00;31mkill\e[00m|\e[00;32mstatus\e[00m|\e[00;31mrestart\e[00m}"#SHUTDOWN_WAIT is wait time in seconds for java proccess to stopSHUTDOWN_WAIT=20
tomcat_pid(){echo`ps -fe | grep $CATALINA_BASE| grep -v grep | tr -s " "|cut -d" " -f2`}
start(){pid=$(tomcat_pid)if[ -n "$pid"]thenecho -e "\e[00;31mTomcat is already running (pid: $pid)\e[00m"else# Start tomcatecho -e "\e[00;32mStarting tomcat\e[00m"#ulimit -n 100000#umask 007#/bin/su -p -s /bin/sh $TOMCAT_USERif[`user_exists $TOMCAT_USER`="1"]then
/bin/su $TOMCAT_USER -c $CATALINA_HOME/bin/startup.sh
elseecho -e "\e[00;31mTomcat user $TOMCAT_USER does not exists. Starting with $(id)\e[00m"
sh $CATALINA_HOME/bin/startup.sh
fi
status
fireturn0}
status(){pid=$(tomcat_pid)if[ -n "$pid"]thenecho -e "\e[00;32mTomcat is running with pid: $pid\e[00m"elseecho -e "\e[00;31mTomcat is not running\e[00m"return3fi}
terminate(){echo -e "\e[00;31mTerminating Tomcat\e[00m"kill -9 $(tomcat_pid)}
stop(){pid=$(tomcat_pid)if[ -n "$pid"]thenecho -e "\e[00;31mStoping Tomcat\e[00m"#/bin/su -p -s /bin/sh $TOMCAT_USER
sh $CATALINA_HOME/bin/shutdown.sh
letkwait=$SHUTDOWN_WAITcount=0;until[`ps -p $pid| grep -c $pid`='0']||[$count -gt $kwait]doecho -n -e "\n\e[00;31mwaiting for processes to exit\e[00m";
sleep 1letcount=$count+1;doneif[$count -gt $kwait];thenecho -n -e "\n\e[00;31mkilling processes didn't stop after $SHUTDOWN_WAIT seconds\e[00m"
terminate
fielseecho -e "\e[00;31mTomcat is not running\e[00m"fireturn0}
user_exists(){if id -u $1 >/dev/null 2>&1;thenecho"1"elseecho"0"fi}case$1in
start)
start
;;
stop)
stop
;;
restart)
stop
start
;;
status)
status
exit$?;;kill)
terminate
;;
*)echo -e $TOMCAT_USAGE;;esacexit0
...
# If you run Tomcat on port numbers that are all higher than 1023, then you# do not need authbind. It is used for binding Tomcat to lower port numbers.# (yes/no, default: no)#AUTHBIND=noJAVA_HOME=/usr/lib/jvm/java-8-openjdk-amd64/jre/
GEOSERVER_DATA_DIR="/opt/data/geoserver_data"GEOSERVER_LOG_LOCATION="/opt/data/geoserver_logs/geoserver.log"GEOWEBCACHE_CACHE_DIR="/opt/data/gwc_cache_dir"GEOFENCE_DIR="$GEOSERVER_DATA_DIR/geofence"TIMEZONE="UTC"JAVA_OPTS="-server -Djava.awt.headless=true -Dorg.geotools.shapefile.datetime=false -XX:+UseParallelGC -XX:ParallelGCThreads=4 -Dfile.encoding=UTF8 -Duser.timezone=$TIMEZONE -Xms512m -Xmx4096m -Djavax.servlet.request.encoding=UTF-8 -Djavax.servlet.response.encoding=UTF-8 -DGEOSERVER_CSRF_DISABLED=true -DPRINT_BASE_URL=http://localhost:8080/geoserver/pdf -DGEOSERVER_DATA_DIR=$GEOSERVER_DATA_DIR -Dgeofence.dir=$GEOFENCE_DIR -DGEOSERVER_LOG_LOCATION=$GEOSERVER_LOG_LOCATION -DGEOWEBCACHE_CACHE_DIR=$GEOWEBCACHE_CACHE_DIR"
# Restart the server
sudo /etc/init.d/tomcat9 restart

# Follow the startup logs
sudo tail -F -n 300 /opt/data/geoserver_logs/geoserver.log
如果您可以在日志上看到类似于此的内容,并且没有错误
...
2019-05-31 10:06:34,190 INFO [geoserver.wps] - Found 5 bindable processes in GeoServer specific processes
2019-05-31 10:06:34,281 INFO [geoserver.wps] - Found 89 bindable processes in Deprecated processes
2019-05-31 10:06:34,298 INFO [geoserver.wps] - Found 31 bindable processes in Vector processes
2019-05-31 10:06:34,307 INFO [geoserver.wps] - Found 48 bindable processes in Geometry processes
2019-05-31 10:06:34,307 INFO [geoserver.wps] - Found 1 bindable processes in PolygonLabelProcess
2019-05-31 10:06:34,311 INFO [geoserver.wps] - Blacklisting process ras:ConvolveCoverage as the input kernel of type class javax.media.jai.KernelJAI cannot be handled
2019-05-31 10:06:34,319 INFO [geoserver.wps] - Blacklisting process ras:RasterZonalStatistics2 as the input zones of type class java.lang.Object cannot be handled
2019-05-31 10:06:34,320 INFO [geoserver.wps] - Blacklisting process ras:RasterZonalStatistics2 as the input nodata of type class it.geosolutions.jaiext.range.Range cannot be handled
2019-05-31 10:06:34,320 INFO [geoserver.wps] - Blacklisting process ras:RasterZonalStatistics2 as the input rangeData of type class java.lang.Object cannot be handled
2019-05-31 10:06:34,320 INFO [geoserver.wps] - Blacklisting process ras:RasterZonalStatistics2 as the output zonal statistics of type interface java.util.List cannot be handled
2019-05-31 10:06:34,321 INFO [geoserver.wps] - Found 18 bindable processes in Raster processes
2019-05-31 10:06:34,917 INFO [ows.OWSHandlerMapping] - Mapped URL path [/TestWfsPost] onto handler 'wfsTestServlet'2019-05-31 10:06:34,918 INFO [ows.OWSHandlerMapping] - Mapped URL path [/wfs/*] onto handler 'dispatcher'2019-05-31 10:06:34,918 INFO [ows.OWSHandlerMapping] - Mapped URL path [/wfs] onto handler 'dispatcher'2019-05-31 10:06:42,237 INFO [geoserver.security] - Start reloading user/groups for service named default
2019-05-31 10:06:42,241 INFO [geoserver.security] - Reloading user/groups successful for service named default
2019-05-31 10:06:42,357 WARN [auth.GeoFenceAuthenticationProvider] - INIT FROM CONFIG
2019-05-31 10:06:42,494 INFO [geoserver.security] - AuthenticationCache Initialized with 1000 Max Entries, 300 seconds idle time, 600 seconds time to live and 3 concurrency level
2019-05-31 10:06:42,495 INFO [geoserver.security] - AuthenticationCache Eviction Task created to run every 600 seconds
2019-05-31 10:06:42,506 INFO [config.GeoserverXMLResourceProvider] - Found configuration file in /opt/data/gwc_cache_dir
2019-05-31 10:06:42,516 INFO [config.GeoserverXMLResourceProvider] - Found configuration file in /opt/data/gwc_cache_dir
2019-05-31 10:06:42,542 INFO [config.XMLConfiguration] - Wrote configuration to /opt/data/gwc_cache_dir
2019-05-31 10:06:42,547 INFO [geoserver.importer] - Enabling import store: memory
[uwsgi]uwsgi-socket=0.0.0.0:8000# http-socket = 0.0.0.0:8000gid=www-dataplugins=python3virtualenv=/home/<my_user>/.virtualenvs/geonodeenv=DJANGO_SETTINGS_MODULE=geonode.settingsenv=GEONODE_INSTANCE_NAME=geonodeenv=GEONODE_LB_HOST_IP=env=GEONODE_LB_PORT=# ################## backend# #################env=POSTGRES_USER=postgresenv=POSTGRES_PASSWORD=postgresenv=GEONODE_DATABASE=geonodeenv=GEONODE_DATABASE_PASSWORD=geonodeenv=GEONODE_GEODATABASE=geonode_dataenv=GEONODE_GEODATABASE_PASSWORD=geonodeenv=GEONODE_DATABASE_SCHEMA=publicenv=GEONODE_GEODATABASE_SCHEMA=publicenv=DATABASE_HOST=localhostenv=DATABASE_PORT=5432env=DATABASE_URL=postgis://geonode:geonode@localhost:5432/geonodeenv=GEODATABASE_URL=postgis://geonode:geonode@localhost:5432/geonode_dataenv=GEONODE_DB_CONN_MAX_AGE=0env=GEONODE_DB_CONN_TOUT=5env=DEFAULT_BACKEND_DATASTORE=datastoreenv=BROKER_URL=amqp://admin:admin@localhost:5672//env=ASYNC_SIGNALS=Falseenv=SITEURL=http://localhost/env=ALLOWED_HOSTS="['*']"# Data Uploaderenv=DEFAULT_BACKEND_UPLOADER=geonode.importerenv=TIME_ENABLED=Trueenv=MOSAIC_ENABLED=Falseenv=HAYSTACK_SEARCH=Falseenv=HAYSTACK_ENGINE_URL=http://elasticsearch:9200/env=HAYSTACK_ENGINE_INDEX_NAME=haystackenv=HAYSTACK_SEARCH_RESULTS_PER_PAGE=200# ################## nginx# HTTPD Server# #################env=GEONODE_LB_HOST_IP=localhostenv=GEONODE_LB_PORT=80# IP or domain name and port where the server can be reached on HTTPS (leave HOST empty if you want to use HTTP only)# port where the server can be reached on HTTPSenv=HTTP_HOST=localhostenv=HTTPS_HOST=env=HTTP_PORT=8000env=HTTPS_PORT=443# ################## geoserver# #################env=GEOSERVER_WEB_UI_LOCATION=http://localhost/geoserver/env=GEOSERVER_PUBLIC_LOCATION=http://localhost/geoserver/env=GEOSERVER_LOCATION=http://localhost:8080/geoserver/env=GEOSERVER_ADMIN_USER=adminenv=GEOSERVER_ADMIN_PASSWORD=geoserverenv=OGC_REQUEST_TIMEOUT=5env=OGC_REQUEST_MAX_RETRIES=1env=OGC_REQUEST_BACKOFF_FACTOR=0.3env=OGC_REQUEST_POOL_MAXSIZE=10env=OGC_REQUEST_POOL_CONNECTIONS=10# Java Options & Memoryenv=ENABLE_JSONP=trueenv=outFormat=text/javascriptenv=GEOSERVER_JAVA_OPTS="-Djava.awt.headless=true -Xms2G -Xmx4G -XX:+UnlockDiagnosticVMOptions -XX:+LogVMOutput -XX:LogFile=/var/log/jvm.log -XX:PerfDataSamplingInterval=500 -XX:SoftRefLRUPolicyMSPerMB=36000 -XX:-UseGCOverheadLimit -XX:+UseConcMarkSweepGC -XX:+UseParNewGC -XX:ParallelGCThreads=4 -Dfile.encoding=UTF8 -Djavax.servlet.request.encoding=UTF-8 -Djavax.servlet.response.encoding=UTF-8 -Duser.timezone=GMT -Dorg.geotools.shapefile.datetime=false -DGEOSERVER_CSRF_DISABLED=true -DPRINT_BASE_URL=http://geoserver:8080/geoserver/pdf -DALLOW_ENV_PARAMETRIZATION=true -Xbootclasspath/a:/usr/local/tomcat/webapps/geoserver/WEB-INF/lib/marlin-0.9.3-Unsafe.jar -Dsun.java2d.renderer=org.marlin.pisces.MarlinRenderingEngine"# ################## Security# ################## Admin Settingsenv=ADMIN_USERNAME=adminenv=ADMIN_PASSWORD=adminenv=ADMIN_EMAIL=admin@localhost# EMAIL Notificationsenv=EMAIL_ENABLE=Falseenv=DJANGO_EMAIL_BACKEND=django.core.mail.backends.smtp.EmailBackendenv=DJANGO_EMAIL_HOST=localhostenv=DJANGO_EMAIL_PORT=25env=DJANGO_EMAIL_HOST_USER=env=DJANGO_EMAIL_HOST_PASSWORD=env=DJANGO_EMAIL_USE_TLS=Falseenv=DJANGO_EMAIL_USE_SSL=Falseenv=DEFAULT_FROM_EMAIL='GeoNode <no-reply@geonode.org>'# Session/Access Controlenv=LOCKDOWN_GEONODE=Falseenv=CORS_ORIGIN_ALLOW_ALL=Trueenv=X_FRAME_OPTIONS="SAMEORIGIN"env=SESSION_EXPIRED_CONTROL_ENABLED=Trueenv=DEFAULT_ANONYMOUS_VIEW_PERMISSION=Trueenv=DEFAULT_ANONYMOUS_DOWNLOAD_PERMISSION=True# Users Registrationenv=ACCOUNT_OPEN_SIGNUP=Trueenv=ACCOUNT_EMAIL_REQUIRED=Trueenv=ACCOUNT_APPROVAL_REQUIRED=Falseenv=ACCOUNT_CONFIRM_EMAIL_ON_GET=Falseenv=ACCOUNT_EMAIL_VERIFICATION=noneenv=ACCOUNT_EMAIL_CONFIRMATION_EMAIL=Falseenv=ACCOUNT_EMAIL_CONFIRMATION_REQUIRED=Falseenv=ACCOUNT_AUTHENTICATION_METHOD=username_emailenv=AUTO_ASSIGN_REGISTERED_MEMBERS_TO_REGISTERED_MEMBERS_GROUP_NAME=True# OAuth2env=OAUTH2_API_KEY=env=OAUTH2_CLIENT_ID=Jrchz2oPY3akmzndmgUTYrs9gczlgoV20YPSvqaVenv=OAUTH2_CLIENT_SECRET=rCnp5txobUo83EpQEblM8fVj3QT5zb5qRfxNsuPzCqZaiRyIoxM4jdgMiZKFfePBHYXCLd7B8NlkfDBY9HKeIQPcy5Cp08KQNpRHQbjpLItDHv12GvkSeXp6OxaUETv3# GeoNode APIsenv=API_LOCKDOWN=Falseenv=TASTYPIE_APIKEY=# ################## Production and# Monitoring# #################env=DEBUG=FalseSECRET_KEY='myv-y4#7j-d*p-__@j#*3z@!y24fz8%^z2v6atuy4bo9vqr1_a'env=CACHE_BUSTING_STATIC_ENABLED=Falseenv=CACHE_BUSTING_MEDIA_ENABLED=Falseenv=MEMCACHED_ENABLED=Falseenv=MEMCACHED_BACKEND=django.core.cache.backends.memcached.MemcachedCacheenv=MEMCACHED_LOCATION=127.0.0.1:11211env=MEMCACHED_LOCK_EXPIRE=3600env=MEMCACHED_LOCK_TIMEOUT=10env=MAX_DOCUMENT_SIZE=2env=CLIENT_RESULTS_LIMIT=5env=API_LIMIT_PER_PAGE=1000# GIS Clientenv=GEONODE_CLIENT_LAYER_PREVIEW_LIBRARY=mapstoreenv=MAPBOX_ACCESS_TOKEN=env=BING_API_KEY=env=GOOGLE_API_KEY=# Monitoringenv=MONITORING_ENABLED=Trueenv=MONITORING_DATA_TTL=365env=USER_ANALYTICS_ENABLED=Trueenv=USER_ANALYTICS_GZIP=Trueenv=CENTRALIZED_DASHBOARD_ENABLED=Falseenv=MONITORING_SERVICE_NAME=local-geonodeenv=MONITORING_HOST_NAME=geonode# Other Options/Contribsenv=MODIFY_TOPICCATEGORY=Trueenv=AVATAR_GRAVATAR_SSL=Trueenv=EXIF_ENABLED=Trueenv=CREATE_LAYER=Trueenv=FAVORITE_ENABLED=Truelogto=/opt/data/logs/geonode.log# pidfile = /tmp/geonode.pidchdir=/opt/geonodemodule=geonode.wsgi:applicationstrict=falsemaster=trueenable-threads=truevacuum=true ; Delete sockets during shutdownsingle-interpreter=truedie-on-term=true ; Shutdown when receiving SIGTERM (default is respawn)need-app=true# logging# path to where uwsgi logs will be saved# logto = /opt/data/geonode_logs/geonode.logdaemonize=/opt/data/logs/geonode.logtouch-reload=/opt/geonode/geonode/wsgi.pybuffer-size=32768harakiri=60 ; forcefully kill workers after 60 secondspy-callos-afterfork=true ; allow workers to trap signalsmax-requests=1000 ; Restart workers after this many requestsmax-worker-lifetime=3600 ; Restart workers after this many secondsreload-on-rss=2048 ; Restart workers after this much resident memoryworker-reload-mercy=60 ; How long to wait before forcefully killing workerscheaper-algo=busynessprocesses=128 ; Maximum number of workers allowedcheaper=8 ; Minimum number of workers allowedcheaper-initial=16 ; Workers created at startupcheaper-overload=1 ; Length of a cycle in secondscheaper-step=16 ; How many workers to spawn at a timecheaper-busyness-multiplier=30 ; How many cycles to wait before killing workerscheaper-busyness-min=20 ; Below this threshold, kill workers (if stable for multiplier cycles)cheaper-busyness-max=70 ; Above this threshold, spawn new workerscheaper-busyness-backlog-alert=16 ; Spawn emergency workers if more than this many requests are waiting in the queuecheaper-busyness-backlog-step=2 ; How many emergency workers to create if there are too many requests in the queue
# Enable the GeoNode UWSGI config
sudo ln -s /etc/uwsgi/apps-available/geonode.ini /etc/uwsgi/apps-enabled/geonode.ini

# Restart UWSGI Service
sudo pkill -9 -f uwsgi
sudo service uwsgi restart
# Backup the original NGINX config
sudo mv /etc/nginx/nginx.conf /etc/nginx/nginx.conf.orig

# Create the GeoNode Default NGINX config
sudo vim /etc/nginx/nginx.conf
# As superuser
sudo su
# Restart Tomcat
service tomcat9 restart
# Restart UWSGI
pkill -9 -f uwsgi
service uwsgi restart
# Update the GeoNode ip or hostnamecd /opt/geonode
# This must be done the first time only
cp package/support/geonode.binary /usr/bin/geonode
cp package/support/geonode.updateip /usr/bin/geonode_updateip
chmod +x /usr/bin/geonode
chmod +x /usr/bin/geonode_updateip
# Refresh GeoNode and GeoServer OAuth2 settingssource .env_local
PYTHONWARNINGS=ignore VIRTUAL_ENV=$VIRTUAL_ENVDJANGO_SETTINGS_MODULE=geonode.settings GEONODE_ETC=/opt/geonode/geonode GEOSERVER_DATA_DIR=/opt/data/geoserver_data TOMCAT_SERVICE="service tomcat9"APACHE_SERVICE="service nginx" geonode_updateip -p localhost
# Go back to standard userexit
sudo vim /etc/nginx/sites-enabled/geonode
# Update the 'server_name' directive
server_name example.org www.example.org;# Restart the service
sudo service nginx restart
更新 UWSGI 配置,以便为新域名提供服务。
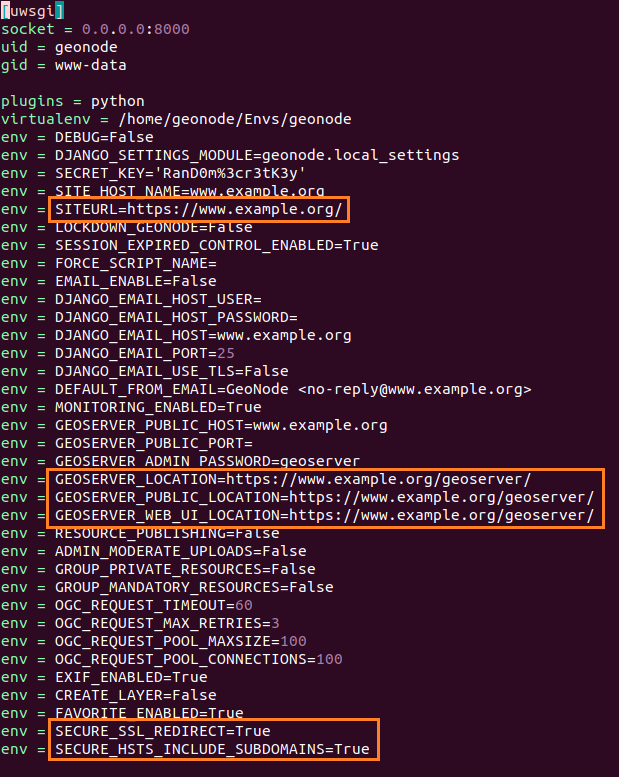
sudo vim /etc/uwsgi/apps-enabled/geonode.ini

# Change everywhere 'localhost' to the new hostname
:%s/localhost/www.example.org/g
:wq

# Restart the service
sudo service uwsgi restart
更新 OAuth2 配置,以便命中新的主机名。
workon geonode
cd /opt/geonode
# Update the GeoNode ip or hostname
sudo PYTHONWARNINGS=ignore VIRTUAL_ENV=$VIRTUAL_ENVDJANGO_SETTINGS_MODULE=geonode.local_settings GEONODE_ETC=/opt/geonode/geonode GEOSERVER_DATA_DIR=/opt/data/geoserver_data TOMCAT_SERVICE="service tomcat"APACHE_SERVICE="service nginx" geonode_updateip -l localhost -p www.example.org
更新现有的 GeoNode 链接以命中新的主机名。
workon geonode
cd /opt/geonode
# Update the GeoNode ip or hostnameDJANGO_SETTINGS_MODULE=geonode.local_settings python manage.py migrate_baseurl --source-address=http://localhost --target-address=http://www.example.org
sudo vim /etc/uwsgi/apps-enabled/geonode.ini
# Change everywhere 'http' to 'https'
%s/http/https/g
# Add three more 'env' variables to the configurationenv=SECURE_SSL_REDIRECT=True
env=SECURE_HSTS_INCLUDE_SUBDOMAINS=True
env=AVATAR_GRAVATAR_SSL=True
# Restart the service
sudo service uwsgi restart
; supervisor config file[unix_http_server]file=/var/run/supervisor.sock ; (the path to the socket file)chmod=0700 ; sockef file mode (default 0700)[supervisord]nodaemon=truelogfile=/var/log/supervisor/supervisord.log ; (main log file;default $CWD/supervisord.log)pidfile=/var/run/supervisord.pid ; (supervisord pidfile;default supervisord.pid)childlogdir=/var/log/supervisor ; ('AUTO' child log dir, default $TEMP)environment=DEBUG="False",CACHE_BUSTING_STATIC_ENABLED="True",CACHE_BUSTING_MEDIA_ENABLED="True",SITEURL="https://<your_geonode_domain>/",DJANGO_SETTINGS_MODULE="geonode.local_settings",GEOSERVER_ADMIN_PASSWORD="<your_geoserver_admin_password>",GEOSERVER_LOCATION="http://localhost:8080/geoserver/",GEOSERVER_PUBLIC_LOCATION="https://<your_geonode_domain>/geoserver/",GEOSERVER_WEB_UI_LOCATION="https://<your_geonode_domain>/geoserver/",MONITORING_ENABLED="True",BROKER_URL="amqp://admin:<your_rabbitmq_admin_password_here>@localhost:5672/",ASYNC_SIGNALS="True"; the below section must remain in the config file for RPC; (supervisorctl/web interface) to work, additional interfaces may be; added by defining them in separate rpcinterface: sections[rpcinterface:supervisor]supervisor.rpcinterface_factory=supervisor.rpcinterface:make_main_rpcinterface[supervisorctl]serverurl=unix:///var/run/supervisor.sock ; use a unix:// URL for a unix socket; The [include] section can just contain the "files" setting. This; setting can list multiple files (separated by whitespace or; newlines). It can also contain wildcards. The filenames are; interpreted as relative to this file. Included files *cannot*; include files themselves.[include]files=/etc/supervisor/conf.d/*.conf
sudo vim /etc/supervisor/conf.d/geonode-celery.conf
# Check the supervisor service status
sudo systemctl status supervisor

# Check the celery workers logs
sudo tail -F -n 300 /var/logs/geonode-celery.log
sudo subscription-manager repos --enable rhel-7-server-optional-rpms --enable rhel-7-server-extras-rpms --enable rhel-7-server-e4s-rpms --enable rhel-7-server-devtools-rpms
sudo yum install -y https://download.postgresql.org/pub/repos/yum/reporpms/EL-7-x86_64/pgdg-redhat-repo-latest.noarch.rpm
sudo yum install -y postgresql13-server postgis31_13 postgresql13-devel
sudo /usr/pgsql-13/bin/postgresql-13-setup initdb
sudo systemctl enable --now postgresql-13
sudo systemctl start postgresql-13
cat <EOF>> /var/lib/pgsql/13/data/pg_hba.conf
# DO NOT DISABLE!# If you change this first entry you will need to make sure that the# database superuser can access the database using some other method.# Noninteractive access to all databases is required during automatic# maintenance (custom daily cronjobs, replication, and similar tasks).## Database administrative login by Unix domain socketlocal all postgres trust
# TYPE DATABASE USER ADDRESS METHOD# "local" is for Unix domain socket connections onlylocal all all md5
# IPv4 local connections:
host all all 127.0.0.1/32 md5
# IPv6 local connections:
host all all ::1/128 md5
# Allow replication connections from localhost, by a user with the# replication privilege.local replication all peer
host replication all 127.0.0.1/32 md5
host replication all ::1/128 md5
EOF
sudo -u postgres createuser geonode
sudo -u postgres createdb geonode
sudo -u postgres createdb geonode_data
sudo -u postgres psql -c "alter user geonode with encrypted password 'geonode';"
sudo -u postgres psql -d geonode -c 'CREATE EXTENSION postgis;'
sudo -u postgres psql -d geonode -c 'GRANT ALL ON geometry_columns TO PUBLIC;'
sudo -u postgres psql -d geonode -c 'GRANT ALL ON spatial_ref_sys TO PUBLIC;'
sudo -u postgres psql -d geonode -c 'GRANT ALL PRIVILEGES ON ALL TABLES IN SCHEMA public TO geonode;'
sudo -u postgres psql -d geonode_data -c 'CREATE EXTENSION postgis;'
sudo -u postgres psql -d geonode_data -c 'GRANT ALL ON geometry_columns TO PUBLIC;'
sudo -u postgres psql -d geonode_data -c 'GRANT ALL ON spatial_ref_sys TO PUBLIC;'
sudo -u postgres psql -d geonode_data -c 'GRANT ALL PRIVILEGES ON ALL TABLES IN SCHEMA public TO geonode;'
# This is to be performed as user geonode# add these lines to .bashrcexportPATH="$HOME/.pyenv/bin:$PATH"eval"$(pyenv init -)"eval"$(pyenv virtualenv-init -)"
[uwsgi]
http-socket =0.0.0.0:8000
id= geonode
gid= nginx
virtualenv= /home/geonode/.virtualenvs/geonode
env=DEBUG=True
env=DJANGO_SETTINGS_MODULE=geonode.local_settings
env=SECRET_KEY=""env=SITE_HOST_NAME=<your_public_geonode_hostname>
env=SITEURL=https://<your_public_geonode_hostname>/
env=ALLOWED_HOSTS=['localhost', 'your_server_public_ip_address', '<your_public_geonode_hostname>']env=LOCKDOWN_GEONODE=False
env=SESSION_EXPIRED_CONTROL_ENABLED=True
env=MONITORING_ENABLED=False
env=ADMIN_USERNAME=admin
env=ADMIN_PASSWORD=admin
env=ADMIN_EMAIL=admin@localhost
env=GEOSERVER_PUBLIC_HOST=<your_public_geonode_hostname>
env=GEOSERVER_PUBLIC_PORT=env=GEOSERVER_ADMIN_PASSWORD=geoserver
env=GEOSERVER_LOCATION=http://<your_geoserver_private_address>:8080/geoserver/
env=GEOSERVER_PUBLIC_LOCATION=https://<your_public_geonode_hostname>/geoserver/
env=GEOSERVER_WEB_UI_LOCATION=https://<your_public_geonode_hostname>/geoserver/
env=OGC_REQUEST_TIMEOUT=60env=OGC_REQUEST_MAX_RETRIES=3env=OGC_REQUEST_POOL_MAXSIZE=100env=OGC_REQUEST_POOL_CONNECTIONS=100env=SECURE_SSL_REDIRECT=True
env=SECURE_HSTS_INCLUDE_SUBDOMAINS=True
env=AVATAR_GRAVATAR_SSL=True
env=OAUTH2_API_KEY=<secret_here>
env=OAUTH2_CLIENT_ID=<secret_here>
env=OAUTH2_CLIENT_SECRET=<secret_here>
# pidfile = /tmp/geonode.pidchdir= /opt/geonode
module= geonode.wsgi:application
strict=falsemaster=true
enable-threads =truevacuum=true; Delete sockets during shutdown
single-interpreter =true
die-on-term =true; Shutdown when receiving SIGTERM (default is respawn)
need-app =truedaemonize= /opt/data/logs/geonode.log
touch-reload = /opt/geonode/geonode/wsgi.py
buffer-size =32768harakiri=60; forcefully kill workers after 60 seconds
py-callos-afterfork =true; allow workers to trap signals
max-requests =1000; Restart workers after this many requests
max-worker-lifetime =3600; Restart workers after this many seconds
reload-on-rss =2048; Restart workers after this much resident memory
worker-reload-mercy =60; How long to wait before forcefully killing workers
cheaper-algo = busyness
processes=128; Maximum number of workers allowed
cheaper=8; Minimum number of workers allowed
cheaper-initial =16; Workers created at startup
cheaper-overload =1; Length of a cycle in seconds
cheaper-step =16; How many workers to spawn at a time
cheaper-busyness-multiplier =30; How many cycles to wait before killing workers
cheaper-busyness-min =20; Below this threshold, kill workers (if stable for multiplier cycles)
cheaper-busyness-max =70; Above this threshold, spawn new workers
cheaper-busyness-backlog-alert =16; Spawn emergency workers if more than this many requests are waiting in the queue
cheaper-busyness-backlog-step =2; How many emergency workers to create if there are too many requests in the queue
# daemonize = /var/log/uwsgi/geonode.log# cron = -1 -1 -1 -1 -1 /usr/local/bin/python /usr/src/{{project_name}}/manage.py collect_metrics -n
# It will open the psql command line
psql -U postgres
# Create database named as geonode and geonode_data
CREATE DATABASE geonode;
CREATE DATABASE geonode_data;# Create user named as geonode and password as geonode
CREATE USER geonode WITH ENCRYPTED PASSWORD 'geonode';# Grant all the privileges of geonode and geonode_data database to user geonode
GRANT ALL PRIVILEGES ON DATABASE geonode TO geonode;
GRANT ALL PRIVILEGES ON DATABASE geonode_data TO geonode;
...
789 static files copied to '/mnt/volumes/statics/static'.
static data refreshed
Executing UWSGI server uwsgi --ini /usr/src/app/uwsgi.ini for Production
[uWSGI] getting INI configuration from /usr/src/app/uwsgi.ini
# Stop the container
docker-compose stop

# Restart the container in Daemon mode
docker-compose -f docker-compose.yml -f docker-compose.override.<whatever>.yml up -d
# Show the currently running containers
docker ps
CONTAINER ID IMAGE COMMAND CREATED STATUS PORTS NAMES
3b232931f820 geonode/nginx:production "nginx -g 'daemon of…"26 minutes ago Up 26 minutes 0.0.0.0:80->80/tcp nginx4geonode
ff7002ae6e91 geonode/geonode:latest "/usr/src/app/entryp…"26 minutes ago Up 26 minutes 8000/tcp django4geonode
2f155e5043be geonode/geoserver:2.18.3 "/usr/local/tomcat/t…"26 minutes ago Up 26 minutes 8080/tcp geoserver4geonode
97f1668a01b1 geonode_celery "/usr/src/app/entryp…"26 minutes ago Up 26 minutes 8000/tcp geonode_celery_1
1b623598b1bd geonode/postgis:10 "docker-entrypoint.s…" About an hour ago Up 26 minutes 5432/tcp db4geonode
通过运行以下命令停止所有容器
docker-compose stop
通过运行以下命令强制杀死所有容器
docker kill$(docker ps -q)
i您想要清理所有容器和映像,而不删除静电卷(即 DB 以及 GeoServercatalog ),发出以下命令
# Remove all containers
docker rm $(docker ps -a -q)# Remove all docker images
docker rmi $(docker images -q)# Prune the old images
docker system prune -a
如果要删除 volume 还包括
# List of the running volumes
docker volume ls
# Remove the GeoServer catalog by its name
docker volume rm -f geonode-gsdatadir
# Remove all dangling docker volumes
docker volume rm $(docker volume ls -qf dangling=true)# update all images, should be run regularly to fetch published updatesfor i in$(docker images| awk 'NR>1{print $1":"$2}'| grep -v '<none>');do docker pull "$i";done