git clone https://github.com/GeoNode/geonode-project.git -b 3.2.x
# Ubuntusource /usr/share/virtualenvwrapper/virtualenvwrapper.sh
mkvirtualenv --python=/usr/bin/python3 my_geonode
Alterantively you can also create the virtual env like below
python3.8 -m venv /home/geonode/dev/.venvs/my_geonode
source /home/geonode/dev/.venvs/my_geonode/bin/activate
pip install Django==3.2
# CentOS
virtualenv -p python3 my_geonode
source my_geonode/bin/activate
django-admin startproject --template=./geonode-project -e py,sh,md,rst,json,yml,ini,env,sample,properties -n monitoring-cron -n Dockerfile my_geonode
# If the previous command does not work for some reason, try the following one
python -m django startproject --template=./geonode-project -e py,sh,md,rst,json,yml,ini,env,sample,properties -n monitoring-cron -n Dockerfile my_geonode
--- geonode-project\.env+++ my_geonode\.env@@ -1,7 +1,7 @@-COMPOSE_PROJECT_NAME={{project_name}}+COMPOSE_PROJECT_NAME=my_geonode
BACKUPS_VOLUME_DRIVER=local
DOCKER_HOST_IP=
DOCKER_ENV=production
# See https://github.com/geosolutions-it/geonode-generic/issues/28
# to see why we force API version to 1.24
@@ -9,40 +9,40 @@
C_FORCE_ROOT=1
IS_CELERY=false
IS_FIRST_START=true
FORCE_REINIT=false
-SITEURL=http://localhost/+SITEURL=https://my_geonode.geonode.org/
ALLOWED_HOSTS=['django',]
# LANGUAGE_CODE=pt
# LANGUAGES=(('en','English'),('pt','Portuguese'))
GEONODE_INSTANCE_NAME=geonode
-DJANGO_SETTINGS_MODULE={{project_name}}.settings-UWSGI_CMD=uwsgi --ini /usr/src/{{project_name}}/uwsgi.ini+DJANGO_SETTINGS_MODULE=my_geonode.settings+UWSGI_CMD=uwsgi --ini /usr/src/my_geonode/uwsgi.ini
# #################
# backend
# #################
-GEONODE_DATABASE={{project_name}}+GEONODE_DATABASE=my_geonode
GEONODE_DATABASE_PASSWORD=geonode
-GEONODE_GEODATABASE={{project_name}}_data+GEONODE_GEODATABASE=my_geonode_data
GEONODE_GEODATABASE_PASSWORD=geonode
-DATABASE_URL=postgis://{{project_name}}:geonode@db:5432/{{project_name}}-GEODATABASE_URL=postgis://{{project_name}}_data:geonode@db:5432/{{project_name}}_data+DATABASE_URL=postgis://my_geonode:geonode@db:5432/my_geonode+GEODATABASE_URL=postgis://my_geonode_data:geonode@db:5432/my_geonode_data
DEFAULT_BACKEND_DATASTORE=datastore
BROKER_URL=amqp://guest:guest@rabbitmq:5672/
# #################
# geoserver
# #################
-GEOSERVER_WEB_UI_LOCATION=http://localhost/geoserver/-GEOSERVER_PUBLIC_LOCATION=http://localhost/geoserver/+GEOSERVER_WEB_UI_LOCATION=https://my_geonode.geonode.org/geoserver/+GEOSERVER_PUBLIC_LOCATION=https://my_geonode.geonode.org/geoserver/
GEOSERVER_LOCATION=http://geoserver:8080/geoserver/
GEOSERVER_ADMIN_PASSWORD=geoserver
OGC_REQUEST_TIMEOUT=30
OGC_REQUEST_MAX_RETRIES=1
OGC_REQUEST_BACKOFF_FACTOR=0.3
@@ -58,50 +58,50 @@
MOSAIC_ENABLED=False
# #################
# nginx
# HTTPD Server
# #################
-GEONODE_LB_HOST_IP=localhost+GEONODE_LB_HOST_IP=my_geonode.geonode.org
GEONODE_LB_PORT=80
# IP or domain name and port where the server can be reached on HTTPS (leave HOST empty if you want to use HTTP only)
# port where the server can be reached on HTTPS
-HTTP_HOST=localhost-HTTPS_HOST=+HTTP_HOST=+HTTPS_HOST=my_geonode.geonode.org
HTTP_PORT=80
HTTPS_PORT=443
# Let's Encrypt certificates for https encryption. You must have a domain name as HTTPS_HOST (doesn't work
# with an ip) and it must be reachable from the outside. This can be one of the following :
# disabled : we do not get a certificate at all (a placeholder certificate will be used)
# staging : we get staging certificates (are invalid, but allow to test the process completely and have much higher limit rates)
# production : we get a normal certificate (default)
-LETSENCRYPT_MODE=disabled+# LETSENCRYPT_MODE=disabled
# LETSENCRYPT_MODE=staging
-# LETSENCRYPT_MODE=production+LETSENCRYPT_MODE=production
RESOLVER=127.0.0.11
# #################
# Security
# #################
# Admin Settings
ADMIN_PASSWORD=admin
-ADMIN_EMAIL=admin@localhost+ADMIN_EMAIL=admin@my_geonode.geonode.org
# EMAIL Notifications
EMAIL_ENABLE=False
DJANGO_EMAIL_BACKEND=django.core.mail.backends.smtp.EmailBackend
DJANGO_EMAIL_HOST=localhost
DJANGO_EMAIL_PORT=25
DJANGO_EMAIL_HOST_USER=
DJANGO_EMAIL_HOST_PASSWORD=
DJANGO_EMAIL_USE_TLS=False
DJANGO_EMAIL_USE_SSL=False
-DEFAULT_FROM_EMAIL='GeoNode <no-reply@geonode.org>'+DEFAULT_FROM_EMAIL='GeoNode <no-reply@my_geonode.geonode.org>'
# Session/Access Control
LOCKDOWN_GEONODE=False
CORS_ORIGIN_ALLOW_ALL=True
SESSION_EXPIRED_CONTROL_ENABLED=True
DEFAULT_ANONYMOUS_VIEW_PERMISSION=True
# NOTE : $VARIABLES are env variables replaced by entrypoint.sh using envsubst# not to be mistaken for nginx variables (also starting with $, but usually lowercase)# This file is to be included in the main nginx.conf configuration if HTTPS_HOST is set
ssl_session_cache shared:SSL:10m;
ssl_session_timeout 10m;# this is the actual HTTPS host
server {
listen 443 ssl;
server_name my_geonode.geonode.org;
keepalive_timeout 70;
ssl_certificate /certificate_symlink/fullchain.pem;
ssl_certificate_key /certificate_symlink/privkey.pem;
ssl_protocols TLSv1 TLSv1.1 TLSv1.2;
ssl_ciphers HIGH:!aNULL:!MD5;
include sites-enabled/*.conf;}# if we try to connect from http, we redirect to https
server {
listen 80;
server_name my_geonode.geonode.org;# TODO : once geoserver supports relative urls, we should allow access though both HTTP and HTTPS at the same time and hence remove HTTP_HOST from this line# Except for let's encrypt challenge
location /.well-known {alias /geonode-certificates/.well-known;
include /etc/nginx/mime.types;}# Redirect to https
location / {return302 https://my_geonode.geonode.org/$request_uri;# TODO : we should use 301 (permanent redirect, but not practical for debug)}}
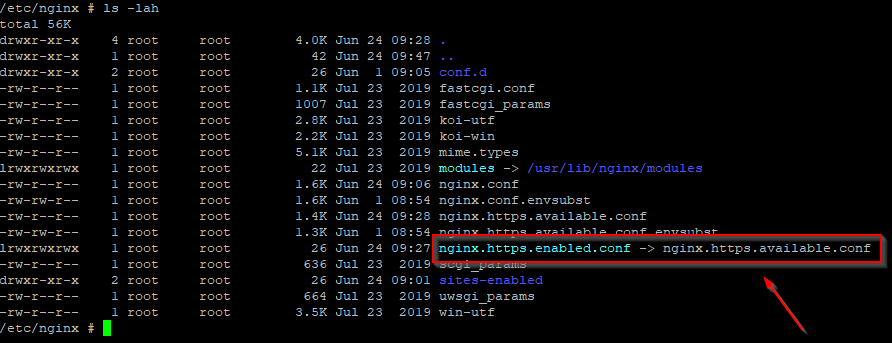
警告
保存更改(如果有)并退出!
重新加载Nginx配置
nginx -s reload
2020/06/24 10:00:11 [notice]112#112: signal process started
/etc/nginx# exit
# Enter the GeoNode Docker Container
docker-compose exec django bash

# Run the `sync_geonode_datasets` management command
./manage.sh sync_geonode_datasets --updatepermissions
# Enter the GeoNode Docker Container
docker-compose exec django bash

# Run the `sync_geonode_datasets` management command
./manage.sh sync_geonode_datasets --updatethumbnails
# Enter the GeoNode Docker Container
docker-compose exec django bash

# Run the `sync_geonode_datasets` management command
./manage.sh sync_geonode_datasets --updatebbox
# Enter the GeoNode Docker Container
docker-compose exec django bash

# Run the `set_all_layers_metadata` management command
./manage.sh set_all_layers_metadata -d
此外,还可以执行以下操作 力 在重新生成之前清除链接:
# Enter the GeoNode Docker Container
docker-compose exec django bash

# Run the `set_all_layers_metadata` management command
./manage.sh set_all_layers_metadata -d --prune
# Enter the GeoNode Docker Container
docker-compose exec django bash

# Run the `migrate_baseurl` management command
./manage.sh migrate_baseurl --source-address=my_geonode.geonode.org --target-address=prod_geonode.geonode.org

# Run the `set_all_layers_metadata` management command
./manage.sh set_all_layers_metadata -d