 Source
图像的NumPy速成课程
中的图像 scikit-image 以NumPy ndarray为代表。因此,可以使用用于操作数组的标准NumPy方法来实现许多常见操作:
>>> from skimage import data
>>> camera = data.camera()
>>> type(camera)
<type 'numpy.ndarray'>
检索图像的几何图形和像素数::
>>> camera.shape
(512, 512)
>>> camera.size
262144
正在检索有关图像强度值的统计信息:
>>> camera.min(), camera.max()
(0, 255)
>>> camera.mean()
118.31400299072266
表示图像的NumPy数组可以是不同的整型或浮点型。看见 图像数据类型及其含义 有关这些类型的更多信息以及如何 scikit-image 治疗他们。
NumPy索引
NumPy索引既可用于查看像素值,也可用于修改它们:
>>> # Get the value of the pixel at the 10th row and 20th column
>>> camera[10, 20]
153
>>> # Set to black the pixel at the 3rd row and 10th column
>>> camera[3, 10] = 0
注意!在NumPy索引中,第一维 (camera.shape[0] )对应于行,而第二个 (camera.shape[1] )对应于列,原点为 (camera[0, 0] )在左上角。这与矩阵/线性代数记数法匹配,但与笛卡尔(x,y)坐标相反。看见 Coordinate conventions 有关更多详细信息,请参阅以下内容。
除了单个像素,还可以使用NumPy的不同索引功能访问/修改整个像素组的值。
切片::
>>> # Set the first ten lines to "black" (0)
>>> camera[:10] = 0
掩码(使用布尔掩码进行索引)::
>>> mask = camera < 87
>>> # Set to "white" (255) the pixels where mask is True
>>> camera[mask] = 255
花式索引(使用多组索引编制索引):
>>> inds_r = np.arange(len(camera))
>>> inds_c = 4 * inds_r % len(camera)
>>> camera[inds_r, inds_c] = 0
当您需要选择一组要执行操作的像素时,蒙版非常有用。遮罩可以是与图像形状相同的任何布尔数组(或可广播到图像形状的形状)。这可用于定义感兴趣区域,例如,磁盘::
>>> nrows, ncols = camera.shape
>>> row, col = np.ogrid[:nrows, :ncols]
>>> cnt_row, cnt_col = nrows / 2, ncols / 2
>>> outer_disk_mask = ((row - cnt_row)**2 + (col - cnt_col)**2 >
...                    (nrows / 2)**2)
>>> camera[outer_disk_mask] = 0
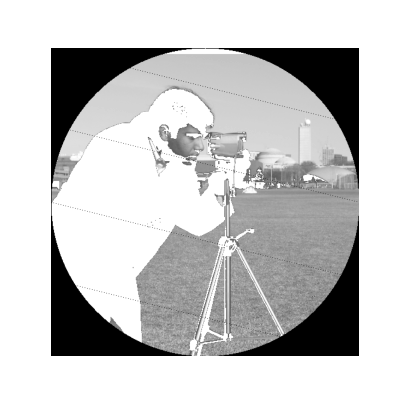
来自NumPy的布尔运算可用于定义更复杂的掩码::
>>> lower_half = row > cnt_row
>>> lower_half_disk = np.logical_and(lower_half, outer_disk_mask)
>>> camera = data.camera()
>>> camera[lower_half_disk] = 0
彩色图像
对于彩色图像,上述所有情况都是正确的。彩色图像是一个NumPy数组,具有通道的附加尾部维度::
>>> cat = data.chelsea()
>>> type(cat)
<type 'numpy.ndarray'>
>>> cat.shape
(300, 451, 3)
这说明, cat 是具有三个通道(红色、绿色和蓝色)的300 x 451像素图像。与前面一样,我们可以获取和设置像素值::
>>> cat[10, 20]
array([151, 129, 115], dtype=uint8)
>>> # Set the pixel at (50th row, 60th column) to "black"
>>> cat[50, 60] = 0
>>> # set the pixel at (50th row, 61st column) to "green"
>>> cat[50, 61] = [0, 255, 0]  # [red, green, blue]
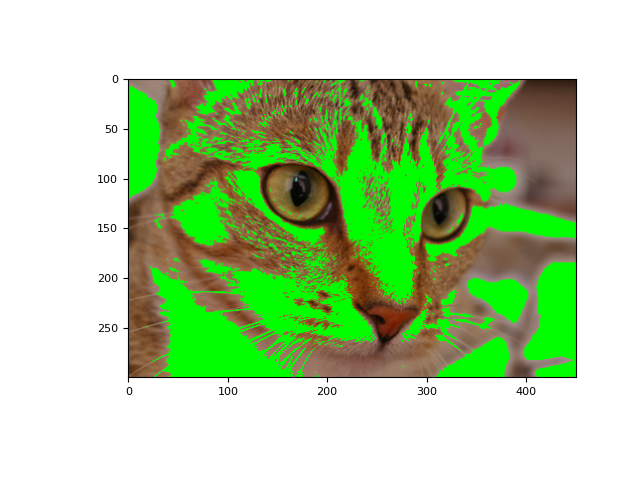
我们还可以对2D多通道图像使用2D布尔蒙版,就像我们对上面的灰度图像所做的那样:
在2D彩色图像上使用2D蒙版
>>> from skimage import data
>>> cat = data.chelsea()
>>> reddish = cat[:, :, 0] > 160
>>> cat[reddish] = [0, 255, 0]
>>> plt.imshow(cat)
(Source code _, png , pdf )
坐标约定
因为 scikit-image 使用NumPy数组表示图像,坐标约定必须匹配。二维(2D)灰度图像(例如 camera 以上)按行和列进行索引(缩写为 (row, col) 或 (r, c) ),元素最低 (0, 0) 在左上角。在类库的不同部分,您还将看到 rr 和 cc 请参阅行和列坐标列表。我们将这一惯例与 (x, y) ,通常表示标准笛卡尔坐标,其中 x 是水平坐标, y -垂直的,原点在左下角(例如,Matplotlib轴使用此约定)。
在多通道图像的情况下,最后一个维度用于颜色通道,并由 channel 或 ch 。
最后,对于体积(3D)图像,例如视频、磁共振成像(MRI)扫描、共焦显微镜等,我们将领先维度称为 plane ,缩写为 pln 或 p 。
这些约定总结如下:
图像类型 |
坐标 |
|---|---|
2D灰度级 |
(行,列) |
2D多通道(例如RGB) |
(ROW、COLE、CH) |
3D灰度 |
(PLN,ROW,COL) |
3D多通道 |
(PLN,ROW,COL,CH) |
中的许多函数 scikit-image 可以直接操作3D图像::
>>> im3d = np.random.rand(100, 1000, 1000)
>>> from skimage import morphology
>>> from scipy import ndimage as ndi
>>> seeds = ndi.label(im3d < 0.1)[0]
>>> ws = morphology.watershed(im3d, seeds)
然而,在许多情况下,第三个空间维度的分辨率低于其他两个维度。一些 scikit-image 函数提供了一个 spacing 帮助处理此类数据的关键字参数::
>>> from skimage import segmentation
>>> slics = segmentation.slic(im3d, spacing=[5, 1, 1], multichannel=False)
在其他情况下,处理必须以平面方式完成。当平面沿前导尺寸堆叠时(与我们的约定一致),可以使用以下语法:
>>> from skimage import filters
>>> edges = np.empty_like(im3d)
>>> for pln, image in enumerate(im3d):
...     # Iterate over the leading dimension
...     edges[pln] = filters.sobel(image)
关于数组维度顺序的注记
尽管轴的标签可能看起来很随意,但它可能会对操作速度产生重大影响。这是因为现代处理器从来不会从内存中只检索一个项目,而是检索相邻项目的整个块(一种称为预取的操作)。因此,处理内存中相邻的元素比处理分散的元素要快,即使操作数相同:
>>> def in_order_multiply(arr, scalar):
...     for plane in list(range(arr.shape[0])):
...         arr[plane, :, :] *= scalar
...
>>> def out_of_order_multiply(arr, scalar):
...     for plane in list(range(arr.shape[2])):
...         arr[:, :, plane] *= scalar
...
>>> import time
>>> im3d = np.random.rand(100, 1024, 1024)
>>> t0 = time.time(); x = in_order_multiply(im3d, 5); t1 = time.time()
>>> print("%.2f seconds" % (t1 - t0))
0.14 seconds
>>> s0 = time.time(); x = out_of_order_multiply(im3d, 5); s1 = time.time()
>>> print("%.2f seconds" % (s1 - s0))
1.18 seconds
>>> print("Speedup: %.1fx" % ((s1 - s0) / (t1 - t0)))
Speedup: 8.6x
当最后/最右边的维度变得更大时,加速比甚至更大。这是值得思考的 数据局部性 在开发算法时。特别是, scikit-image 默认情况下使用C连续数组。当使用嵌套循环时,数组的最后/最右边的维度应该在计算的最里面的循环中。在上面的示例中, *= NumPy运算符在所有剩余维度上迭代。
关于时间维的一个注记
虽然 scikit-image 目前没有提供专门处理时变3D数据的函数,它与NumPy数组的兼容性使我们可以非常自然地处理形状为(t,pln,row,coll,ch)的5D数组:
>>> for timepoint in image5d:
...     # Each timepoint is a 3D multichannel image
...     do_something_with(timepoint)
然后,我们可以按如下方式补充上表:
图像类型 |
坐标 |
|---|---|
2D彩色视频 |
(T、ROW、COL、CH) |
3D多通道视频 |
(T、PLN、ROW、COL、CH) |