 Source
备注
单击 here 下载完整的示例代码或通过活页夹在浏览器中运行此示例
图像配准
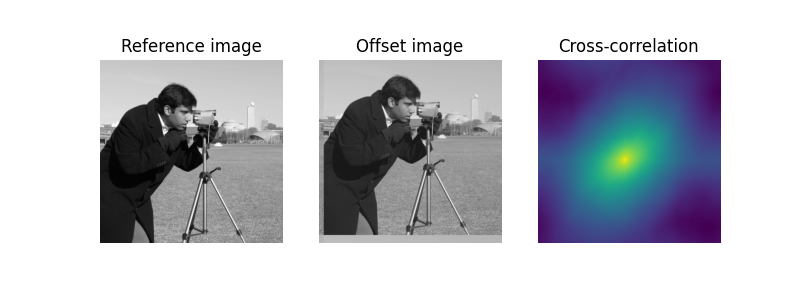
在这个例子中,我们使用相位互相关来识别两个大小相似的图像之间的相对移位。
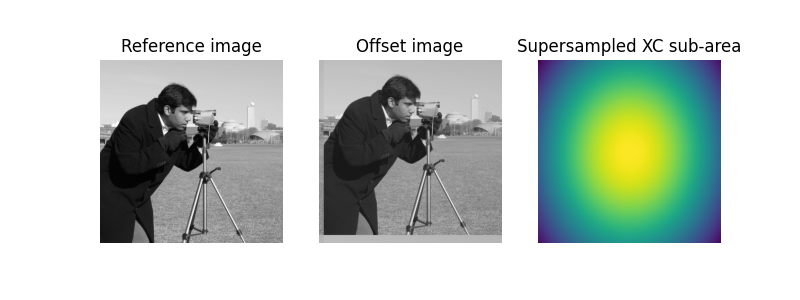
这个 phase_cross_correlation 函数使用傅里叶空间中的互相关,可选地使用上采样矩阵乘法DFT来实现任意亚像素精度 1.
- 1
曼努埃尔·吉萨尔-西开罗斯、塞缪尔·T·瑟曼和詹姆斯·R·菲尼普,《高效亚像素图像配准算法》,《光学通讯》33,156-158(2008)。 DOI:10.1364/OL.33.000156
输出:
Known offset (y, x): (-22.4, 13.32)
Detected pixel offset (y, x): [ 22. -13.]
Detected subpixel offset (y, x): [ 22.4  -13.32]
import numpy as np
import matplotlib.pyplot as plt

from skimage import data
from skimage.registration import phase_cross_correlation
from skimage.registration._phase_cross_correlation import _upsampled_dft
from scipy.ndimage import fourier_shift

image = data.camera()
shift = (-22.4, 13.32)
# The shift corresponds to the pixel offset relative to the reference image
offset_image = fourier_shift(np.fft.fftn(image), shift)
offset_image = np.fft.ifftn(offset_image)
print(f"Known offset (y, x): {shift}")

# pixel precision first
shift, error, diffphase = phase_cross_correlation(image, offset_image)

fig = plt.figure(figsize=(8, 3))
ax1 = plt.subplot(1, 3, 1)
ax2 = plt.subplot(1, 3, 2, sharex=ax1, sharey=ax1)
ax3 = plt.subplot(1, 3, 3)

ax1.imshow(image, cmap='gray')
ax1.set_axis_off()
ax1.set_title('Reference image')

ax2.imshow(offset_image.real, cmap='gray')
ax2.set_axis_off()
ax2.set_title('Offset image')

# Show the output of a cross-correlation to show what the algorithm is
# doing behind the scenes
image_product = np.fft.fft2(image) * np.fft.fft2(offset_image).conj()
cc_image = np.fft.fftshift(np.fft.ifft2(image_product))
ax3.imshow(cc_image.real)
ax3.set_axis_off()
ax3.set_title("Cross-correlation")

plt.show()

print(f"Detected pixel offset (y, x): {shift}")

# subpixel precision
shift, error, diffphase = phase_cross_correlation(image, offset_image,
                                                  upsample_factor=100)

fig = plt.figure(figsize=(8, 3))
ax1 = plt.subplot(1, 3, 1)
ax2 = plt.subplot(1, 3, 2, sharex=ax1, sharey=ax1)
ax3 = plt.subplot(1, 3, 3)

ax1.imshow(image, cmap='gray')
ax1.set_axis_off()
ax1.set_title('Reference image')

ax2.imshow(offset_image.real, cmap='gray')
ax2.set_axis_off()
ax2.set_title('Offset image')

# Calculate the upsampled DFT, again to show what the algorithm is doing
# behind the scenes.  Constants correspond to calculated values in routine.
# See source code for details.
cc_image = _upsampled_dft(image_product, 150, 100, (shift*100)+75).conj()
ax3.imshow(cc_image.real)
ax3.set_axis_off()
ax3.set_title("Supersampled XC sub-area")


plt.show()

print(f"Detected subpixel offset (y, x): {shift}")
脚本的总运行时间: (0分0.380秒)