小精灵
HTML5、WebSocket和WebRTC
Godot的一大特点是它能够导出到HTML5/WebAssembly平台,当用户访问您的网页时,允许您的游戏直接在浏览器中运行。
这对演示和完整游戏来说都是一个很好的机会,但过去也有一些局限性。在网络领域,浏览器以前只支持httprequest,直到最近,第一个websocket和第二个webrtc被提出作为标准。
WebSocket
当WebSocket协议在2011年12月标准化时,它允许浏览器创建到WebSocket服务器的稳定双向连接。该协议非常简单,但是是向浏览器发送推送通知的一个非常强大的工具,已经被用于实现聊天、基于回合的游戏等。
然而,websockets仍然使用TCP连接,这对可靠性很好,但对延迟却没有好处,因此对于诸如VoIP和快节奏游戏之类的实时应用程序不太好。
小精灵
因此,自2010年以来,谷歌开始研究一种称为WebRTC的新技术,该技术后来于2017年成为W3C候选推荐。WebRTC是一组更加复杂的规范,它依赖于许多其他幕后技术(ICE、DTL、SDP),以提供两个对等端之间的快速、实时和安全的通信。
其目的是在两个对等机之间找到最快的路由,并尽可能建立直接通信(即尽量避免中继服务器)。
但是,这是有代价的,即在开始通信之前,必须在两个对等端之间交换一些媒体信息(以会话描述协议-SDP字符串的形式)。这通常采用所谓的WebRTC信令服务器的形式。
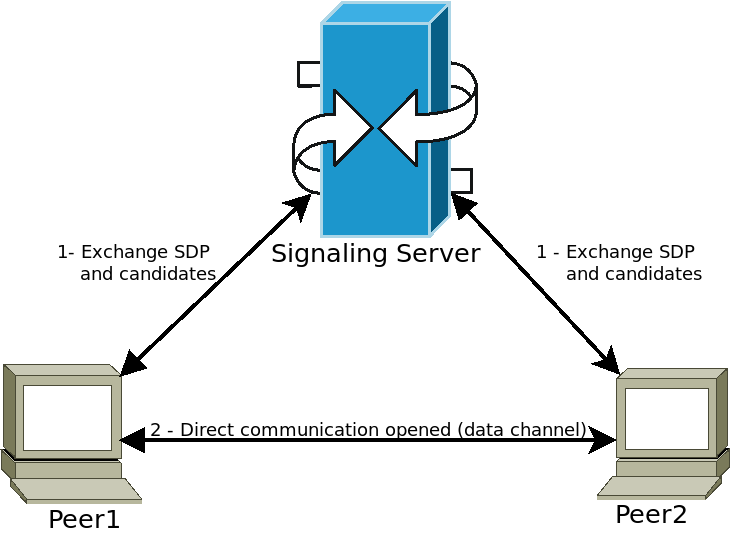
对等端连接到信令服务器(例如WebSocket服务器)并发送其媒体信息。然后,服务器将这些信息转发给其他对等方,允许它们建立所需的直接通信。完成此步骤后,对等端可以断开与信令服务器的连接,并保持直接对等端(P2P)连接打开。
在Godot中使用WebRTC
webrtc通过两个主要类在godot中实现 WebRTCPeerConnection 和 WebRTCDataChannel ,加上多人API实现 WebRTCMultiplayer . 参见第节 high-level multiplayer 了解更多详细信息。
注解
这些类在HTML5中自动可用,但是 require an external GDNative plugin on native (non-HTML5) plaftorms . 查看 webrtc-native plugin repository 获取最新信息 release .
最小连接示例
此示例将向您展示如何在同一应用程序中的两个对等端之间创建WebRTC连接。这在现实生活中并不是很有用,但会让您对WebRTC连接的设置有一个很好的了解。
extends Node

# Create the two peers
var p1 = WebRTCPeerConnection.new()
var p2 = WebRTCPeerConnection.new()
# And a negotiated channel for each each peer
var ch1 = p1.create_data_channel("chat", {"id": 1, "negotiated": true})
var ch2 = p2.create_data_channel("chat", {"id": 1, "negotiated": true})

func _ready():
    # Connect P1 session created to itself to set local description
    p1.connect("session_description_created", p1, "set_local_description")
    # Connect P1 session and ICE created to p2 set remote description and candidates
    p1.connect("session_description_created", p2, "set_remote_description")
    p1.connect("ice_candidate_created", p2, "add_ice_candidate")

    # Same for P2
    p2.connect("session_description_created", p2, "set_local_description")
    p2.connect("session_description_created", p1, "set_remote_description")
    p2.connect("ice_candidate_created", p1, "add_ice_candidate")

    # Let P1 create the offer
    p1.create_offer()

    # Wait a second and send message from P1
    yield(get_tree().create_timer(1), "timeout")
    ch1.put_packet("Hi from P1".to_utf8())

    # Wait a second and send message from P2
    yield(get_tree().create_timer(1), "timeout")
    ch2.put_packet("Hi from P2".to_utf8())

func _process(_delta):
    # Poll connections
    p1.poll()
    p2.poll()

    # Check for messages
    if ch1.get_ready_state() == ch1.STATE_OPEN and ch1.get_available_packet_count() > 0:
        print("P1 received: ", ch1.get_packet().get_string_from_utf8())
    if ch2.get_ready_state() == ch2.STATE_OPEN and ch2.get_available_packet_count() > 0:
        print("P2 received: ", ch2.get_packet().get_string_from_utf8())
这将打印:
P1 received: Hi from P1
P2 received: Hi from P2
本地信令示例
此示例在上一个示例上展开,在两个不同的场景中分离对等点,并使用 singleton 作为信号服务器。
# An example P2P chat client (chat.gd)
extends Node

var peer = WebRTCPeerConnection.new()

# Create negotiated data channel
var channel = peer.create_data_channel("chat", {"negotiated": true, "id": 1})

func _ready():
    # Connect all functions
    peer.connect("ice_candidate_created", self, "_on_ice_candidate")
    peer.connect("session_description_created", self, "_on_session")

    # Register to the local signaling server (see below for the implementation)
    Signaling.register(get_path())

func _on_ice_candidate(mid, index, sdp):
    # Send the ICE candidate to the other peer via signaling server
    Signaling.send_candidate(get_path(), mid, index, sdp)

func _on_session(type, sdp):
    # Send the session to other peer via signaling server
    Signaling.send_session(get_path(), type, sdp)
    # Set generated description as local
    peer.set_local_description(type, sdp)

func _process(delta):
    # Always poll the connection frequently
    peer.poll()
    if channel.get_ready_state() == WebRTCDataChannel.STATE_OPEN:
        while channel.get_available_packet_count() > 0:
            print(get_path(), " received: ", channel.get_packet().get_string_from_utf8())

func send_message(message):
    channel.put_packet(message.to_utf8())
现在对于本地信令服务器:
注解
此本地信令服务器应该用作 singleton 在同一场景中连接两个对等点。
# A local signaling server. Add this to autoloads with name "Signaling" (/root/Signaling)
extends Node

# We will store the two peers here
var peers = []

func register(path):
    assert(peers.size() < 2)
    peers.append(path)
    # If it's the second one, create an offer
    if peers.size() == 2:
        get_node(peers[0]).peer.create_offer()

func _find_other(path):
    # Find the other registered peer.
    for p in peers:
        if p != path:
            return p
    return ""

func send_session(path, type, sdp):
    var other = _find_other(path)
    assert(other != "")
    get_node(other).peer.set_remote_description(type, sdp)

func send_candidate(path, mid, index, sdp):
    var other = _find_other(path)
    assert(other != "")
    get_node(other).peer.add_ice_candidate(mid, index, sdp)
然后你可以这样使用它:
# Main scene (main.gd)
extends Node

const Chat = preload("res://chat.gd")

func _ready():
    var p1 = Chat.new()
    var p2 = Chat.new()
    add_child(p1)
    add_child(p2)
    get_tree().create_timer(1), "timeout")
    p1.send_message("Hi from %s" % p1.path())

    # Wait a second and send message from P2
    yield(get_tree().create_timer(1), "timeout")
    p2.send_message("Hi from %s" % p2.path())
这将打印类似的内容:
/root/main/@@3 received: Hi from /root/main/@@2
/root/main/@@2 received: Hi from /root/main/@@3
使用WebSocket进行远程信令
一个更高级的演示,使用WebSocket发送对等点和 WebRTCMultiplayer 在 godot demo projects 在下面 networking/webrtc_signaling .