脚本(续)
处理
Godot中的一些操作是由回调或虚拟函数触发的,因此不需要编写一直运行的代码。
但是,在每一帧上都需要处理一个脚本仍然很常见。有两种类型的处理:空闲处理和物理处理。
当方法 Node._process() 在脚本中找到。它可以通过 Node.set_process() 功能。
每次绘制帧时都将调用此方法:
func _process(delta):
    # Do something...
    pass
public override void _Process(float delta)
{
    // Do something...
}
重要的是要记住 _process() 将根据应用程序运行的每秒帧数(fps)来调用。此速率随时间和设备而变化。
为了帮助管理这种可变性, delta 参数包含自上次调用 _process() .
这个参数可以用来确保不管游戏的fps是多少,事情总是花费相同的时间。
例如,移动通常与时间增量相乘,以使移动速度既恒定又独立于帧速率。
物理处理 _physics_process() 是相似的,但它应该用于每个物理步骤之前必须发生的过程,例如控制一个字符。它总是在物理步骤之前运行,并以固定的时间间隔调用:默认为每秒60次。您可以在项目设置中的物理->公共->物理fps下更改间隔。
函数 _process() 然而,与物理学并不同步。它的帧速率不是恒定的,取决于硬件和游戏优化。它的执行是在单线程游戏的物理步骤之后完成的。
一种简单的方法 _process() 工作中的功能是用单个标签节点创建一个场景,脚本如下:
extends Label

var accum = 0

func _process(delta):
    accum += delta
    text = str(accum) # 'text' is a built-in label property.
public class CustomLabel : Label
{
    private float _accum;

    public override void _Process(float delta)
    {
        _accum += delta;
        Text = _accum.ToString(); // 'Text' is a built-in label property.
    }
}
这将显示一个计数器增加每个帧。
组
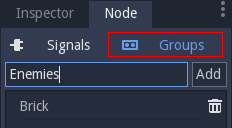
Godot中的组工作起来就像你在其他软件中遇到的标签。节点可以根据需要添加到任意多个组中。这是组织大型场景的有用功能。向组中添加节点有两种方法。第一个来自UI,使用节点面板下的Groups按钮:
第二种方法是从代码开始。以下脚本将当前节点添加到 enemies 当它出现在场景树上时立即分组。
func _ready():
    add_to_group("enemies")
public override void _Ready()
{
    base._Ready();

    AddToGroup("enemies");
}
这样,如果玩家被发现潜入秘密基地,所有的敌人都可以通过 SceneTree.call_group() :
func _on_discovered(): # This is a purely illustrative function.
    get_tree().call_group("enemies", "player_was_discovered")
public void _OnDiscovered() // This is a purely illustrative function.
{
    GetTree().CallGroup("enemies", "player_was_discovered");
}
上面的代码调用函数 player_was_discovered 在小组的每个成员身上 enemies .
还可以获得 enemies 通过调用的节点 SceneTree.get_nodes_in_group() :
var enemies = get_tree().get_nodes_in_group("enemies")
var enemies = GetTree().GetNodesInGroup("enemies");
这个 SceneTree 类提供了许多有用的方法,如与场景交互、节点层次结构和节点组。它允许你轻松地切换场景或重新加载,退出游戏或暂停并取消暂停。它甚至带有有趣的信号。所以如果你有时间的话就去看看吧!
通知
Godot有一套通知系统。这些通常不需要编写脚本,因为它的级别太低,而且大多数脚本都提供了虚拟函数。很高兴知道它们的存在。例如,您可以添加 Object._notification() 脚本中的函数:
func _notification(what):
    match what:
        NOTIFICATION_READY:
            print("This is the same as overriding _ready()...")
        NOTIFICATION_PROCESS:
            print("This is the same as overriding _process()...")
public override void _Notification(int what)
{
    base._Notification(what);

    switch (what)
    {
        case NotificationReady:
            GD.Print("This is the same as overriding _Ready()...");
            break;
        case NotificationProcess:
            var delta = GetProcessDeltaTime();
            GD.Print("This is the same as overriding _Process()...");
            break;
    }
}
中每个类的文档 Class Reference 显示它可以接收的通知。然而,在大多数情况下,gdscript提供更简单的可重写函数。
可重写函数
这些可重写的函数如下所述,可以应用于节点:
func _enter_tree():
    # When the node enters the Scene Tree, it becomes active
    # and  this function is called. Children nodes have not entered
    # the active scene yet. In general, it's better to use _ready()
    # for most cases.
    pass

func _ready():
    # This function is called after _enter_tree, but it ensures
    # that all children nodes have also entered the Scene Tree,
    # and became active.
    pass

func _exit_tree():
    # When the node exits the Scene Tree, this function is called.
    # Children nodes have all exited the Scene Tree at this point
    # and all became inactive.
    pass

func _process(delta):
    # This function is called every frame.
    pass

func _physics_process(delta):
    # This is called every physics frame.
    pass
public override void _EnterTree()
{
    // When the node enters the Scene Tree, it becomes active
    // and  this function is called. Children nodes have not entered
    // the active scene yet. In general, it's better to use _ready()
    // for most cases.
    base._EnterTree();
}

public override void _Ready()
{
    // This function is called after _enter_tree, but it ensures
    // that all children nodes have also entered the Scene Tree,
    // and became active.
    base._Ready();
}

public override void _ExitTree()
{
    // When the node exits the Scene Tree, this function is called.
    // Children nodes have all exited the Scene Tree at this point
    // and all became inactive.
    base._ExitTree();
}

public override void _Process(float delta)
{
    // This function is called every frame.
    base._Process(delta);
}

public override void _PhysicsProcess(float delta)
{
    // This is called every physics frame.
    base._PhysicsProcess(delta);
}
如前所述,最好使用这些函数而不是通知系统。
创建节点
要从代码创建节点,请调用 .new() 方法,类似于任何其他基于类的数据类型。例如:
var s
func _ready():
    s = Sprite.new() # Create a new sprite!
    add_child(s) # Add it as a child of this node.
private Sprite _sprite;

public override void _Ready()
{
    base._Ready();

    _sprite = new Sprite(); // Create a new sprite!
    AddChild(_sprite); // Add it as a child of this node.
}
要删除节点,无论是在场景内部还是外部, free() 必须使用:
func _someaction():
    s.free() # Immediately removes the node from the scene and frees it.
public void _SomeAction()
{
    _sprite.Free(); // Immediately removes the node from the scene and frees it.
}
当一个节点被释放时,它也会释放它的所有子节点。因此,手动删除节点比看起来要简单得多。释放基节点,子树中的其他所有内容都会随之消失。
当我们想要删除一个当前被“阻塞”的节点时,可能会出现一种情况,因为它正在发出一个信号或调用一个函数。这将使游戏失败。使用调试器运行Godot通常会捕获此情况并警告您。
删除节点最安全的方法是使用 Node.queue_free() . 这将在空闲期间安全地擦除节点。
func _someaction():
    s.queue_free() # Removes the node from the scene and frees it when it becomes safe to do so.
public void _SomeAction()
{
    _sprite.QueueFree(); // Removes the node from the scene and frees it when it becomes safe to do so.
}
实例场景
从代码中实例化场景分两步完成。第一种方法是从硬盘加载场景:
var scene = load("res://myscene.tscn") # Will load when the script is instanced.
var scene = GD.Load<PackedScene>("res://myscene.tscn"); // Will load when the script is instanced.
预加载它可能更方便,因为它发生在解析时(仅gdscript):
var scene = preload("res://myscene.tscn") # Will load when parsing the script.
但是 scene 还不是节点。它被包装在一个叫做 PackedScene . 要创建实际节点,函数 PackedScene.instance() 必须调用。这将返回可添加到活动场景的节点树:
var node = scene.instance()
add_child(node)
var node = scene.Instance();
AddChild(node);
这两步过程的优点是,打包场景可以保持加载并随时可用,这样您就可以根据需要创建任意多个实例。这对于在活动场景中快速实例几个敌人、子弹和其他实体特别有用。
将脚本注册为类
Godot有一个“脚本类”功能,可以在编辑器中注册单个脚本。默认情况下,只能通过直接加载文件来访问未命名的脚本。
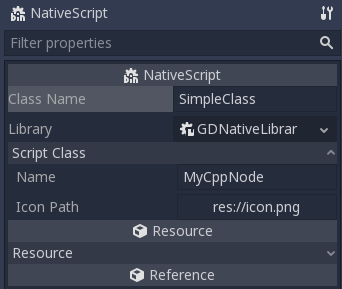
您可以在编辑器中将脚本命名并注册为类型, class_name 关键字,后跟类的名称。您可以添加一个逗号和一个可选的图像路径以用作图标。然后,您将在“节点”或“资源创建”对话框中找到新类型。
extends Node

# Declare the class name here
class_name ScriptName, "res://path/to/optional/icon.svg"

func _ready():
    var this = ScriptName           # reference to the script
    var cppNode = MyCppNode.new()   # new instance of a class named MyCppNode

    cppNode.queue_free()
警告
在Godot 3.1中:
只有GDScript和NATScript脚本,即C++和其他GDATE语言,可以注册脚本。
只有gdscript为每个命名脚本创建全局变量。