点
虽然点看起来是最简单的形状类型,只有位置,没有其他维度,但在SLD中有许多不同的方法可以为点设置样式。
警告
本页所示的代码示例为 不是完整的SLD代码 ,因为为了简洁起见,它们省略了SLD的页眉和页脚信息。请使用链接下载每个示例的完整SLD。
示例点图层
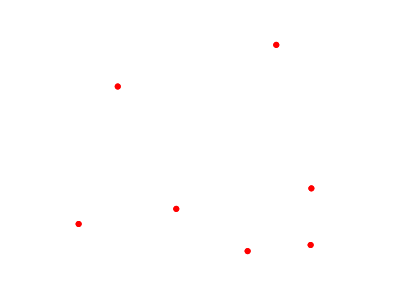
这个 points layer 下面的示例包含虚构国家主要城市的名称和人口信息。作为参考,下面包含了该层中点的属性表。
fid (功能ID) |
name (城市名称) |
pop (人口) |
point.1 |
长鳍金枪鱼 |
157860 |
point.2 |
Supox市 |
578231 |
point.3 |
卢基斯 |
98159 |
point.4 |
这块土地 |
34879 |
point.5 |
Synopolis公司 |
24567 |
point.6 |
圣格利桑多 |
76024 |
point.7 |
碎屑 |
205609 |
简单点
此示例指定点的样式为直径为6像素的红色圆。
简单点
代码
View and download the full "Simple point" SLD
 1   <FeatureTypeStyle>
 2     <Rule>
 3       <PointSymbolizer>
 4         <Graphic>
 5           <Mark>
 6             <WellKnownName>circle</WellKnownName>
 7             <Fill>
 8               <CssParameter name="fill">#FF0000</CssParameter>
 9             </Fill>
10           </Mark>
11           <Size>6</Size>
12         </Graphic>
13       </PointSymbolizer>
14     </Rule>
15   </FeatureTypeStyle>
细节
有一个 <Rule> 在一个 <FeatureTypeStyle> 对于这个SLD,这是最简单的可能情况。(所有后续示例将包含一个 <Rule> 一个 <FeatureTypeStyle> 除非另有规定。)造型点通过 <PointSymbolizer> ( lines 3-13 ) 第6行 将符号的形状指定为圆形, 第8行 确定填充颜色为红色 (#FF0000 ) Line 11 将图形的大小(直径)设置为6像素。
带笔划的简单点
此示例在 简单点 ,笔画颜色为黑色,厚度为2像素。
带笔划的简单点
代码
View and download the full "Simple point with stroke" SLD
 1   <FeatureTypeStyle>
 2     <Rule>
 3       <PointSymbolizer>
 4         <Graphic>
 5           <Mark>
 6             <WellKnownName>circle</WellKnownName>
 7             <Fill>
 8               <CssParameter name="fill">#FF0000</CssParameter>
 9             </Fill>
10             <Stroke>
11               <CssParameter name="stroke">#000000</CssParameter>
12               <CssParameter name="stroke-width">2</CssParameter>
13             </Stroke>
14           </Mark>
15           <Size>6</Size>
16         </Graphic>
17       </PointSymbolizer>
18     </Rule>
19   </FeatureTypeStyle>
细节
此示例与 简单点 例子。 Lines 10-13 指定笔划,使用 第11行 将颜色设置为黑色 (#000000 ) 第12行 将宽度设置为2像素。
旋转正方形
此示例创建一个正方形而不是圆形,将其变为绿色,将其大小调整为12个像素,并将其旋转45度。
旋转正方形
代码
View and download the full "Rotated square" SLD
 1   <FeatureTypeStyle>
 2     <Rule>
 3       <PointSymbolizer>
 4         <Graphic>
 5           <Mark>
 6             <WellKnownName>square</WellKnownName>
 7             <Fill>
 8               <CssParameter name="fill">#009900</CssParameter>
 9             </Fill>
10           </Mark>
11           <Size>12</Size>
12           <Rotation>45</Rotation>
13         </Graphic>
14       </PointSymbolizer>
15     </Rule>
16   </FeatureTypeStyle>
细节
在这个例子中, 第6行 将形状设置为方形, 第8行 将颜色设置为深绿色 (#009900 ) Line 11 将正方形的大小设置为12像素,以及 第12行 将旋转角度设置为45度。
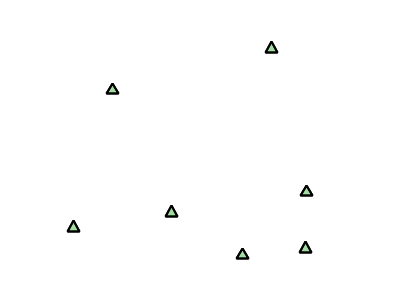
透明三角形
此示例绘制三角形,创建与 带笔划的简单点 示例,并将三角形的填充设置为20%不透明度(大部分是透明的)。
透明三角形
代码
View and download the full "Transparent triangle" SLD
 1   <FeatureTypeStyle>
 2     <Rule>
 3       <PointSymbolizer>
 4         <Graphic>
 5           <Mark>
 6             <WellKnownName>triangle</WellKnownName>
 7             <Fill>
 8               <CssParameter name="fill">#009900</CssParameter>
 9               <CssParameter name="fill-opacity">0.2</CssParameter>
10             </Fill>
11             <Stroke>
12               <CssParameter name="stroke">#000000</CssParameter>
13               <CssParameter name="stroke-width">2</CssParameter>
14             </Stroke>
15           </Mark>
16           <Size>12</Size>
17         </Graphic>
18       </PointSymbolizer>
19     </Rule>
20   </FeatureTypeStyle>
细节
在这个例子中, 第6行 再次将形状设置为三角形。 第8行 将填充颜色设置为深绿色 (#009900 ) 第9行 将不透明度设置为0.2(20%不透明)。不透明度值为1表示形状是100%不透明的,而不透明度值为0表示形状是0%不透明或完全透明的。0.2(20%不透明)的值表示点的填充部分采用其下方绘制的任何内容的颜色和样式。在本例中,由于背景是白色,所以深绿色看起来更亮。如果将这些点设置在深色背景上,则生成的颜色将更暗。 Lines 12-13 将笔划颜色设置为黑色 (#000000 )宽度为2像素。最后, 第16行 将点的直径设置为12像素。
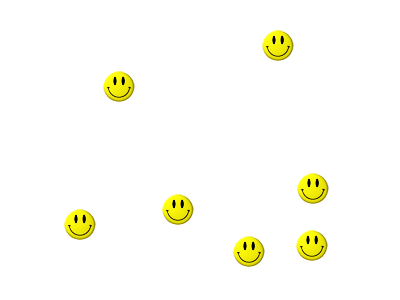
指向图形
此示例将每个点样式设置为图形而不是简单形状。
指向图形
代码
View and download the full "Point as graphic" SLD
 1   <FeatureTypeStyle>
 2     <Rule>
 3       <PointSymbolizer>
 4         <Graphic>
 5           <ExternalGraphic>
 6             <OnlineResource
 7               xlink:type="simple"
 8               xlink:href="smileyface.png" />
 9             <Format>image/png</Format>
10           </ExternalGraphic>
11           <Size>32</Size>
12         </Graphic>
13       </PointSymbolizer>
14     </Rule>
15   </FeatureTypeStyle>
细节
此样式使用图形而不是简单形状来渲染点。在SLD中,这被称为 <ExternalGraphic> ,以将其与渲染器“内部”的常用形状(如正方形和圆形)区分开来。 Lines 5-10 指定此图形的详细信息。 第8行 设置图形的路径和文件名,同时 第9行 指示图形(image/png)的格式(mime类型)。在本例中,图形与SLD包含在同一目录中,因此在 第8行 ,但如果需要,可以使用完整的URL。 Line 11 确定所显示图形的大小;可以独立于图形本身的尺寸进行设置,但在这种情况下,它们是相同的(32像素)。如果图形是矩形的, <Size> 值将应用于 高度 仅限于图形,宽度按比例缩放。

用于点的图形
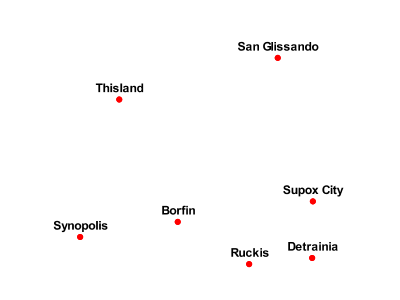
带默认标签的点
此示例在 简单点 显示点的“名称”属性。这是在没有任何其他自定义的情况下标签的显示方式。
带默认标签的点
代码
View and download the full "Point with default label" SLD
 1   <FeatureTypeStyle>
 2     <Rule>
 3       <PointSymbolizer>
 4         <Graphic>
 5           <Mark>
 6             <WellKnownName>circle</WellKnownName>
 7             <Fill>
 8               <CssParameter name="fill">#FF0000</CssParameter>
 9             </Fill>
10           </Mark>
11           <Size>6</Size>
12         </Graphic>
13       </PointSymbolizer>
14       <TextSymbolizer>
15         <Label>
16           <ogc:PropertyName>name</ogc:PropertyName>
17         </Label>
18         <Fill>
19           <CssParameter name="fill">#000000</CssParameter>
20         </Fill>
21       </TextSymbolizer>
22     </Rule>
23   </FeatureTypeStyle>
细节
Lines 3-13 ,其中包含 <PointSymbolizer> ,与 简单点 上面的例子。标签设置在 <TextSymbolizer> 在 lines 14-27 . Lines 15-17 确定要在标签中显示的文本,在本例中是“name”属性的值。(请参阅中的属性表 示例点图层 如有必要,请参见第节。) 第19行 设置文本颜色。关于标签的所有其他细节都设置为渲染器默认值,这里是Times New Roman字体,字体颜色为黑色,字体大小为10像素。标签的左下角与点的中心对齐。
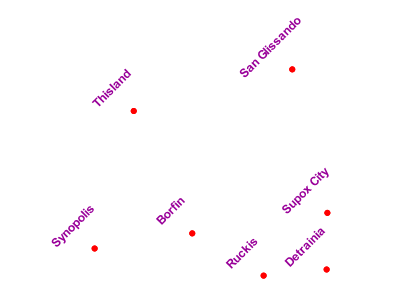
带样式标签的点
此示例改进了 带默认标签的点 例如,将标签放在点上方,并提供不同的字体名称和大小。
带样式标签的点
代码
View and download the full "Point with styled label" SLD
 1   <FeatureTypeStyle>
 2     <Rule>
 3       <PointSymbolizer>
 4         <Graphic>
 5           <Mark>
 6             <WellKnownName>circle</WellKnownName>
 7             <Fill>
 8               <CssParameter name="fill">#FF0000</CssParameter>
 9             </Fill>
10           </Mark>
11           <Size>6</Size>
12         </Graphic>
13       </PointSymbolizer>
14       <TextSymbolizer>
15         <Label>
16           <ogc:PropertyName>name</ogc:PropertyName>
17         </Label>
18         <Font>
19           <CssParameter name="font-family">Arial</CssParameter>
20           <CssParameter name="font-size">12</CssParameter>
21           <CssParameter name="font-style">normal</CssParameter>
22           <CssParameter name="font-weight">bold</CssParameter>
23         </Font>
24         <LabelPlacement>
25           <PointPlacement>
26             <AnchorPoint>
27               <AnchorPointX>0.5</AnchorPointX>
28               <AnchorPointY>0.0</AnchorPointY>
29             </AnchorPoint>
30             <Displacement>
31               <DisplacementX>0</DisplacementX>
32               <DisplacementY>5</DisplacementY>
33             </Displacement>
34           </PointPlacement>
35         </LabelPlacement>
36         <Fill>
37           <CssParameter name="fill">#000000</CssParameter>
38         </Fill>
39       </TextSymbolizer>
40     </Rule>
41   </FeatureTypeStyle>
细节
In this example, lines 3-13 are identical to the 简单点 example above. The <TextSymbolizer> on lines 14-39 contains many more details about the label styling than the previous example, 带默认标签的点. Lines 15-17 once again specify the "name" attribute as text to display. Lines 18-23 set the font information: line 19 sets the font family to be "Arial", line 20 sets the font size to 12, line 21 sets the font style to "normal" (as opposed to "italic" or "oblique"), and line 22 sets the font weight to "bold" (as opposed to "normal"). Lines 24-35 (<LabelPlacement>) determine the placement of the label relative to the point. The <AnchorPoint> (lines 26-29) sets the point of intersection between the label and point, which here (line 27-28) sets the point to be centered (0.5) horizontally axis and bottom aligned (0.0) vertically with the label. There is also <Displacement> (lines 30-33), which sets the offset of the label relative to the line, which in this case is 0 pixels horizontally (line 31) and 5 pixels vertically (line 32). Finally, line 37 sets the font color of the label to black (#000000).
结果是一个居中的粗体标签,略高于每个点。
带旋转标签的点
此示例基于上一个示例, 带样式标签的点 将标签旋转45度,使标签远离点,并将标签颜色更改为紫色。
带旋转标签的点
代码
View and download the full "Point with rotated label" SLD
 1   <FeatureTypeStyle>
 2     <Rule>
 3       <PointSymbolizer>
 4         <Graphic>
 5           <Mark>
 6             <WellKnownName>circle</WellKnownName>
 7             <Fill>
 8               <CssParameter name="fill">#FF0000</CssParameter>
 9             </Fill>
10           </Mark>
11           <Size>6</Size>
12         </Graphic>
13       </PointSymbolizer>
14       <TextSymbolizer>
15         <Label>
16           <ogc:PropertyName>name</ogc:PropertyName>
17         </Label>
18         <Font>
19           <CssParameter name="font-family">Arial</CssParameter>
20           <CssParameter name="font-size">12</CssParameter>
21           <CssParameter name="font-style">normal</CssParameter>
22           <CssParameter name="font-weight">bold</CssParameter>
23         </Font>
24         <LabelPlacement>
25           <PointPlacement>
26             <AnchorPoint>
27               <AnchorPointX>0.5</AnchorPointX>
28               <AnchorPointY>0.0</AnchorPointY>
29             </AnchorPoint>
30             <Displacement>
31               <DisplacementX>0</DisplacementX>
32               <DisplacementY>25</DisplacementY>
33             </Displacement>
34             <Rotation>-45</Rotation>
35           </PointPlacement>
36         </LabelPlacement>
37         <Fill>
38           <CssParameter name="fill">#990099</CssParameter>
39         </Fill>
40       </TextSymbolizer>
41     </Rule>
42   </FeatureTypeStyle>
细节
此示例与 带样式标签的点 但是有三个重要的区别。 第32行 指定25像素的垂直位移。 第34行 指定逆时针旋转“-45”或45度。(旋转值顺时针增加,这就是为什么值为负数。)最后, 第38行 将字体颜色设置为紫色阴影 (#99099 )
请注意,在渲染过程中,位移在旋转之前生效,因此在本例中,25像素垂直位移本身旋转45度。
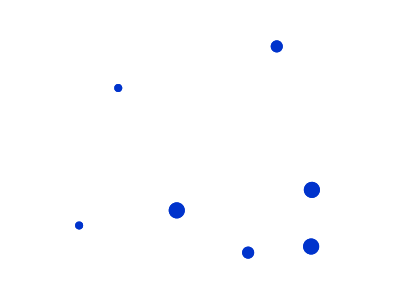
基于属性的点
此示例根据填充(“pop”)属性的值更改符号的大小。
Attribute-based point
代码
View and download the full "Attribute-based point" SLD
 1   <FeatureTypeStyle>
 2     <Rule>
 3       <Name>SmallPop</Name>
 4       <Title>1 to 50000</Title>
 5       <ogc:Filter>
 6         <ogc:PropertyIsLessThan>
 7           <ogc:PropertyName>pop</ogc:PropertyName>
 8           <ogc:Literal>50000</ogc:Literal>
 9         </ogc:PropertyIsLessThan>
10       </ogc:Filter>
11       <PointSymbolizer>
12         <Graphic>
13           <Mark>
14             <WellKnownName>circle</WellKnownName>
15             <Fill>
16               <CssParameter name="fill">#0033CC</CssParameter>
17             </Fill>
18           </Mark>
19           <Size>8</Size>
20         </Graphic>
21       </PointSymbolizer>
22     </Rule>
23     <Rule>
24       <Name>MediumPop</Name>
25       <Title>50000 to 100000</Title>
26       <ogc:Filter>
27         <ogc:And>
28           <ogc:PropertyIsGreaterThanOrEqualTo>
29             <ogc:PropertyName>pop</ogc:PropertyName>
30             <ogc:Literal>50000</ogc:Literal>
31           </ogc:PropertyIsGreaterThanOrEqualTo>
32           <ogc:PropertyIsLessThan>
33             <ogc:PropertyName>pop</ogc:PropertyName>
34             <ogc:Literal>100000</ogc:Literal>
35           </ogc:PropertyIsLessThan>
36         </ogc:And>
37       </ogc:Filter>
38       <PointSymbolizer>
39         <Graphic>
40           <Mark>
41             <WellKnownName>circle</WellKnownName>
42             <Fill>
43               <CssParameter name="fill">#0033CC</CssParameter>
44             </Fill>
45           </Mark>
46           <Size>12</Size>
47         </Graphic>
48       </PointSymbolizer>
49     </Rule>
50     <Rule>
51       <Name>LargePop</Name>
52       <Title>Greater than 100000</Title>
53       <ogc:Filter>
54         <ogc:PropertyIsGreaterThanOrEqualTo>
55           <ogc:PropertyName>pop</ogc:PropertyName>
56           <ogc:Literal>100000</ogc:Literal>
57         </ogc:PropertyIsGreaterThanOrEqualTo>
58       </ogc:Filter>
59       <PointSymbolizer>
60         <Graphic>
61           <Mark>
62             <WellKnownName>circle</WellKnownName>
63             <Fill>
64               <CssParameter name="fill">#0033CC</CssParameter>
65             </Fill>
66           </Mark>
67           <Size>16</Size>
68         </Graphic>
69       </PointSymbolizer>
70     </Rule>
71   </FeatureTypeStyle>
细节
此样式包含三个规则。每个 <Rule> 根据每个点的“总体”(“pop”)属性值更改样式,较小的值生成较小的圆,较大的值生成较大的圆。
三条规则设计如下:
规则顺序 |
规则名称 |
人口 (pop) |
Size |
1 |
SmallPop |
少于50000 |
8 |
2 |
MediumPop |
50000至100000 |
12 |
3 |
LargePop |
大于100000 |
16 |
在这种情况下,规则的顺序并不重要,因为每个形状仅由单个规则呈现。
第一条规则,关于 lines 2-22 ,指定填充属性小于50000的点的样式。 Lines 5-10 设置此筛选器,使用 lines 6-9 设置“小于”过滤器, 第7行 表示属性(“pop”),以及 第8行 价值50000美元。符号是一个圆( 第14行 )颜色为深蓝色。 (#0033CC 上 第16行 ,直径为8像素( 第19行 )
第二条规则 lines 23-49 ,指定填充属性大于或等于50000且小于100000的点的样式。填充过滤器设置为 lines 26-37 .此筛选器比第一个规则中的筛选器长,因为需要指定两个条件而不是一个:“大于或等于”和“小于”筛选器。注意 And 在 第27行 和 第36行 .这要求两个过滤器都必须为真,规则才能适用。图形的大小设置为12像素 第46行 .所有其他样式指令都与第一个规则相同。
第三条规则 lines 50-70 ,指定填充属性大于或等于100000的点的样式。填充过滤器设置为 lines 53-58 唯一不同的是圆的大小,在这个规则中( 第67行 )是16像素。
这种风格的结果是人口较多的城市拥有更大的积分。
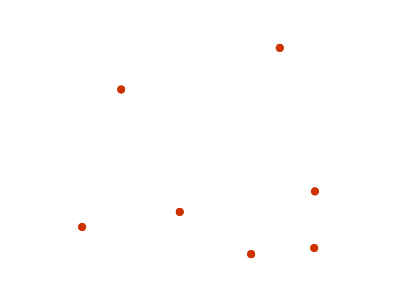
基于缩放的点
这个例子改变了不同缩放级别的点的样式。

Zoom-based point: Zoomed in
Zoom-based point: Partially zoomed
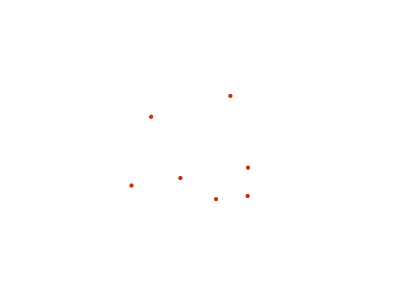
Zoom-based point: Zoomed out
代码
View and download the full "Zoom-based point" SLD
 1   <FeatureTypeStyle>
 2     <Rule>
 3       <Name>Large</Name>
 4       <MaxScaleDenominator>160000000</MaxScaleDenominator>
 5       <PointSymbolizer>
 6         <Graphic>
 7           <Mark>
 8             <WellKnownName>circle</WellKnownName>
 9             <Fill>
10               <CssParameter name="fill">#CC3300</CssParameter>
11             </Fill>
12           </Mark>
13           <Size>12</Size>
14         </Graphic>
15       </PointSymbolizer>
16     </Rule>
17     <Rule>
18       <Name>Medium</Name>
19       <MinScaleDenominator>160000000</MinScaleDenominator>
20       <MaxScaleDenominator>320000000</MaxScaleDenominator>
21       <PointSymbolizer>
22         <Graphic>
23           <Mark>
24             <WellKnownName>circle</WellKnownName>
25             <Fill>
26               <CssParameter name="fill">#CC3300</CssParameter>
27             </Fill>
28           </Mark>
29           <Size>8</Size>
30         </Graphic>
31       </PointSymbolizer>
32     </Rule>
33     <Rule>
34       <Name>Small</Name>
35       <MinScaleDenominator>320000000</MinScaleDenominator>
36       <PointSymbolizer>
37         <Graphic>
38           <Mark>
39             <WellKnownName>circle</WellKnownName>
40             <Fill>
41               <CssParameter name="fill">#CC3300</CssParameter>
42             </Fill>
43           </Mark>
44           <Size>4</Size>
45         </Graphic>
46       </PointSymbolizer>
47     </Rule>
48   </FeatureTypeStyle>
细节
在创建自然外观的地图时,通常需要在更高的缩放级别上使形状更大。此示例根据缩放级别(或更准确地说,缩放分母)设置点的大小。比例分母是指地图的比例。比例尺分母为10000表示地图的比例尺为1:10000,以地图投影的单位表示。
备注
确定要使用的适当比例分母(缩放级别)超出了本例的范围。
此样式包含三个规则。三条规则设计如下:
规则顺序 |
规则名称 |
比例分母 |
点大小 |
1 |
大 |
1:160000000或以下 |
12 |
2 |
培养基 |
1:160000000至1:32000000 |
8 |
3 |
小的 |
大于1:320000000 |
4 |
这些规则的顺序并不重要,因为每个规则中指定的比例不重叠。
第一条规则( lines 2-16 )是最小比例分母,对应于视图“放大”的时间。比例规则设置为 第4行 ,以便该规则适用于比例尺分母小于等于160000000的任何地图。规则画一个圆( 第8行 ),红色 (#CC3300 在 第10行 )尺寸为12像素( 第13行 )
第二条规则( lines 17-32 )是中间比例分母,对应于视图“部分缩放”的时间。比例规则设置在 lines 19-20 ,以便该规则适用于比例尺分母在160000000和32000000之间的任何地图。(以下简称 <MinScaleDenominator> 具有包容性, <MaxScaleDenominator> 是独占的,所以精确到32000000的缩放级别 not 此处应用。)除比例外,此规则与第一个规则的唯一区别是符号的大小,在 第29行 .
第三条规则( lines 33-47 )是最大的比例分母,对应于地图“缩小”的时间。比例规则设置为 第35行 ,以便该规则适用于任何比例尺分母为32000000或更大的地图。同样,此规则与其他规则之间的唯一区别是符号的大小,该符号在 第44行 .
这种样式的结果是,当一个点放大时,绘制的点会变大;当一个点缩小时,绘制的点会变小。