线
虽然线条看起来也可以是简单的形状,有长度但没有宽度,但是有许多选项和技巧可以使线条显示得很好。
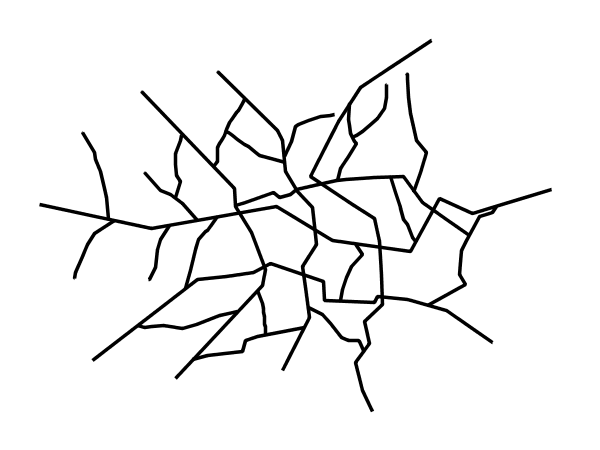
线条层示例
这个 lines layer 下面的例子中使用的是一个虚构国家的道路信息。作为参考,下面包含了该层中点的属性表。
|
|
|
|---|---|---|
line.1 |
人行道 |
公路 |
line.2 |
新月大道 |
第二的 |
line.3 |
森林大道 |
第二的 |
line.4 |
长路 |
公路 |
line.5 |
萨克森大街 |
第二的 |
line.6 |
里奇大街 |
第二的 |
line.7 |
霍利巷 |
地方公路 |
line.8 |
桑树街 |
地方公路 |
line.9 |
内森巷 |
地方公路 |
line.10 |
中央大街 |
地方公路 |
line.11 |
洛伊斯巷 |
地方公路 |
line.12 |
洛基路 |
地方公路 |
line.13 |
舰队街 |
地方公路 |
line.14 |
黛安娜法院 |
地方公路 |
line.15 |
雪松小径 |
地方公路 |
line.16 |
胜利之路 |
地方公路 |
line.17 |
高原路 |
地方公路 |
line.18 |
安逸街 |
地方公路 |
line.19 |
希尔街 |
地方公路 |
line.20 |
乡村公路 |
地方公路 |
line.21 |
主要街道 |
地方公路 |
line.22 |
贾尼·蓝道 |
地方公路 |
line.23 |
胫骨巷 |
地方公路 |
line.24 |
州街道 |
地方公路 |
line.25 |
河道 |
地方公路 |
简单线条
此示例指定线条为黑色,粗细为3像素。
简单线条
代码
Download the "Simple line" MBStyle
 1{
 2  "version": 8,
 3  "name": "simple-line",
 4  "layers": [
 5    {
 6      "id": "simple-line",
 7      "type": "line",
 8      "paint": {
 9        "line-color": "#000000",
10        "line-width": 3
11      }
12    }
13  ]
14}
细节
这种MBStyle有一种层样式,这是最简单的可能情况。造型线是使用线图层完成的。 第9行 指定线条的颜色为黑色 ("#000000" ) 第10行 指定线条宽度为3像素。
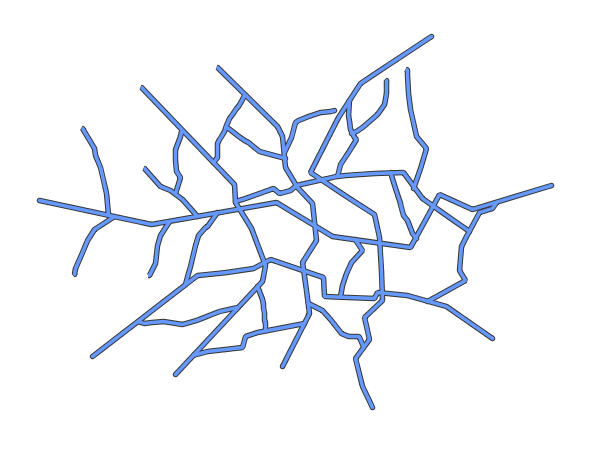
带边框的线条
此示例演示如何绘制带边框的线条(有时称为“cased lines”)。在这种情况下,线条以3像素的蓝色中心和1像素宽的灰色边框绘制。
带边框的线条
代码
Download the "Line with border" MBStyle
 1{
 2  "version": 8,
 3  "name": "simple-borderedline",
 4  "layers": [
 5    {
 6      "id": "simple-borderedline",
 7      "type": "line",
 8      "layout": {
 9        "line-cap": "round"
10      },
11      "paint": {
12        "line-color": "#333333",
13        "line-width": 5
14      }
15    },
16    {
17      "id": "simple-line",
18      "type": "line",
19      "layout": {
20        "line-cap": "round"
21      },
22      "paint": {
23        "line-color": "#6699FF",
24        "line-width": 3
25      }
26    }
27  ]
28}
细节
在本例中,我们将绘制两次线条,以获得带有边框的线条的外观。由于每行绘制两次,渲染的顺序是 very 重要。地理服务器渲染 layers 按它们在mbstyle中显示的顺序。在这种样式中,灰色边框线首先通过第一层样式绘制,其次是第二层样式中的蓝色中心线。这样可以确保蓝线不会被灰色线遮挡,也可以确保在交叉点处正确渲染,从而使蓝线“连接”。
In this example, lines 5-15 comprise the first layer style, which is the outer line (or "stroke").
Line 12 specifies the color of the line to be dark gray ("#333333"), line 13 specifies the width of this line to be 5 pixels, and in the layout line 9 a line-cap parameter of round
renders the ends of the line as rounded instead of flat.
(When working with bordered lines using a round line cap ensures that the border connects properly at the ends of the lines.)
Lines 16-26 comprise the second layer, which is the inner line (or "fill"). Line 23
specifies the color of the line to be a medium blue ("#6699FF"), line 24 specifies the width of this line to be 3 pixels, and in the layout line 20 again renders the edges of the line to be rounded instead of flat.
结果是3像素蓝线和1像素灰色边框,因为5像素灰线将在3像素蓝线的每侧显示1像素。
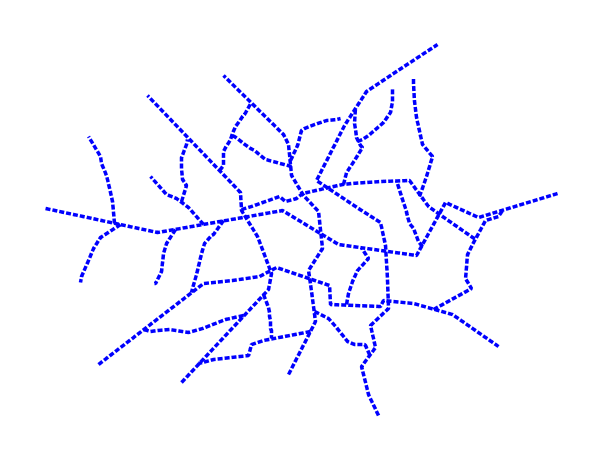
虚线
这个例子改变了 简单线条 创建一条由5个像素的绘制线和2个像素的空格交替组成的虚线。
虚线
代码
Download the "Dashed line" MBStyle
 1{
 2  "version": 8,
 3  "name": "simple-dashedline",
 4  "layers": [
 5    {
 6      "id": "simple-dashedline",
 7      "type": "line",
 8      "paint": {
 9        "line-color": "#0000FF",
10        "line-width": 3,
11        "line-dasharray": [5, 2]
12      }
13    }
14  ]
15}
细节
在这个例子中, 第9行 将线条的颜色设置为蓝色 ("#0000FF" ) 第10行 将线条宽度设置为3像素。 Line 11 确定线条短划线的组成。价值 [5, 2] 创建一个5像素绘制线条的重复图案,后跟2像素省略线条。
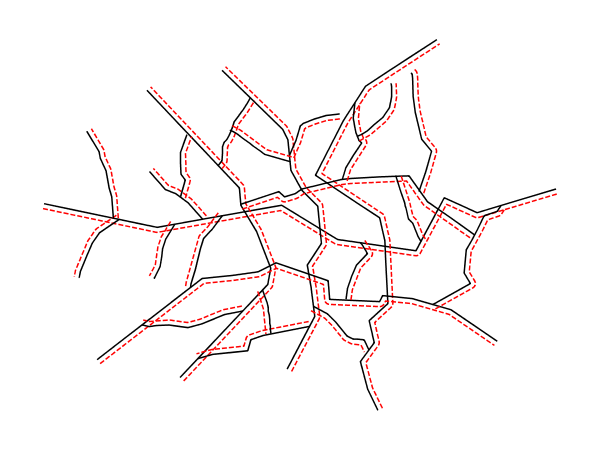
偏移线
这个例子改变了 简单线条 在直线左侧添加一条垂直偏移线,距离为5像素。
虚线
代码
Download the "Offset line" MBStlye
 1{
 2  "version": 8,
 3  "name": "simple-offsetline",
 4  "layers": [
 5    {
 6      "id": "simple-line",
 7      "type": "line",
 8      "paint": {
 9        "line-color": "#000000",
10        "line-width": 1
11      }
12    },
13    {
14      "id": "simple-offsetline",
15      "type": "line",
16      "paint": {
17        "line-color": "#FF0000",
18        "line-width": 1,
19        "line-dasharray": [5, 2],
20        "line-offset": 5
21      }
22    }
23  ]
24}
细节
在这个例子中, lines 5-11 画一条简单的黑线,就像在简单线示例中那样。 Lines 13-21 绘制一条红色虚线,如上面的虚线示例所示。 第20行 修改从线条几何图形偏移5像素的虚线。