使用创建我的照片网站 CubicWeb 第五部分:让我们让它更人性化
步骤1:厌倦了默认外观?
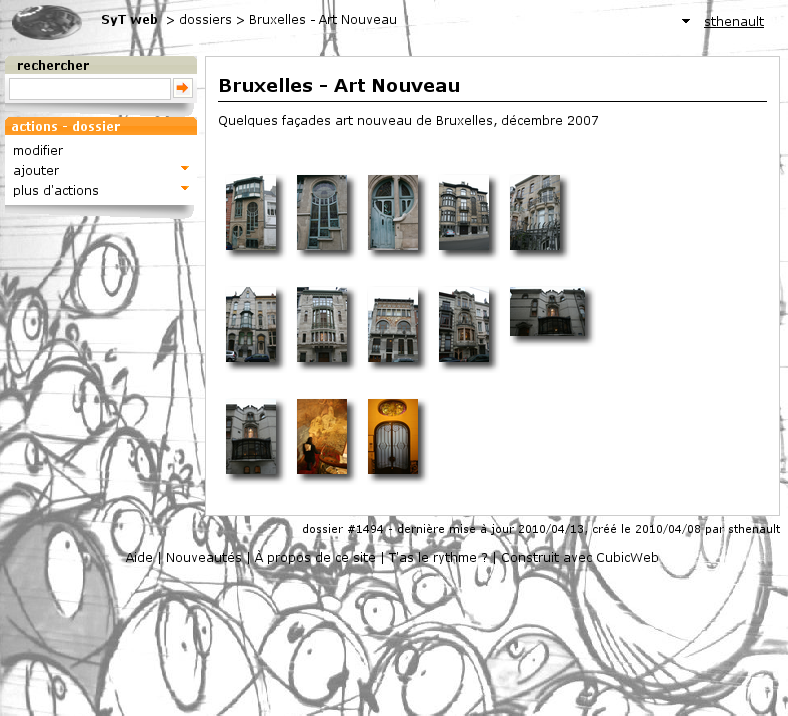
好啊。。。现在我们的网站有了它最想要的功能。但是…我想让它看起来有点像 my 网站。毕竟它不是www.cubicweb.org。让我们先解决这个问题!
我们能做的第一件事就是改变商标。实现这一点的方法多种多样。最简单的方法是 logo.png 文件到多维数据集的 data 目录。当根据多维数据集顺序(CubicWeb资源排在最后)查看数据文件时,将选择该文件而不是CubicWeb的文件。
注解
当静态资源的位置被缓存时,您必须重新启动实例才能考虑到这一点。
尽管有些情况下你不想使用 logo.png 文件。例如,如果它是一个jpeg文件。您仍然可以通过在多维数据集的 uiprops.py 文件:
LOGO = data('logo.jpg')
注解
如果文件 uiprops.py 不存在于多维数据集中,只需创建它即可。
uiprops机制用于定义一些静态文件资源,例如徽标、默认的javascript/css文件以及css属性(稍后我们将看到)。
注解
此文件是由 CubicWeb ,具有预定义的名称空间,例如包含 data 函数,指示文件位于多维数据集或CubicWeb的数据目录中。
这样做的一个副作用是它不能作为常规的Python模块导入。
好的是,在调试模式下,改为 uiprops.py 检测到文件,然后自动重新加载。
现在,因为这是一个照片网站,我想有一张我的照片作为背景…经过一些试验,我在这里没有详细说明,我找到了一个工作配方解释 here .我所要做的就是重写默认CubicWeb用户界面的一些内容,以便按照说明应用它。
第一件事就是 <img/> 标记为后面的第一个元素 <body> 标签。如果你知道通过简单地在CSS中指定图像来避免这种情况,请告诉我!最简单的方法是重写 HTMLPageHeader 视图,因为这是直接调用 <body> 已经写好了。我是怎么找到这个的?通过查看 cubiweb.web.views.basetemplates 模块,因为我知道全局页面布局就在那里。我也可以把“身体”标签放进去 cubicweb.web.views ……发现这是最困难的部分。现在我只需要定制它来写 img 标签,如下所示 views.py :
from cubicweb.web.views import basetemplates


class HTMLPageHeader(basetemplates.HTMLPageHeader):
    # override this since it's the easier way to have our bg image
    # as the first element following <body>
    def call(self, **kwargs):
        self.w(u'<img id="bg-image" src="%sbackground.jpg" alt="background image"/>'
               % self._cw.datadir_url)
        super(HTMLPageHeader, self).call(**kwargs)


def registration_callback(vreg):
    vreg.register_all(globals().values(), __name__, (HTMLPageHeader))
    vreg.register_and_replace(HTMLPageHeader, basetemplates.HTMLPageHeader)
你可能已经猜到了,我的背景图像在 background.jpg 多维数据集中的文件 data 目录,但是这里仍然有一些事情需要向新来者解释:
这个
call()方法是视图的主要访问点。它是由视图调用的render()方法。它不是视图的唯一访问点,但稍后将详细介绍。调用 self.w 将某些内容写入输出流。除了二进制视图(不生成文本)之外,它 must 传递一个Unicode字符串。
获取文件的正确方法
data目录将使用 datadir_url 传入请求的属性(例如 self._cw )
我不会再解释了 registration_callback() 东西,你现在应该明白了!如果没有,请返回 previous post in the series :)
好的。现在,我要做的就是添加一点CSS,让它表现得很好(目前还不是这样)。我会把这些放在 cubes.sytweb.css 文件,像往常一样存储在我们的 data 目录:
/* fixed full screen background image
 * as explained on http://webdesign.about.com/od/css3/f/blfaqbgsize.htm
 *
 * syt update: set z-index=0 on the img instead of z-index=1 on div#page & co to
 * avoid pb with the user actions menu
 */
img#bg-image {
    position: fixed;
    top: 0;
    left: 0;
    width: 100%;
    height: 100%;
    z-index: 0;
}

div#page, table#header, div#footer {
    background: transparent;
    position: relative;
}

/* add some space around the logo
 */
img#logo {
    padding: 5px 15px 0px 15px;
}

/* more dark font for metadata to have a chance to see them with the background
 *  image
 */
div.metadata {
    color: black;
}
您可以在这里看到引用页面中解释的内容,在注释中只解释了一点修改,加上一些额外的规则,使事情变得更清晰:
徽标周围有点填充物
默认情况下在内容下方显示的较暗的元数据(页面中的白色框架)
为了让这个CSS文件在站点的任何地方都能使用,我必须修改 uiprops.py 以上介绍的文件:
STYLESHEETS = sheet['STYLESHEETS'] + [data('cubes.sytweb.css')]
注解
sheet 是包含已由进程定义的值的另一个预定义变量 :file: uiprops.py``文件,尤其是cubicWeb的文件。
在这里,除了CubicWeb的基本CSS文件之外,我们只需要我们的CSS,因此我们重新定义了 STYLESHEETS 现有CSS的变量(通过 sheet 变量)。我也可以这样做:
sheet['STYLESHEETS'].append(data('cubes.sytweb.css'))
但这并不有趣,因为我们没有看到覆盖机制…
此时,网站应该开始看起来不错,背景图像的大小正在调整以适应屏幕。
最后一点:让我们自定义CubicWeb的CSS以减少橙色……只需添加
contextualBoxTitleBg = incontextBoxTitleBg = '#AAAAAA'
重新加载我们刚才看到的页面,我们知道有一个漂亮的灰色盒子而不是橙色的:
这是因为CubicWeb的CSS包含一些变量,这些变量由中定义的值展开。 uiprops.py 文件。在我们的例子中,我们控制了CSS的属性 background 具有css类的框的属性 contextualBoxTitleBg 和 incontextBoxTitleBg .
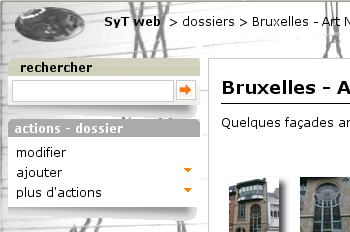
步骤2:配置框
向用户提供一些使用应用程序的方法。我们先在 views.py 文件:
from cubicweb.predicates import none_rset
from cubicweb.web.views import bookmark
from cubicweb_zone import views as zone
from cubicweb_tag import views as tag


# change bookmarks box selector so it's only displayed on startup views
bookmark.BookmarksBox.__select__ = bookmark.BookmarksBox.__select__ & none_rset()
# move zone box to the left instead of in the context frame and tweak its order
zone.ZoneBox.context = 'left'
zone.ZoneBox.order = 100
# move tags box to the left instead of in the context frame and tweak its order
tag.TagsBox.context = 'left'
tag.TagsBox.order = 102
# hide similarity box, not interested
tag.SimilarityBox.visible = False
我们的想法是移动左栏中的所有框,这样我们就可以获得更多的照片空间。现在,重要的是:我想要一个类似于标签框的框,但是要处理 Person displayed_on File 关系。我们可以通过添加 AjaxEditRelationCtxComponent 我们视图的子类,如下所示:
from cubicweb import _
from logilab.common.decorators import monkeypatch
from cubicweb import ValidationError
from cubicweb.web.views import uicfg, component
from cubicweb.web.views import basecontrollers


# hide displayed_on relation using uicfg since it will be displayed by the box below
uicfg.primaryview_section.tag_object_of(('*', 'displayed_on', '*'), 'hidden')


class PersonBox(component.AjaxEditRelationCtxComponent):
    __regid__ = 'sytweb.displayed-on-box'
    # box position
    order = 101
    context = 'left'
    # define relation to be handled
    rtype = 'displayed_on'
    role = 'object'
    target_etype = 'Person'
    # messages
    added_msg = _('person has been added')
    removed_msg = _('person has been removed')
    # bind to js_* methods of the json controller
    fname_vocabulary = 'unrelated_persons'
    fname_validate = 'link_to_person'
    fname_remove = 'unlink_person'


@monkeypatch(basecontrollers.JSonController)
@basecontrollers.jsonize
def js_unrelated_persons(self, eid):
    """return tag unrelated to an entity"""
    rql = "Any F + ' ' + S WHERE P surname S, P firstname F, X eid %(x)s, NOT P displayed_on X"
    return [name for (name,) in self._cw.execute(rql, {'x' : eid})]


@monkeypatch(basecontrollers.JSonController)
def js_link_to_person(self, eid, people):
    req = self._cw
    for name in people:
        name = name.strip().title()
        if not name:
            continue
        try:
            firstname, surname = name.split(None, 1)
        except:
            raise ValidationError(eid, {('displayed_on', 'object'): 'provide <first name> <surname>'})
        rset = req.execute('Person P WHERE '
                           'P firstname %(firstname)s, P surname %(surname)s',
                           locals())
        if rset:
            person = rset.get_entity(0, 0)
        else:
            person = req.create_entity('Person', firstname=firstname,
                                            surname=surname)
        req.execute('SET P displayed_on X WHERE '
                    'P eid %(p)s, X eid %(x)s, NOT P displayed_on X',
                    {'p': person.eid, 'x' : eid})


@monkeypatch(basecontrollers.JSonController)
def js_unlink_person(self, eid, personeid):
    self._cw.execute('DELETE P displayed_on X WHERE P eid %(p)s, X eid %(x)s',
                     {'p': personeid, 'x': eid})
您基本上可以使用一些类属性进行子类配置。这个 fname_* 属性给出了应该在JSON控件上定义的方法的名称,以使小部件的Ajax部分工作:一个用于获取词汇表,一个用于添加关系,另一个用于删除关系。这些方法必须以 js_ 前缀和使用添加到控制器 @monkeypatch 装饰师。在我的例子中,最复杂的方法是添加一个关系,因为它试图查看这个人是否已经存在,否则会自动创建它,假设用户输入了“名字姓氏”。
让我们看看它在文件主视图上的外观:
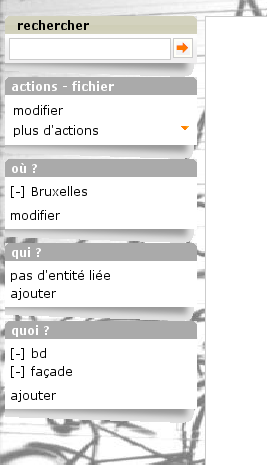
太好了,现在我很容易把我的照片链接到人,而不是标记他们。此外,参观者可以得到这两条信息的一致显示。
注解
UI组件系统已在中重构 CubicWeb 3.10 也介绍了 AjaxEditRelationCtxComponent 班级。
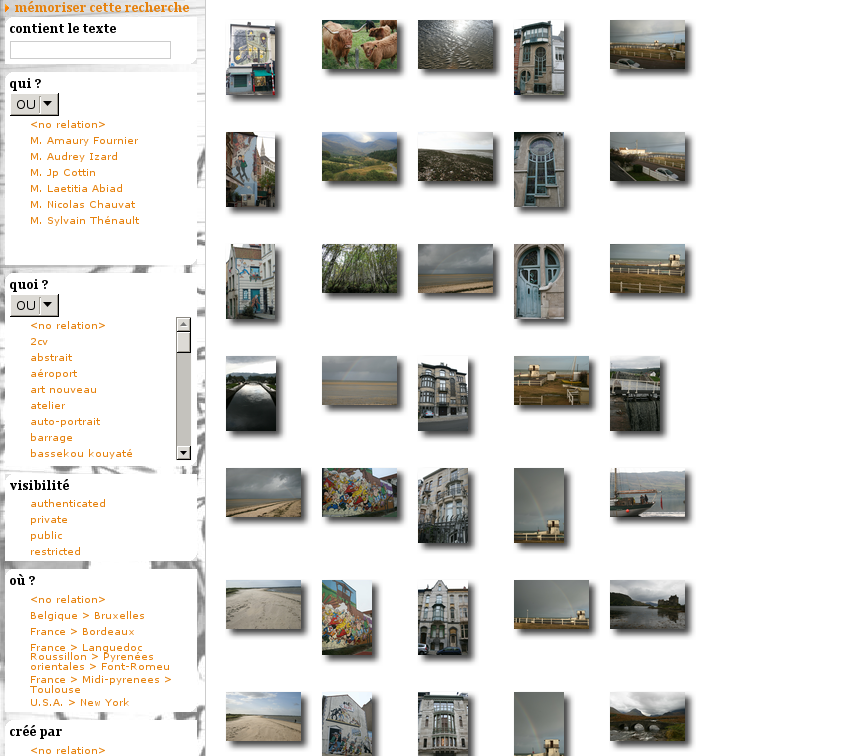
步骤3:配置方面
我们今天要添加的最后一个特性是方面配置。如果您访问了“/file”URL,您将看到一组“facets”出现在左边的列中。方面提供了一种直观的方法来逐步构建查询,通过向用户建议各种方法来限制结果集。例如,CubicWeb根据创建实体的人提出要限制的方面;标记多维数据集根据标记提出要限制的方面;Zoe多维数据集根据地理位置提出要限制的方面,等等。在这个要点中,我想提出一个方面来限制基于图片上显示的人。为此,在 cubicweb.web.facet 模块,它只需要使用类属性进行配置,就像我们在框中所做的那样。在我们的例子中,我们将定义 RelationFacet .
注解
因为这是用户界面的东西,我们将继续在下面添加代码 views.py 文件。尽管我们开始有很多不同的代码,所以现在是将视图模块分为 view 包裹。对于简单的应用程序(粘合)多维数据集,我们可以开始使用下面的布局:::
views/__init__.py   # uicfg configuration, facets
views/layout.py     # header/footer/background stuff
views/components.py # boxes, adapters
views/pages.py      # index view, 404 view
from cubicweb.web import facet


class DisplayedOnFacet(facet.RelationFacet):
    __regid__ = 'displayed_on-facet'
    # relation to be displayed
    rtype = 'displayed_on'
    role = 'object'
    # view to use to display persons
    label_vid = 'combobox'
假设我们还想根据 visibility 属性。这更简单,因为我们只需要从 AttributeFacet 班级:
class VisibilityFacet(facet.AttributeFacet):
    __regid__ = 'visibility-facet'
    rtype = 'visibility'
现在,如果我在我的网站上搜索一些图片,我可以获得以下方面:
注解
默认情况下,方面必须适用于结果集中的每个实体,并至少提供两个要显示的词汇表元素(例如,您不会看到 created_by 方面(如果同一用户创建了所有实体)。这可以解释为什么你看不到你的…
结论
我们开始看到框架提供的基础设施背后的力量,无论是在纯UI(CSS、javascript)方面还是在Python方面(组件的高级通用类,包括框和方面)。我们现在有了一个功能齐全、外观个性化的网站,只需几行代码。
当然,随着时间的推移,我们可能会想要更多,但现在我们可以集中精力制作好的照片,出版专辑,并与朋友分享…